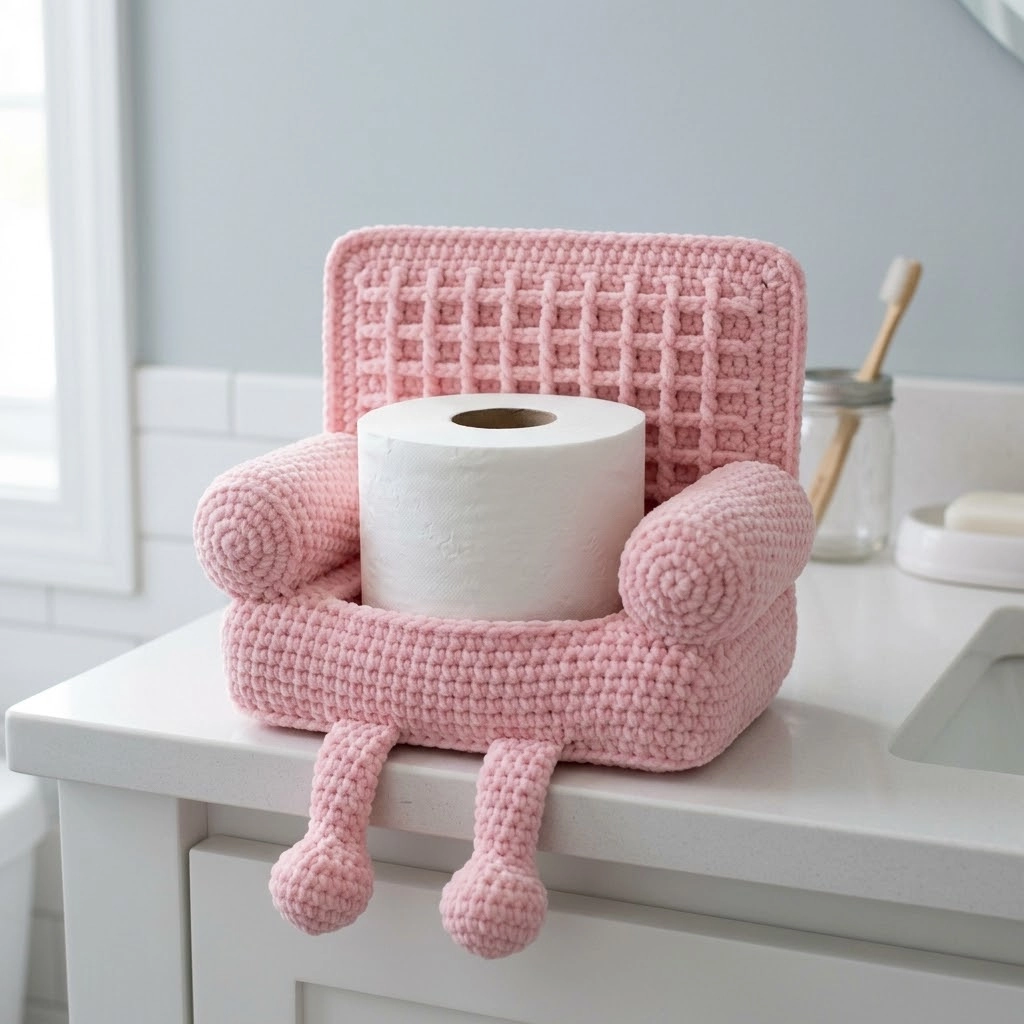
I absolutely love a quirky bathroom accessory, and this little pink couch toilet paper holder might just be the cutest project I have ever made. Picture this: a tiny armchair, complete with rolled arms, little legs, and a tufted backrest, all crocheted in soft dusty pink yarn. And sitting right on the seat? A full roll of toilet paper, looking like the world’s most comfortable guest.
This crochet pattern is beginner friendly with some intermediate shaping techniques. If you can work basic stitches in the round and follow simple increases and decreases, you can absolutely make this. I will walk you through every single step.
Let me show you how to crochet this adorable conversation piece from start to finish.
Why This Pink Couch Toilet Paper Holder Pattern Works
This is not just a toilet paper cover. It is a miniature piece of furniture that makes people smile every time they walk into your bathroom. The design features a rectangular seat base that perfectly cradles a standard toilet paper roll. Two plump armrests with spiral end caps frame the sides. A structured backrest with a charming tufted grid texture adds that vintage upholstered look. And four little legs dangle off the front edge like the couch is sitting on a countertop ready for a chat.
The construction uses single crochet (sc) throughout for a tight, sturdy fabric that holds its shape without sagging. The tufted texture on the backrest comes from simple chain spaces worked into the fabric. No complicated stitches here.
This step by step crochet tutorial breaks everything down into manageable pieces. You will make each component separately, stuff them, and then assemble everything at the end.
Materials You Will Need
Before we start, gather these supplies:
Yarn:
- Approximately 200 grams of worsted weight yarn (medium weight, category 4) in dusty pink or your preferred color
- I recommend a cotton or cotton blend for structure and washability in a bathroom setting
- Acrylic works well too and is budget friendly
Hook:
- 4.0mm (G/6) crochet hook for tight, sturdy stitches
- Go down a hook size if your stitches look loose or gaps appear
Notions:
- Polyester fiberfill stuffing (approximately 150 grams)
- Yarn needle for seaming
- Stitch markers (4 to 6)
- Scissors
- Optional: cardboard or plastic canvas for added structure in the seat base
Finished Dimensions:
- Seat base: approximately 5 inches wide x 5 inches deep x 3 inches tall
- Overall height with backrest: approximately 8 inches
- Fits a standard toilet paper roll (4.5 inches diameter)
Stitch Abbreviations and Definitions
Let me define every stitch before we begin. Read through these once so nothing surprises you mid-project.
Chain (ch): The foundation stitch. Yarn over, pull through the loop on your hook. Example: ch 6 means make 6 chain stitches in a row.
Slip Stitch (sl st): Insert hook, yarn over, pull through both the stitch and the loop on your hook in one motion. Used to join rounds or move across stitches invisibly.
Single Crochet (sc): Insert hook into stitch, yarn over and pull up a loop (2 loops on hook), yarn over and pull through both loops. This creates a short, dense stitch.
Increase (inc): Work 2 single crochet stitches into the same stitch. This adds one stitch to your count.
Decrease (dec): Insert hook into next stitch, pull up a loop, insert hook into following stitch, pull up a loop (3 loops on hook), yarn over and pull through all 3 loops. This removes one stitch from your count. Also called single crochet 2 together (sc2tog).
Magic Ring (MR): An adjustable starting loop that closes completely with no hole in the center. If you prefer, you can substitute ch 2 and work your stitches into the second chain from the hook.
Front Loop Only (FLO): Work into only the front loop of the stitch (the loop closest to you) instead of both loops.
Back Loop Only (BLO): Work into only the back loop of the stitch (the loop farthest from you).
Gauge Check
Gauge matters here because you want a firm fabric that holds stuffing inside without showing through.
Work 10 sc and 10 rows in single crochet. Your swatch should measure approximately 2 inches by 2 inches. If your swatch is larger, try a smaller hook. If smaller, try a larger hook.
A tight gauge is your friend for amigurumi style projects like this one.
Pattern Instructions
This crochet pattern is worked in continuous spiral rounds unless otherwise noted. Use a stitch marker to track the beginning of each round.
Part 1: Seat Base
The seat base is a rectangular box that holds the toilet paper roll. We will work it in rows first to create the flat seat top, then pick up stitches around the edges and work down to form the sides.
Seat Top (worked in rows):
Row 1: Ch 21. Sc in 2nd ch from hook and in each ch across. (20 sts)
Rows 2 to 20: Ch 1, turn. Sc in each st across. (20 sts)
You now have a flat square approximately 4.5 to 5 inches on each side.
Sides (worked in continuous rounds):
Rotate your work to pick up stitches around all four edges.
Round 1: Working along the edges, sc 20 across the top edge, sc 20 down the side (1 st per row end), sc 20 across the bottom edge, sc 20 up the remaining side. Place marker. (80 sts)
Rounds 2 to 12: Sc in each st around. (80 sts)
Round 13: Sl st in next st. Fasten off, leaving a long tail for seaming.
Do not stuff yet. Set aside.
Part 2: Backrest
The backrest features a tufted grid texture created by working chains over a solid base.
Back Panel (worked in rows):
Row 1: Ch 21. Sc in 2nd ch from hook and in each ch across. (20 sts)
Rows 2 to 4: Ch 1, turn. Sc in each st across. (20 sts)
Row 5 (texture row): Ch 1, turn. Sc in first 2 sts, *ch 2, skip 2 sts, sc in next 2 sts.* Repeat from * across. (10 sc, 4 ch-2 spaces)
Row 6: Ch 1, turn. Sc in each sc and 2 sc in each ch-2 space across. (20 sts)
Rows 7 to 8: Ch 1, turn. Sc in each st across. (20 sts)
Rows 9 to 24: Repeat Rows 5 to 8 four more times. This creates 5 horizontal rows of the tufted grid pattern.
Rows 25 to 28: Ch 1, turn. Sc in each st across. (20 sts)
Fasten off, leaving a long tail.
Vertical Chains (surface detail):
Thread a length of yarn onto your needle. Working from bottom to top, weave vertical chains through the ch-2 spaces to create the grid appearance. Space them evenly across the panel, creating 4 to 5 vertical lines. Secure ends on the back.
Backrest Back Panel:
Repeat Rows 1 to 28 without the texture rows. Work plain sc throughout. This creates the back side of the backrest.
Assembly:
Hold both panels wrong sides together. Sc around three edges (sides and top), inserting hook through both layers. Stuff firmly before closing the bottom edge. Sl st to join. Fasten off.
Part 3: Armrests (make 2)
Each armrest is a cylinder with a spiral end cap.
End Cap:
Round 1: MR, 6 sc into ring. Pull tight. (6 sts)
Round 2: Inc in each st around. (12 sts)
Round 3: *Sc 1, inc.* Repeat around. (18 sts)
Round 4: *Sc 2, inc.* Repeat around. (24 sts)
Rounds 5 to 6: Sc in each st around. (24 sts)
Cylinder:
Rounds 7 to 22: Sc in each st around. (24 sts)
Stuff firmly as you go.
Round 23: *Sc 2, dec.* Repeat around. (18 sts)
Round 24: *Sc 1, dec.* Repeat around. (12 sts)
Stuff remaining space.
Round 25: Dec around. (6 sts)
Fasten off. Close the hole by weaving through the remaining 6 stitches and pulling tight.
Repeat for the second armrest.
Part 4: Legs (make 4)
The legs are simple tubes.
Round 1: MR, 6 sc into ring. (6 sts)
Round 2: Inc in each st around. (12 sts)
Rounds 3 to 14: Sc in each st around. (12 sts)
Stuff lightly. Leave the top open for attaching.
Fasten off, leaving a long tail for sewing.
Assembly Instructions
Now comes the fun part. Grab your yarn needle and let us put this little couch together.
Step 1: Attach the Backrest
Position the backrest along the back edge of the seat base, with the tufted side facing forward. The bottom edge of the backrest should align with the back edge of the seat top. Whip stitch securely all along the bottom edge.
Step 2: Attach the Armrests
Position each armrest along the side edges of the seat base. The spiral end cap should face forward and sit slightly above the seat level. The cylinder portion runs along the side of the seat. Whip stitch each armrest to the seat base side and slightly to the backrest for stability.
Step 3: Attach the Legs
Position two legs at the front corners of the seat base, dangling over the edge. Attach two more legs slightly behind them or spaced along the front edge for balance. Whip stitch the open ends of each leg securely to the underside of the seat base.
Step 4: Stuff the Seat Base
Before fully closing, add fiberfill stuffing to the seat base. You want it firm enough to hold shape but with a slight indent on top where the toilet paper roll will rest. If desired, insert a cardboard or plastic canvas piece at the bottom for extra structure.
Step 5: Final Touches
Weave in all remaining yarn tails. Fluff the armrests and adjust the legs so they hang evenly. Place a toilet paper roll on the seat and admire your work.
Tips for Success
Tight stitches matter. If you see stuffing peeking through, your tension is too loose. Try going down a hook size.
Stuff as you go. It is much easier to stuff the armrests and legs before closing them than trying to poke stuffing through a tiny hole at the end.
Block the backrest. If your tufted panel curls, lightly steam block it before assembly. This helps it lay flat and look polished.
Customize the color. This pattern works beautifully in any color. Try classic red for a retro vibe, sage green for a spa feel, or bright yellow for a cheerful pop.
Frequently Asked Questions
Can beginners make this crochet pattern?
Yes. If you know single crochet, increases, decreases, and working in the round, you have all the skills needed. The shaping is straightforward and I have explained every step.
What yarn works best?
Cotton or cotton blend yarns give the best structure and are easy to wash. Acrylic is also a great budget option and comes in endless colors.
Can I make this bigger?
You can adjust the size by using bulky weight yarn and a larger hook. Keep the stitch counts the same but expect a larger finished piece.
How do I wash it?
Remove the toilet paper roll first. Hand wash in cool water with mild soap, squeeze gently, reshape, and air dry flat.
Thank You for Making This With Me
I really hope you enjoy making this adorable pink couch toilet paper holder as much as I did. It is such a satisfying project to watch come together, and the finished piece never fails to get compliments.
If you make one, I would absolutely love to see it. Tag me on Instagram or share a photo in my Facebook group. Seeing your creations is honestly the best part of sharing patterns.
Happy crocheting, friend. You have got this.
