You’re looking at one of my absolute favorite makes this season. This champagne gold bell sleeve crochet top combines vintage romance with modern wearability. The dramatic pineapple lace sleeves? Show-stopping. The cascade of dimensional roses? Pure artistry. And I promise you can make this even if fancy garments feel intimidating.
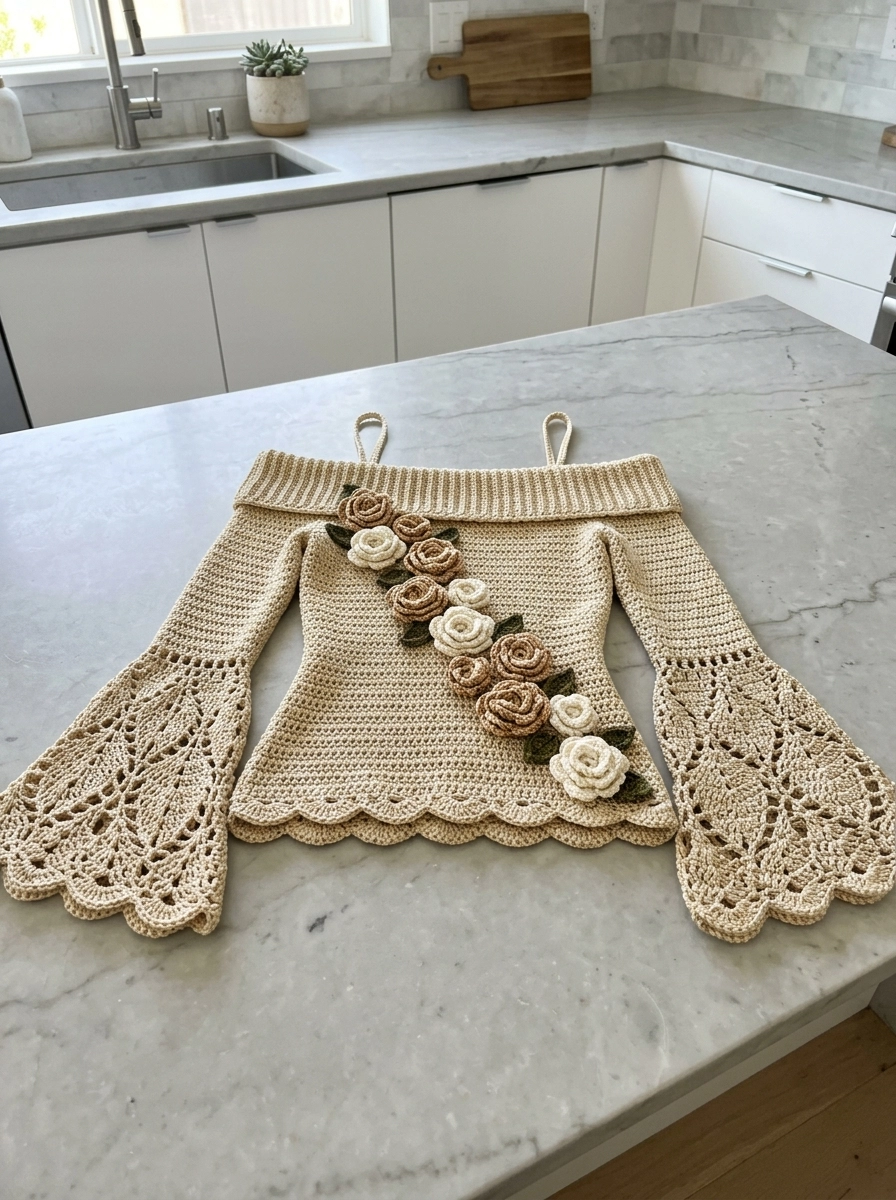
This off-shoulder beauty features a fitted bodice, elegant ribbed neckband, and those stunning flared sleeves that will make everyone ask if you bought it at a boutique. Today I’m walking you through my complete crochet pattern so you can recreate this top stitch by stitch.
Let’s dive in.
Why This Crochet Top Pattern Works
The construction is actually simpler than it looks. The body is mostly basic stitches worked flat. Those gorgeous sleeves use a classic pineapple motif that repeats predictably once you get the rhythm. And the roses? Separate little projects you attach at the end.
I designed this crochet tutorial in sections so you can take breaks. Make a rose while watching TV. Work sleeve panels on the weekend. No marathon sessions required.
Skill level: Confident intermediate. You should be comfortable with basic stitches, working in rounds, and following lace charts or written pineapple instructions.
Materials You’ll Need
Yarn:
- Main color (champagne gold): 400-450g sport weight cotton or cotton blend
- Accent colors for roses: Small amounts in cream, caramel, and tan (approximately 20g each)
- Leaf green: 30g for all leaves
I used a smooth mercerized cotton with subtle sheen. The drape is essential for those bell sleeves to flow properly. Avoid anything too stiff or fuzzy.
Hook:
- 3.5mm (US E/4) for body and sleeves
- 3.0mm (US D/3) for ribbed neckband and roses (smaller creates tighter texture)
Notions:
- Stitch markers
- Tapestry needle
- Measuring tape
- Pins for blocking
Gauge:
20 sts x 22 rows = 4 inches in single crochet with 3.5mm hook
Check your gauge. Really. The fit depends on it.
Abbreviations and Stitch Definitions
Let me break down every stitch you’ll use. No guessing required.
Ch — Chain: Yarn over, pull through loop on hook. The foundation of most crochet.
Sl st — Slip stitch: Insert hook, yarn over, pull through stitch AND loop on hook in one motion. Used for joining.
Sc — Single crochet: Insert hook, yarn over, pull up loop (2 loops on hook), yarn over, pull through both loops. Your shortest basic stitch.
Hdc — Half double crochet: Yarn over, insert hook, yarn over, pull up loop (3 loops on hook), yarn over, pull through all 3 loops.
Dc — Double crochet: Yarn over, insert hook, yarn over, pull up loop, (yarn over, pull through 2 loops) twice. Taller than sc, creates nice drape.
Tr — Treble crochet: Yarn over twice, insert hook, yarn over, pull up loop, (yarn over, pull through 2 loops) three times. Even taller. Used in pineapple motifs.
Dc2tog — Double crochet 2 together: A decrease. Work dc until 2 loops remain, stop. Work next dc until 2 loops remain (3 loops on hook), yarn over, pull through all 3.
Ch-sp — Chain space: The gap created by chains in previous row. You’ll work into these spaces, not individual chains.
BLO — Back loop only: Insert hook under just the back loop of the stitch (loop furthest from you). Creates ribbed texture.
FLO — Front loop only: Insert hook under just the front loop (closest to you).
Pattern Notes Before You Start
- This pattern is written for size Small (bust 32-34″). I’ll include modification notes for adjusting.
- The body is worked flat in two panels (front and back), then seamed.
- Sleeves are worked separately and attached.
- Roses and leaves are made individually and sewn on last.
- The ribbed neckband is worked sideways and attached.
Take a breath. We’ll go section by section.
Step by Step Crochet Pattern
Part 1: Front Body Panel
Foundation:
Ch 86.
Row 1: Sc in 2nd ch from hook and in each ch across. (85 sts)
Row 2: Ch 1, turn. Sc in each st across. (85 sts)
Rows 3-48: Repeat Row 2.
Your panel should measure approximately 17″ wide and 8.5″ tall. This creates the main bodice section.
Shaping the neckline (Rows 49-54):
Row 49: Ch 1, turn. Sc in first 30 sts. Leave remaining sts unworked. (30 sts) This is your left shoulder section.
Row 50: Ch 1, turn. Sc2tog over first 2 sts, sc across. (29 sts)
Row 51: Ch 1, turn. Sc across to last 2 sts, sc2tog. (28 sts)
Rows 52-54: Ch 1, turn. Sc in each st across. (28 sts)
Fasten off.
Right shoulder section:
Skip center 25 sts from Row 48. Join yarn in next st.
Row 49: Ch 1, sc in same st and in each remaining st. (30 sts)
Row 50: Ch 1, turn. Sc across to last 2 sts, sc2tog. (29 sts)
Row 51: Ch 1, turn. Sc2tog, sc across. (28 sts)
Rows 52-54: Ch 1, turn. Sc in each st across. (28 sts)
Fasten off.
Part 2: Back Body Panel
Work exactly as Front Body Panel, Rows 1-48. (85 sts)
For the back, we need a shallower neckline.
Row 49: Ch 1, turn. Sc in first 32 sts. Leave remaining unworked. (32 sts)
Row 50: Ch 1, turn. Sc2tog, sc across. (31 sts)
Rows 51-54: Sc across. (31 sts)
Fasten off.
Right back shoulder:
Skip center 21 sts. Join yarn.
Row 49: Ch 1, sc across. (32 sts)
Row 50: Ch 1, turn. Sc across to last 2 sts, sc2tog. (31 sts)
Rows 51-54: Sc across. (31 sts)
Fasten off.
Part 3: Joining Body Panels
Place front and back panels with right sides facing.
Using sl st or your preferred seaming method, join shoulder seams.
Leave side seams open for now. We’ll attach sleeves first.
Part 4: Pineapple Bell Sleeves (Make 2)
This is where the magic happens. The sleeves start narrow at the armhole and flare dramatically into that gorgeous pineapple lace.
Upper Sleeve Section:
Ch 52, sl st to join into ring. Be careful not to twist.
Round 1: Ch 1, sc in each ch around. Sl st to join. (52 sts)
Rounds 2-12: Ch 1, sc in each st around. Sl st to join. (52 sts)
Your sleeve tube should be approximately 2.5″ tall.
Transition to Pineapple Motif:
Round 13: Ch 3 (counts as dc), dc in same st. *Skip 2 sts, (2 dc, ch 2, 2 dc) in next st — this is your shell. Skip 2 sts, dc in next st.* Repeat around, adjusting final stitches to end evenly. Sl st to join to top of ch-3.
Round 14: Sl st to ch-2 space. Ch 3, dc, ch 2, 2 dc in same ch-2 sp. *Ch 3, sc in dc between shells. Ch 3, (2 dc, ch 2, 2 dc) in next ch-2 sp.* Repeat around.
Round 15: Sl st to ch-2 sp. Shell in ch-2 sp. *Ch 3, sc in ch-3 sp, ch 1, sc in ch-3 sp, ch 3. Shell in ch-2 sp.* Repeat around.
Round 16: Shell in each ch-2 sp. Between shells: ch 3, sc in ch-sp, (ch 1, sc) across the pineapple base, ch 3.
Continue building the pineapple motif. Each round adds one more sc/ch-1 group into the expanding pineapple “body” while the shells remain at the tips.
Rounds 17-26: Continue pineapple pattern. The ch-1 spaces between sc stitches create the characteristic pineapple texture. Each pineapple grows by adding stitches, then decreases as you work toward the point.
Finishing Rounds (Scalloped Edge):
Round 27: *In ch-2 sp of shell: (sc, hdc, 3 dc, hdc, sc). Sc in tip of pineapple.* Repeat around for scalloped edge.
Fasten off. Weave in ends.
The finished sleeve should flare to approximately 14-16″ at the widest point.
Part 5: Ribbed Neckband
Using 3.0mm hook:
Ch 12.
Row 1: Sc in 2nd ch from hook and each ch across. (11 sts)
Row 2: Ch 1, turn. Working in BLO, sc in each st across. (11 sts)
Repeat Row 2 until band measures approximately 24″ or fits comfortably around neckline when slightly stretched.
Sl st short ends together to form a loop.
Part 6: Hanging Loops (Make 2)
Ch 40. Sl st in 2nd ch from hook and each ch across.
Fasten off. Fold in half to create loop.
Part 7: Scalloped Hem Border
Join yarn at bottom edge of joined body.
Round 1: Sc evenly around entire bottom edge.
Round 2: *Skip 2 sts, 5 dc in next st (shell made), skip 2 sts, sl st in next st.* Repeat around.
This creates those pretty waves at the hemline.
Part 8: Dimensional Roses
These roses are the crowning glory. Make as many as you’d like. I made 8 total in varying colors.
Using 3.0mm hook:
Foundation: Ch 48.
Row 1: Dc in 4th ch from hook. *Ch 1, skip 1 ch, 2 dc in next ch.* Repeat across. You’ll have a long strip with V-shaped clusters.
Row 2: Ch 3, turn. 4 dc in first ch-1 sp. *5 dc in next ch-1 sp.* Repeat across.
Now the fun part: starting from one end, roll the strip tightly. The second row creates natural petal shapes as you spiral. Use tapestry needle and matching yarn to tack the bottom together, stitching through all layers to secure.
Make roses in cream, caramel, and tan as shown.
Part 9: Leaves
Foundation: Ch 10.
Row 1: Sl st in 2nd ch, sc in next ch, hdc in next ch, dc in next 3 ch, hdc in next ch, sc in next ch, sl st in last ch. Ch 1, working along opposite side of foundation ch, sl st, sc, hdc, dc, dc, dc, hdc, sc, sl st.
You’ve created an oval leaf shape. Make 10-12 leaves in green.
Assembly Instructions
Now let’s bring it all together.
1. Attach sleeves: Pin sleeve openings to armhole edges of body. Sl st or whip stitch in place, easing fullness evenly.
2. Close side seams: Sew from bottom hem to underarm on both sides.
3. Attach neckband: Pin ribbed band around top edge, stretching slightly to fit. The band should sit just above the bodice, creating the off-shoulder look. Sl st in place.
4. Add hanging loops: Fold each loop in half. Sew securely to inside of neckband at shoulder points. These help with storage.
5. Arrange roses: Lay top flat. Position roses in a diagonal cascade from upper left to lower right (or your preferred arrangement). Pin in place.
6. Tuck leaves: Slide leaf points beneath roses, arranging naturally. Some pointing up, some down.
7. Sew florals: Using matching thread, tack each rose and leaf securely. Stitch through multiple points on each flower for durability.
Sizing Modifications
For Medium (36-38″): Start with ch 96. Add 2 additional rows before neckline shaping.
For Large (40-42″): Start with ch 106. Add 4 additional rows before shaping. Increase sleeve starting chain to 58.
Always check gauge and try on as you go.
Blocking Tips
Wet block the body panels before assembly for professional results. Pin sleeves into dramatic bell shapes. Let roses dry in natural curled form.
You Did It
And just like that, you have a stunning champagne gold bell sleeve crochet top ready for garden parties, date nights, or feeling fancy on a random Tuesday.
This crochet pattern combines so many techniques. Basic bodice construction. Dramatic pineapple lace. Sculptural flower making. You just leveled up your skills in the prettiest way possible.
I truly hope you love making this as much as I loved designing it. There’s something special about creating wearable art with your own hands.
If you make this top, I would absolutely love to see it. Tag me on Instagram or share in my Facebook group. Your version might look completely different with your color choices, and that’s the beauty of handmade.
Thank you for trusting me with your time and yarn stash. Now go make something beautiful.
Happy hooking.
