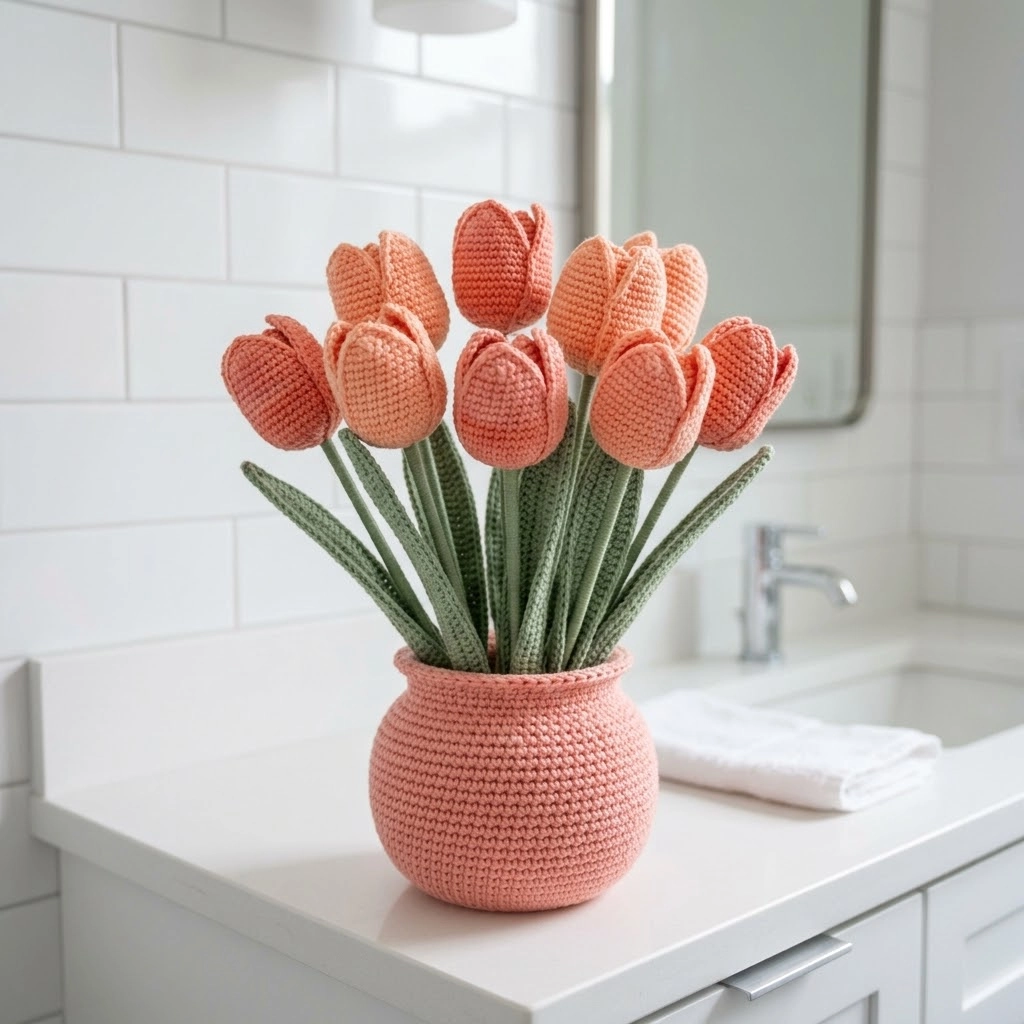
There is something magical about flowers that never wilt. This coral tulip crocheted bathroom vase brings warmth and charm to any space without a single drop of water. I designed this piece to sit perfectly on a bathroom counter, vanity, or windowsill. The soft peachy coral tones paired with sage green stems create a display that feels fresh all year round.
If you can work in the round and know your basic stitches, you can absolutely make this. The construction is simpler than it looks. Each tulip is a small amigurumi shape. The stems are straightforward tubes. The vase is a classic rounded pot shape. Put them together and you have a stunning decorative piece that looks like it took months but actually comes together in a weekend.
Let me walk you through everything you need to recreate this exact project from start to finish.
Understanding the Coral Tulip Crocheted Bathroom Vase Design
Looking at this piece closely, I can see several distinct components working together. The vase itself is a rounded pot shape worked in continuous rounds using single crochet (sc) stitches. It has a gentle curve at the bottom that swells outward, then tapers slightly at the neck before flaring just a bit at the rim. A decorative twisted or braided edge finishes the top beautifully.
The tulips are classic amigurumi style. Each bloom consists of overlapping petals that cup inward to create that recognizable tulip silhouette. They are stuffed lightly to hold their shape. The color appears to be a warm peachy coral, almost salmon shade.
The stems and leaves are worked in a muted sage green. The stems are narrow tubes stiffened with wire so they stand upright. The leaves are flat tapered pieces that add dimension and realism to the arrangement.
This crochet tutorial will give you everything for all three elements.
Materials You Will Need
Yarn:
- Worsted weight cotton yarn in coral or peach (approximately 200 yards for vase and tulips)
- Worsted weight cotton yarn in sage green (approximately 150 yards for stems and leaves)
I recommend 100% cotton for this project. It holds shape beautifully and gives that clean matte finish visible in the design. Brands like Lily Sugar’n Cream, Paintbox Cotton, or Drops Paris work wonderfully.
Hook:
- 3.5mm (US E/4) crochet hook
Using a smaller hook than typically recommended for worsted weight creates a tight fabric. This prevents stuffing from showing through on the amigurumi tulips and gives the vase a sturdy structure.
Additional Supplies:
- Polyester fiberfill stuffing
- Floral wire (18 gauge) cut into 10 to 12 inch lengths
- Tapestry needle
- Stitch marker
- Scissors
- Optional: small weighted pellets or dried beans for vase stability
Stitch Abbreviations and Definitions
Before we begin, here are all the stitches you will use in this step by step crochet pattern.
Magic Ring (MR): An adjustable loop that tightens completely closed. You wrap yarn around your fingers, pull up a loop, and work your first round into that ring. Then you pull the tail to close any gap.
Chain (ch): The foundation stitch. Yarn over, pull through the loop on your hook. One chain made.
Slip Stitch (sl st): Insert hook, yarn over, pull through both the stitch and the loop on your hook in one motion. Used for joining or moving across stitches invisibly.
Single Crochet (sc): Insert hook into stitch, yarn over and pull up a loop (two loops on hook), yarn over and pull through both loops. This is the main stitch for this entire project.
Increase (inc): Work two single crochet stitches into the same stitch. This adds one stitch to your total count.
Invisible Decrease (invdec): Insert hook through the front loops only of the next two stitches, yarn over and pull through both front loops, yarn over and pull through both loops on hook. This creates a cleaner decrease than the standard method.
Half Double Crochet (hdc): Yarn over, insert hook, yarn over and pull up a loop (three loops on hook), yarn over and pull through all three loops.
Gauge and Finished Size
Work 5 sc stitches and 5 rows per inch in continuous rounds.
Finished Measurements:
- Vase: approximately 4 inches tall, 4 inches wide at widest point
- Each tulip bloom: approximately 2 inches tall
- Stems: approximately 8 to 10 inches long
- Leaves: approximately 6 to 8 inches long
- Complete arrangement: approximately 12 inches tall
How to Crochet the Vase
This vase is worked from the bottom up in continuous spirals. Place a stitch marker at the start of each round and move it as you go.
Round 1: Using coral yarn, MR, 6 sc into ring. Pull tight. (6 sts)
Round 2: Inc in each st around. (12 sts)
Round 3: *Sc 1, inc* repeat around. (18 sts)
Round 4: *Sc 2, inc* repeat around. (24 sts)
Round 5: *Sc 3, inc* repeat around. (30 sts)
Round 6: *Sc 4, inc* repeat around. (36 sts)
Round 7: *Sc 5, inc* repeat around. (42 sts)
Round 8: *Sc 6, inc* repeat around. (48 sts)
Rounds 9 to 11: Sc in each st around. (48 sts) This creates the flat bottom.
Round 12: Working in back loops only this round, sc in each st around. (48 sts) This creates a defined edge where the bottom meets the sides.
Rounds 13 to 18: Sc in each st around. (48 sts)
Round 19: *Sc 6, invdec* repeat around. (42 sts)
Round 20: Sc in each st around. (42 sts)
Round 21: *Sc 5, invdec* repeat around. (36 sts)
Rounds 22 to 24: Sc in each st around. (36 sts)
Round 25: *Sc 5, inc* repeat around. (42 sts) This creates the flared rim.
Round 26: Sl st in each st around. Fasten off, leaving a long tail.
For the decorative rim, chain 80. Fasten off. Twist or loosely braid if desired and whip stitch around the top edge of the vase.
If you want extra stability, add weighted pellets to the bottom before stuffing the base lightly with fiberfill.
How to Crochet the Tulip Blooms
Each tulip is made from one piece worked in a spiral, then shaped by gathering. Make 12 to 15 tulips for a full bouquet like the one shown.
Round 1: Using coral yarn, MR, 6 sc into ring. (6 sts)
Round 2: Inc in each st around. (12 sts)
Round 3: *Sc 1, inc* repeat around. (18 sts)
Round 4: *Sc 2, inc* repeat around. (24 sts)
Rounds 5 to 8: Sc in each st around. (24 sts)
Round 9: *Sc 2, invdec* repeat around. (18 sts)
Round 10: *Sc 1, invdec* repeat around. (12 sts)
Stuff the tulip lightly now. You want it to hold shape but not be rock hard.
Round 11: Invdec around. (6 sts)
Fasten off, leaving a long tail. Thread through remaining stitches and pull to close.
Creating the Petal Definition:
Using your tapestry needle and a length of coral yarn, create three vertical indentations by threading from the base, coming up between stitches about halfway up the bloom, wrapping around and pulling slightly to create a crease, then going back down. Repeat this at three evenly spaced points around the tulip. This gives you those beautiful petal separations visible in the design.
This step is optional but makes a huge difference in realism. Do not worry about perfection here. The slight irregularities make them look more natural.
How to Crochet the Stems
Each stem is a simple tube worked around floral wire for stability. Make one stem per tulip.
Round 1: Using green yarn, MR, 6 sc into ring. (6 sts)
Rounds 2 to 50: Sc in each st around. (6 sts)
This gives you approximately 10 inches of stem. Adjust the round count for shorter or taller stems. Variety in height makes the arrangement look natural.
Before closing, insert an 11 inch piece of floral wire into the tube. Leave about half an inch at the top for attaching the bloom.
Fasten off, leaving a long tail. Sew the stem to the base of the tulip securely, wrapping around the wire to anchor it.
How to Crochet the Leaves
The leaves are flat tapered pieces. Make 6 to 10 leaves for a full arrangement.
Chain 45.
Row 1: Starting in second ch from hook, sc in next 20 ch, hdc in next 15 ch, sc in next 9 ch. (44 sts)
Row 2: Ch 1, turn. Sc in next 9 sts, hdc in next 15 sts, sc in next 20 sts. (44 sts)
Fasten off, leaving a long tail.
Insert a piece of floral wire down the center of the leaf, bending the end over to secure. This allows you to curve and position each leaf naturally.
Assembly and Finishing
Now comes the satisfying part. Gather your completed vase, all your tulips with attached stems, and your leaves.
First, arrange the tulips inside the vase. Bend the wire stems gently to create natural curves. Position taller blooms toward the center and shorter ones around the edges.
Next, tuck the leaves in among the stems. Angle them outward slightly to mimic how real tulip leaves grow.
Once you are happy with the arrangement, you can secure everything by adding a small amount of fiberfill stuffing into the base of the vase to hold the stems in place. Alternatively, you could use floral foam cut to fit inside if you want to adjust the arrangement later.
Tips for Success With This Beginner Friendly Crochet Pattern
Tight stitches matter. If your fabric is loose and you can see through it, go down a hook size. Amigurumi relies on dense fabric.
Count your stitches. I know it sounds tedious but losing or gaining stitches in the round throws off your shape completely. Use that stitch marker religiously.
Do not stress about perfect tulips. Real tulips are not identical. Variations in your blooms add to the handmade charm.
Wire makes everything easier. I know some crocheters skip wire to save time. Please do not. Your stems will flop sadly without support and the whole arrangement loses its impact.
Why This Coral Tulip Crocheted Bathroom Vase Makes a Perfect Gift
Handmade gifts carry meaning that store bought items simply cannot match. This arrangement works beautifully for housewarmings, Mother’s Day, birthdays, or just because. It never needs watering, never wilts, and brings color to any room for years.
You could customize the colors endlessly. Pink blooms in a white vase. Yellow tulips with bright green stems. Red and cream for a classic look. The pattern stays the same. Only your yarn choices change.
Final Thoughts
Thank you so much for choosing this pattern and trusting me to guide you through the process. I genuinely hope you enjoy making your coral tulip crocheted bathroom vase as much as I enjoyed designing it.
When you finish your bouquet, I would absolutely love to see it. Tag me on Instagram or share it in our Facebook group. Seeing your creations brings me so much joy and inspires other makers to try patterns they might have felt nervous about.
Happy crocheting, friend. You have got this.
