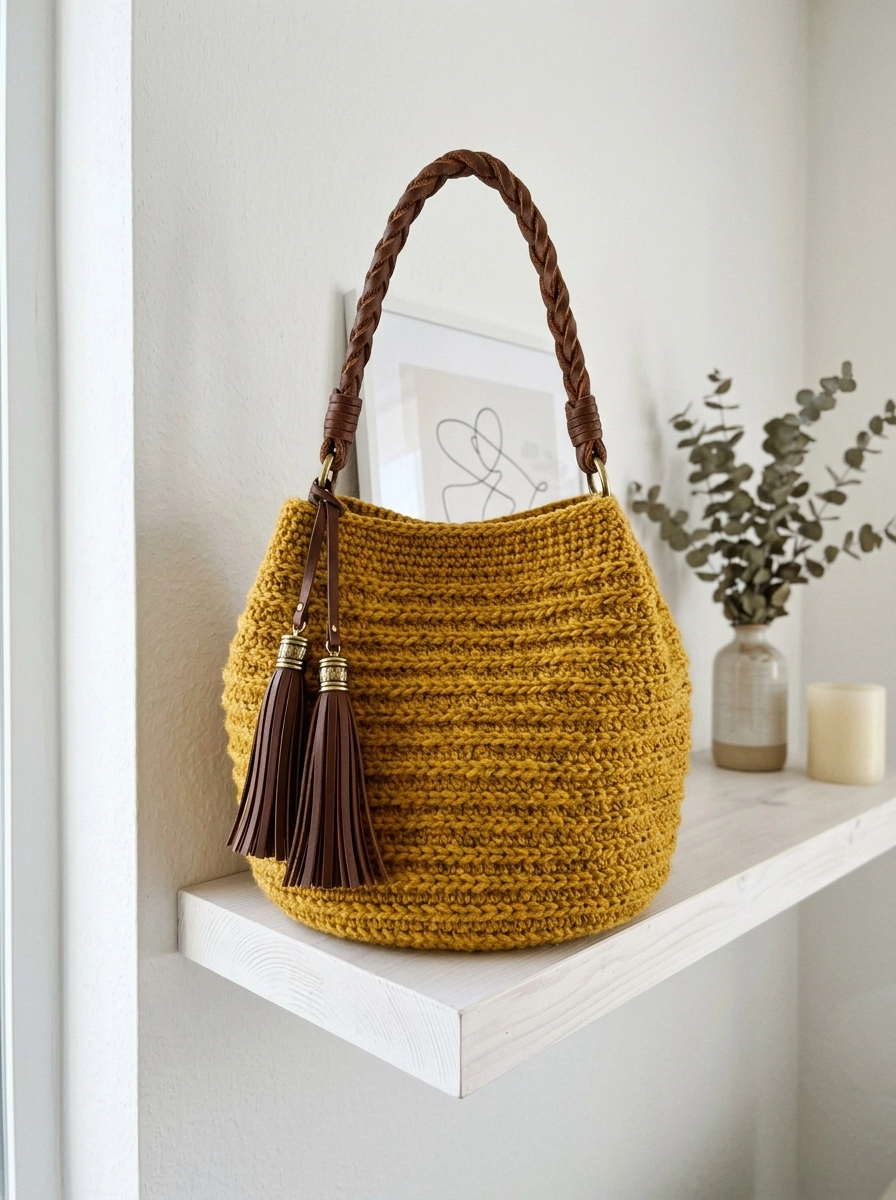
This gorgeous mustard yellow boho tote might just become your favorite handmade accessory. I designed this crochet pattern to create a bag that looks like you bought it at a trendy boutique, but you made it yourself. The combination of textured horizontal ridges, a rounded bucket shape, and those stunning brown leather tassels gives this tote serious style. And here is the good news: if you can work basic stitches in the round, you can absolutely make this bag.
This crochet tutorial walks you through every single step. I am talking materials, stitch definitions, row by row instructions, and all the finishing details to attach those beautiful hardware pieces. By the end, you will have a functional, sturdy, and undeniably chic boho tote bag that works for farmers markets, beach days, or just running errands in style.
Why This Crochet Pattern Works So Well
Let me tell you what makes this mustard yellow boho tote special. The construction uses a simple technique that creates those beautiful textured ridges you see wrapping around the bag. These ridges are not complicated at all. They come from working into the back loop only, which creates a raised horizontal line with each round.
The rounded bucket shape happens naturally through strategic increases at the base and then working straight up the sides. No tricky shaping. No confusing math. Just follow the stitch counts, and your bag will take shape beautifully.
I chose a sturdy worsted weight yarn for this project because it holds its shape without being stiff. The golden mustard color is absolutely perfect for fall, but honestly, this bag works year round. Swap the color for navy, cream, terracotta, or sage green and you have a completely different vibe.
Skill Level
Confident Beginner to Intermediate
You should be comfortable with these skills before starting:
- Working in continuous rounds
- Single crochet stitches
- Working into the back loop only
- Increasing stitches evenly
- Attaching hardware
If you have never worked in the round before, I recommend practicing with a simple coaster first. But if you have made a basic hat or basket, you are ready for this crochet pattern.
Finished Dimensions
- Height: Approximately 10 inches (not including handle)
- Width at widest point: Approximately 12 inches
- Base diameter: Approximately 7 inches
Your finished size may vary slightly depending on your tension and the specific yarn you choose.
Materials Needed
Gather everything before you start. There is nothing worse than getting halfway through a project and realizing you need to order something online.
Yarn
- Weight: Worsted weight (category 4)
- Fiber: 100% cotton or cotton blend works best for structure. Acrylic will work but may stretch more over time.
- Color: Mustard yellow, golden ochre, or similar warm yellow
- Amount: Approximately 350 to 400 yards (320 to 365 meters)
Recommended brands: Lion Brand 24/7 Cotton, Paintbox Yarns Cotton Aran, or Drops Paris
Hook
- Size: 5.0 mm (US H/8)
- Adjust up or down if needed to achieve gauge
Notions and Hardware
- Stitch marker (I like locking markers for bags)
- Tapestry needle for weaving ends
- 2 D-rings or O-rings: Approximately 1 inch (25 mm) inner diameter, antique brass or gold finish
- 1 braided leather handle: Approximately 18 to 20 inches long with lobster clasps or swivel hooks on each end
- 2 leather tassels with decorative caps: Look for tassels with metal bead caps in coordinating brass or gold
- 2 small leather connector straps: These attach the D-rings to the bag (often sold with handles or separately)
Where to find hardware: Etsy shops specializing in bag making supplies, Amazon, or craft stores like Joann. Search for “crochet bag hardware set” or “purse handle leather braided.”
Gauge
16 stitches and 18 rounds = 4 inches in single crochet worked in continuous rounds
Gauge matters here because the bag needs to be sturdy and hold its shape. If your stitches are too loose, your bag will be floppy. Too tight, and it will be stiff as a board. Take five minutes to make a gauge swatch. Future you will be grateful.
Abbreviations and Stitch Definitions
Let me define every stitch and term before we dive in. Even if you know these, a quick refresher never hurts.
- ch: Chain. Wrap yarn over hook, pull through loop on hook. This creates your starting foundation.
- sl st: Slip stitch. Insert hook, yarn over, pull through stitch and loop on hook in one motion. Used for joining.
- sc: Single crochet. Insert hook into stitch, yarn over, pull up a loop (2 loops on hook), yarn over, pull through both loops.
- inc: Increase. Work 2 single crochet stitches into the same stitch. This adds one stitch to your count.
- BLO: Back loop only. Instead of inserting your hook under both loops at the top of the stitch, insert under only the back loop (the one farthest from you). This creates the textured ridge.
- st(s): Stitch(es)
- rnd(s): Round(s)
Pattern Notes Before You Begin
Read this section. Seriously. It will save you confusion later.
1. This bag is worked in continuous rounds. You do not join at the end of each round. Instead, place a stitch marker in the first stitch of each round and move it up as you go. This creates a seamless look.
2. The base is worked through both loops. You only switch to back loop only (BLO) when you start the sides. I will tell you exactly when.
3. Count your stitches. At the end of every round, I give you a stitch count in parentheses. Check your count. If you are off, it is much easier to fix now than three rounds later.
4. The ridged texture comes from BLO. When you work into the back loop only, the front loop creates a raised ridge on the outside of your bag. This is where the magic happens.
Step by Step Crochet Pattern
Base of the Bag
We start with a flat circular base, working in standard single crochet through both loops.
Magic ring or ch 2 method: I prefer a magic ring because it closes completely with no hole. If magic rings stress you out, chain 2 and work Round 1 into the second chain from the hook.
Rnd 1: Create a magic ring. Work 6 sc into the ring. Pull tail to close. Place stitch marker in first sc. (6 sts)
Rnd 2: Work 2 sc in each st around. (12 sts)
Rnd 3: *Sc in next st, inc in next st.* Repeat from * around. (18 sts)
Rnd 4: *Sc in next 2 sts, inc in next st.* Repeat from * around. (24 sts)
Rnd 5: *Sc in next 3 sts, inc in next st.* Repeat from * around. (30 sts)
Rnd 6: *Sc in next 4 sts, inc in next st.* Repeat from * around. (36 sts)
Rnd 7: *Sc in next 5 sts, inc in next st.* Repeat from * around. (42 sts)
Rnd 8: *Sc in next 6 sts, inc in next st.* Repeat from * around. (48 sts)
Rnd 9: *Sc in next 7 sts, inc in next st.* Repeat from * around. (54 sts)
Rnd 10: *Sc in next 8 sts, inc in next st.* Repeat from * around. (60 sts)
Rnd 11: *Sc in next 9 sts, inc in next st.* Repeat from * around. (66 sts)
Rnd 12: *Sc in next 10 sts, inc in next st.* Repeat from * around. (72 sts)
Your base should measure approximately 7 inches across. If it is significantly smaller, try going up a hook size. If larger, go down a size.
Sides of the Bag (Textured Ridges)
Now we transition to the sides. This is where we switch to back loop only to create those gorgeous horizontal ridges.
Rnd 13: Working in BLO only, sc in each st around. (72 sts)
This first BLO round creates the sharp angle between the base and sides. You should see the base lying flat and the sides starting to rise straight up.
Rnds 14 through 50: Continue working in BLO, sc in each st around. (72 sts each round)
That is 37 rounds of BLO single crochet. Yes, it is repetitive. But this is the perfect project for watching TV or listening to podcasts. The rhythm becomes almost meditative.
Quick tip: Every 10 rounds or so, count your stitches. If you accidentally skipped or added a stitch, catching it early means an easy fix.
Shaping the Top Opening
Now we gently curve the top inward to create that rounded bucket shape.
Rnd 51: Working in BLO, *sc in next 10 sts, skip next st.* Repeat from * around. (66 sts)
Rnd 52: Sc in BLO in each st around. (66 sts)
Rnd 53: Working in BLO, *sc in next 9 sts, skip next st.* Repeat from * around. (60 sts)
Rnd 54: Sc in BLO in each st around. (60 sts)
Rnd 55: Working in BLO, *sc in next 8 sts, skip next st.* Repeat from * around. (54 sts)
Rnds 56 through 58: Sc in BLO in each st around. (54 sts each round)
Top Edge
For a clean finished edge, work the final round through both loops.
Rnd 59: Working through both loops, sc in each st around. Sl st to first sc to join. (54 sts)
Fasten off. Weave in all ends securely using your tapestry needle. For a bag that will get daily use, I weave ends through at least 2 inches of stitches in multiple directions.
Attaching the Hardware
This part is easier than it looks. Take your time and your bag will look professionally finished.
D-Ring Placement
You need to attach two D-rings on opposite sides of the bag opening. These will hold the handle.
1. Locate the center front and back. Place one D-ring at the center of one side, approximately 1 inch below the top edge.
2. Thread your leather connector strap through the D-ring. Fold the strap in half so both ends meet.
3. Using matching thread and a sharp needle (or a small crochet hook if the strap has holes), secure the strap to the inside of the bag. Stitch through multiple times for strength. The strap should sit on the outside, with the connection hidden inside.
4. Repeat on the opposite side for the second D-ring.
Attaching the Handle
Clip or hook your braided leather handle onto both D-rings. Most handles come with lobster clasps or swivel hooks that make this super easy.
Adding the Tassels
Attach your leather tassels to the same D-ring loops or directly to the handle near the clips. I attached mine near one D-ring so they hang together as a decorative cluster. Use small jump rings if your tassels need a connector.
Care Instructions
- Spot clean with a damp cloth for minor dirt
- Hand wash gently in cool water with mild soap if needed
- Reshape while damp and lay flat to dry
- Remove leather hardware before washing to protect it
Pattern Variations to Try
Once you master this crochet pattern, consider these tweaks:
- Add a fabric lining for a polished interior and to prevent items from poking through
- Work stripes by changing colors every 4 to 6 rounds
- Skip the leather handle and crochet your own using chains or i-cord
- Add a magnetic snap closure at the top opening
- Make it smaller by stopping increases earlier for a clutch size version
Troubleshooting Common Issues
My bag is too floppy. Your tension might be too loose. Try going down a hook size or using a stiffer yarn like 100% cotton.
My ridges are not showing. Make sure you are working into the back loop only, not both loops. The front loop should be left unworked and visible on the outside.
My base is curling up. This usually means your tension is too tight on the increase rounds. Try relaxing your grip or going up a hook size for just the base.
I lost count of my rounds. Use a row counter app or place a safety pin every 10 rounds to keep track.
Final Thoughts on This Mustard Yellow Boho Tote Crochet Pattern
You did it. Or you are about to do it. Either way, I am genuinely excited for you. This boho tote bag is one of those projects that looks impressive but is totally achievable. The textured stitches, the rich mustard color, and those gorgeous brown leather details come together into something you will actually want to use every day.
Thank you so much for choosing this pattern. It means the world to me when makers trust my designs to guide their creativity.
When you finish your bag, I would absolutely love to see it. Tag me on Instagram or share in my Facebook group. Seeing your versions of my patterns is honestly the best part of this whole thing.
Happy crocheting, friend. You have got this.
