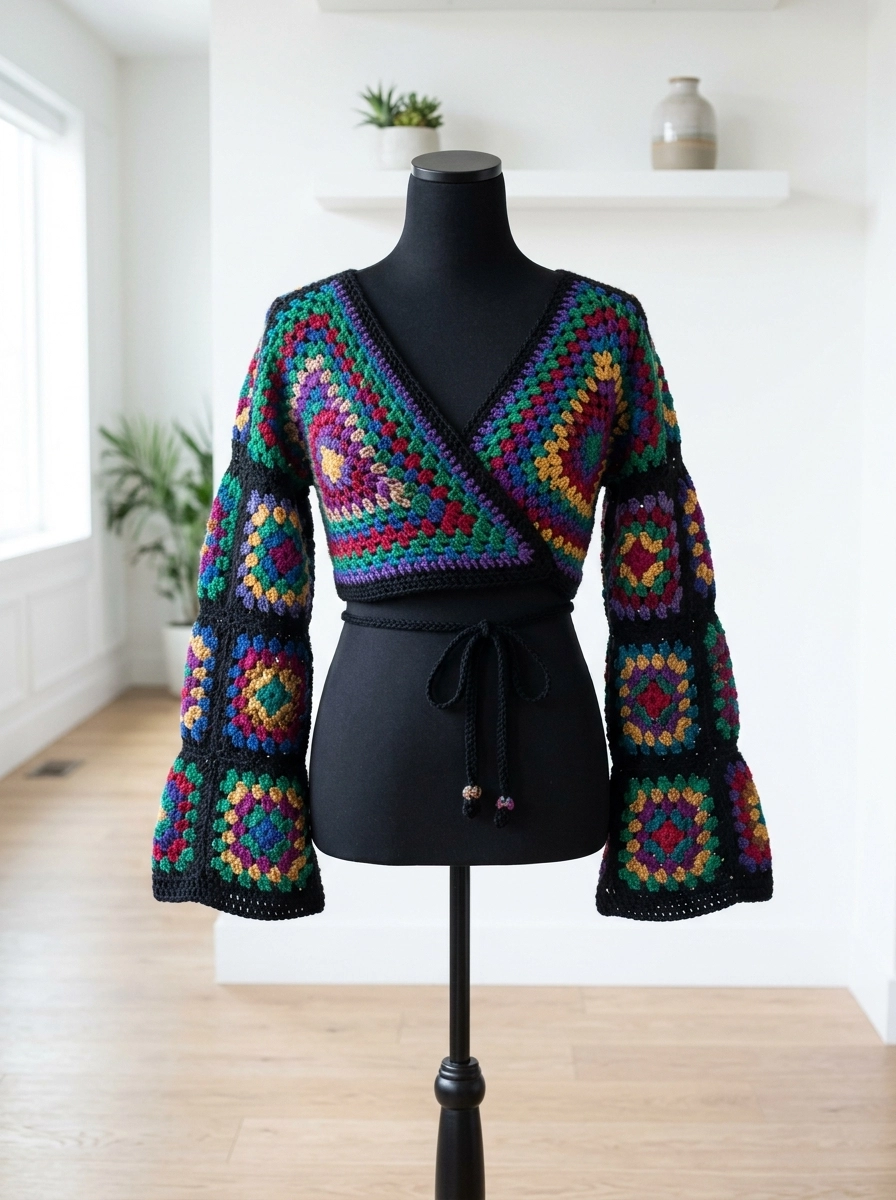
I absolutely fell in love with this project the moment I finished it. This granny square wrap top crochet pattern combines vintage charm with modern style. The jewel tones pop against the black borders. The cropped silhouette feels fresh and flattering. And those dramatic bell sleeves? Pure magic.
If you can make a basic granny square, you can make this top. I promise.
The construction is simpler than it looks. You will make individual squares, join them strategically, then add a few finishing touches. No complicated shaping. No confusing decreases. Just squares, seaming, and a bit of edging work.
Let me walk you through everything you need to know to create your own stunning wrap top.
Why This Granny Square Wrap Top Works
This design hits all the right notes for intermediate crocheters looking to level up.
The wrap silhouette is incredibly forgiving. It ties at the waist so you control the fit. No need for precise bust measurements or complicated armhole shaping. The crossover front creates a flattering V neckline that works on everyone.
The jewel tone color palette makes this piece feel luxurious. Deep teals, rich burgundies, warm golds, royal purples, and forest greens all play together beautifully. The black borders unify everything and add sophisticated contrast.
And those bell sleeves constructed from joined granny squares? They are the statement element that makes this top unforgettable.
Materials Needed
Yarn:
- Worsted weight yarn (medium, #4) in the following colors:
– Black (main border color): approximately 400 yards
– Teal: approximately 150 yards
– Burgundy: approximately 150 yards
– Gold/Mustard: approximately 100 yards
– Purple: approximately 100 yards
– Forest Green: approximately 100 yards
– Deep Red: approximately 100 yards
I recommend 100% acrylic or an acrylic blend for this project. You want good stitch definition and easy care. Something like Red Heart Super Saver, Caron Simply Soft, or Lion Brand Vanna’s Choice works wonderfully.
Hook:
- 5.0mm (H/8) crochet hook, or size needed for gauge
Notions:
- Tapestry needle for weaving ends and seaming
- Scissors
- Stitch markers
- Measuring tape
Gauge
This is important. Please check your gauge.
One completed 5-round granny square should measure approximately 4 inches by 4 inches (10cm x 10cm) when blocked.
If your squares are larger, try a smaller hook. If they are smaller, go up a hook size.
Skill Level
Intermediate
You should be comfortable with:
- Basic granny squares
- Changing colors
- Joining motifs
- Single crochet edging
- Weaving in ends (lots of them, I will not lie)
If you have never made a granny square before, practice a few first. Once you get the rhythm, this project moves quickly.
Abbreviations and Stitch Definitions
Let me define everything before we begin.
ch = chain: Yarn over, pull through the loop on your hook. This creates a foundation or spaces between stitches.
sl st = slip stitch: Insert hook, yarn over, pull through both the stitch and the loop on your hook in one motion. Used for joining or moving across stitches invisibly.
sc = single crochet: Insert hook, yarn over, pull up a loop (2 loops on hook), yarn over, pull through both loops. A short, tight stitch.
dc = double crochet: Yarn over, insert hook, yarn over, pull up a loop (3 loops on hook), yarn over, pull through 2 loops, yarn over, pull through remaining 2 loops. A taller stitch that creates the signature granny square look.
3-dc cluster = Three double crochets worked into the same stitch or space. This is the building block of granny squares.
ch-sp = chain space: The gap created by chains in a previous row. You work into this space, not into individual chain stitches.
RS = right side: The front of your work, the side that faces out when worn.
WS = wrong side: The back of your work.
Pattern Notes
- All squares are worked from the center outward.
- Change colors at the end of rounds for crisp color transitions.
- Final round of every square is worked in black for consistent borders.
- Weave in ends as you go. Trust me on this one. You will thank yourself later.
The Basic Granny Square
You will make many of these. The color combinations vary, but the structure stays the same.
Round 1: With your first color, make a magic ring. Ch 3 (counts as first dc here and throughout). Work 2 dc into the ring. Ch 2. *Work 3 dc into the ring, ch 2.* Repeat from * two more times. Sl st to top of ch-3 to join. (4 clusters, 4 ch-2 corner spaces)
Round 2: Change to second color. Sl st into the ch-2 corner space. Ch 3, 2 dc, ch 2, 3 dc all in the same corner space. This creates your first corner. *Ch 1. In the next corner ch-2 space, work (3 dc, ch 2, 3 dc).* Repeat from * around. Ch 1. Sl st to top of ch-3 to join. (8 clusters, 4 corners, 4 ch-1 spaces)
Round 3: Change to third color. Sl st into the corner ch-2 space. Ch 3, 2 dc, ch 2, 3 dc in the same corner. *Ch 1. 3 dc in the next ch-1 space. Ch 1. In the corner ch-2 space, work (3 dc, ch 2, 3 dc).* Repeat from * around, ending with ch 1, 3 dc in the last ch-1 space, ch 1. Sl st to join. (12 clusters total)
Round 4: Change to fourth color. Work same as Round 3, but you will now have two 3-dc clusters along each side between corners. Sl st to join. (16 clusters total)
Round 5: Change to black. Work same as previous rounds. You will now have three 3-dc clusters along each side between corners. Sl st to join. Fasten off. (20 clusters total)
Your finished square should measure 4 inches.
Squares Needed
For a size Small/Medium (adjustable with ties):
Large Squares (5 rounds each):
- 2 for front body panels
- 2 for back (optional, pattern works without back panels for an open back style as shown)
Medium Squares (4 rounds each, approximately 3 inches):
- 24 for sleeves (12 per sleeve)
Small Squares (3 rounds, approximately 2 inches):
- Optional accent squares for sleeve design variation
The front panels appear to be constructed from larger granny squares positioned on the diagonal, creating that beautiful geometric effect.
Front Panel Construction
The front body uses two large squares positioned diagonally. This creates the wrap effect.
Make 2 large front squares using 5 rounds each. These squares are larger than your sleeve squares. Work 6 to 7 rounds to achieve approximately 6 to 7 inches per square.
Extended Large Square (for body):
Follow the basic granny square pattern but continue adding rounds until your square measures approximately 6.5 to 7 inches.
Round 6 and beyond follow the same pattern. Each round adds one more 3-dc cluster per side.
Position these squares on the diagonal. The corners become the center front point, shoulder points, and side points.
Joining the Front Panels
Lay both large front squares on a flat surface, positioned as diamonds (corners pointing up, down, left, right).
The squares overlap at center front, with the left panel crossing over the right. This creates the wrap neckline.
Using black yarn and a tapestry needle, whip stitch the overlapping section together where the squares meet at center front. Leave the upper V open for the neckline.
The top corners of each square form the shoulders. The side corners will connect to the sleeves.
Sleeve Construction
Each sleeve uses 12 medium granny squares arranged in a tube.
Layout for each sleeve:
Arrange squares in a 3 wide by 4 tall grid. The squares at the wrist end create that beautiful bell shape when the sleeve opens up.
Joining method:
Using black yarn, join squares with single crochet or whip stitch. Work through back loops only for a flatter seam, or through both loops for a raised decorative ridge.
Join the long edges first to create a strip. Then join the short edges to form a tube.
Wrist border:
With black yarn, join at any corner of the wrist opening.
Round 1: Ch 1, sc evenly around the entire wrist opening, working approximately 3 sc per granny square side. Sl st to join.
Rounds 2 to 4: Ch 1, sc in each sc around. Sl st to join.
Fasten off. This creates a clean, slightly fitted wrist cuff that contrasts beautifully with the bell shape.
Attaching Sleeves to Body
Match the top of each sleeve tube to the shoulder point and side point of the front panels.
Using black yarn, whip stitch or single crochet the sleeves to the body panels. Work carefully to distribute the fabric evenly.
The sleeves attach at the top two squares on each side.
Neckline and Front Edging
This is where the wrap top really comes together.
V-Neckline Border:
With black yarn, join at the back of the neck (or side if making an open-back version).
Row 1: Ch 1, sc evenly down the left front edge, around the point of the V, and up the right front edge. Turn.
Row 2: Ch 1, sc in each sc across. At the V point, work 3 sc in the center stitch to maintain the angle. Turn.
Rows 3 to 5: Repeat Row 2.
Fasten off. This creates that polished black border visible in the design.
Waistband
The waistband adds structure and creates the cropped silhouette.
Bottom Ribbed Band:
With black yarn, join at a side seam.
Round 1: Ch 1, sc evenly around the entire bottom edge. Sl st to join. Work approximately 3 sc per granny square side.
Rounds 2 to 8: Ch 1, sc in back loop only around. Sl st to join. (This creates a ribbed texture.)
Fasten off.
Tie Closure
The tie wraps around the waist and secures the front closed.
Make 1 long tie:
Ch 200 (or desired length, approximately 60 inches).
Row 1: Sc in second ch from hook and each ch across. (199 sc)
Fasten off.
Optional tie ends:
Add small tassels or pom poms to the tie ends for extra flair. Wrap yarn around cardboard, cut one end, tie at the middle, trim to desired length.
Thread the tie through the waistband at center back, bring both ends to the front, cross over, wrap around to the back, and tie in a bow at the front or side.
Finishing Touches
Blocking:
Wet block your finished top by soaking it in cool water, gently squeezing out excess moisture (do not wring), and laying flat to dry. Pin if needed to square up the granny squares.
Weaving ends:
You will have many ends. Weave each one through at least 2 inches of stitches on the wrong side. Trim close.
Sizing Adjustments
To size up: Add one more round to each granny square. Make additional squares for the body panels. Lengthen the waistband.
To size down: Use fewer rounds per square. Use a smaller hook size.
The wrap construction makes this pattern naturally adjustable through the tie closure.
Tips for Success
Color planning matters. Lay out your colors before starting. I like to vary which color sits in the center versus the outer rounds for visual interest.
Consistent tension is key. Your squares must match in size. Check your first few against each other.
Join as you go if you prefer. Some crocheters hate seaming. You can join squares on the final round instead of sewing afterward.
Try it on as you build. Pin pieces together and check the fit before permanently joining.
Final Thoughts on This Granny Square Wrap Top Crochet Pattern
This project is one of those satisfying makes where the pieces come together in an almost magical way. Each little square feels quick and portable. Then suddenly you have enough to build something truly stunning.
The jewel tones against black give this wrap top a richness that photographs beautifully and looks incredible in person. The bell sleeves move with such lovely drama. And the wrap construction means you get a perfect fit every single time you put it on.
I hope this step by step crochet tutorial gives you everything you need to create your own version. Take your time with it. Enjoy the process. And play with your color combinations.
Thank you so much for choosing this pattern. I truly appreciate you being here and trusting me to guide you through this project. It means the world.
When you finish your wrap top, I would absolutely love to see it. Tag me on Instagram or share your photo in my Facebook group. Seeing your creations is genuinely the best part of sharing these patterns.
Happy crocheting, friend. You have got this.
