This gorgeous bucket bag might just be my new favorite project. The combination of delicate lace panels against a solid blush pink base creates something that looks straight out of a boutique window. And here is the good news: if you can work in the round and follow a lace repeat, you can absolutely make this romantic crochet bucket bag yourself.
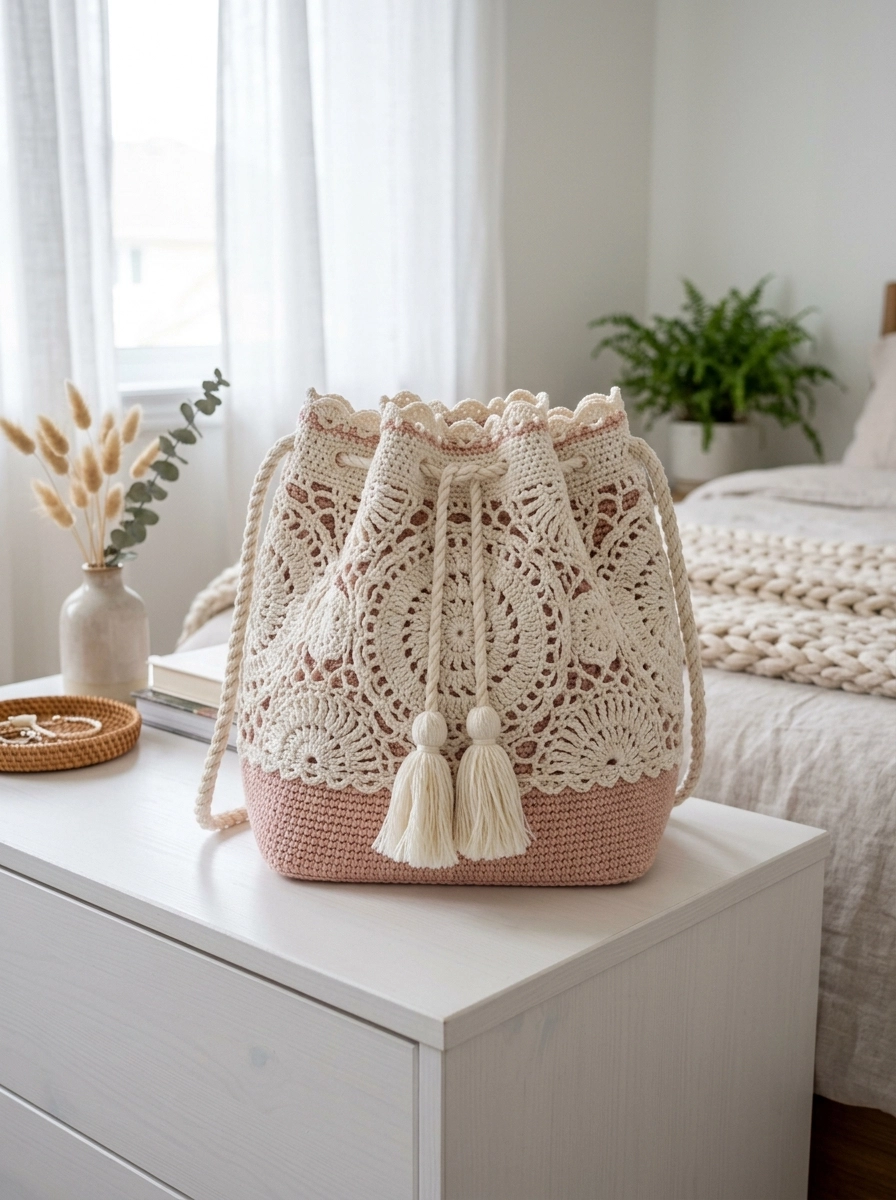
I designed this pattern to balance beauty with practicality. The solid base provides structure and durability where you need it most. The lace body keeps the bag lightweight and breathable. And those sweet tassels on the drawstring closure? They add the perfect finishing touch.
Let me walk you through every single step.
Why You Will Love This Crochet Bucket Bag Pattern
This lace bucket bag hits that sweet spot between elegant and everyday wearable. The romantic openwork design makes it perfect for summer outings, farmers market trips, or even as a project bag for smaller crochet works. The drawstring closure keeps your belongings secure while the crossbody strap leaves your hands free.
The two-tone color scheme creates visual interest without overwhelming complexity. Blush pink grounds the design with warmth while the cream lace portion adds vintage charm. You could easily customize these colors to match your wardrobe or personal style.
Skill level: Intermediate. You should be comfortable working in continuous rounds, reading lace charts or written lace patterns, and shaping with increases. If you have made doilies or lace shawls before, this bag will feel familiar.
Materials Needed for Your Romantic Lace Bucket Bag
Yarn:
- Color A (Blush Pink): 150 grams of DK weight cotton or cotton blend yarn
- Color B (Cream): 200 grams of DK weight cotton or cotton blend yarn
I recommend 100% mercerized cotton for this project. The slight sheen enhances the lace definition, and cotton holds its shape beautifully for bags. Look for yarn with tight twist for crisp stitch definition.
Suggested yarns: Drops Muskat, Paintbox Cotton DK, or Scheepjes Catona work wonderfully.
Hook:
- 3.5mm (US E/4) crochet hook for main body
- 3.0mm (US D/3) crochet hook for tighter base (optional)
Notions:
- Stitch marker
- Yarn needle for weaving ends
- Scissors
- Optional: fabric lining material (approximately 0.5 meter)
Gauge:
20 stitches and 22 rows = 4 inches in single crochet with 3.5mm hook
*Always check your gauge. A too-loose gauge will create a floppy bag. A too-tight gauge will make crocheting uncomfortable and the bag stiff.*
Finished Dimensions
- Height: Approximately 11 inches (28 cm) not including strap
- Base diameter: 7 inches (18 cm)
- Circumference at widest point: 22 inches (56 cm)
- Strap length: Adjustable, approximately 44 inches (112 cm)
Abbreviations and Stitch Definitions
Let me break down every stitch you will use in this crochet tutorial. No confusion allowed.
ch = chain: Yarn over, pull through loop on hook. The foundation of most crochet.
sl st = slip stitch: Insert hook, yarn over, pull through stitch AND loop on hook in one motion. Used for joining rounds.
sc = single crochet: Insert hook, yarn over, pull up a loop (2 loops on hook), yarn over, pull through both loops. Your basic short stitch.
hdc = half double crochet: Yarn over, insert hook, yarn over, pull up a loop (3 loops on hook), yarn over, pull through all 3 loops. Slightly taller than sc.
dc = double crochet: Yarn over, insert hook, yarn over, pull up a loop (3 loops on hook), yarn over, pull through 2 loops, yarn over, pull through remaining 2 loops. The workhorse of lace patterns.
tr = treble crochet (triple crochet): Yarn over twice, insert hook, yarn over, pull up a loop (4 loops on hook), [yarn over, pull through 2 loops] three times. Creates tall, elegant stitches.
ch-sp = chain space: The gap created by chains in the previous row. You work into this space, not into individual chains.
sk = skip: Miss the indicated number of stitches.
inc = increase: Work 2 stitches into 1 stitch from the previous round.
Special Techniques
The Invisible Join
For a polished finish on color change rounds, try an invisible join instead of a standard slip stitch. Cut yarn leaving a 6-inch tail. Pull through last loop. Thread tail onto yarn needle. Insert needle under both loops of first stitch of round, then back down through center of last stitch made. Weave in on wrong side.
Shell Stitch
A shell is multiple stitches worked into the same stitch or space. In this pattern: (2 dc, ch 2, 2 dc) in same stitch or space creates our standard shell.
Scallop Edging
The decorative top edge uses: (sc, hdc, dc, hdc, sc) worked into one space to create wave-like scallops.
Step by Step Crochet Pattern
Part 1: The Solid Base (Blush Pink)
We start from the center bottom and work outward in a flat circle.
With Color A and 3.5mm hook, create a magic ring.
Round 1: Ch 1 (does not count as stitch), 6 sc into ring, pull ring closed, do not join, place marker in first sc. (6 sts)
Round 2: 2 sc in each st around. (12 sts)
Round 3: *Sc in next st, 2 sc in next st* repeat around. (18 sts)
Round 4: *Sc in next 2 sts, 2 sc in next st* repeat around. (24 sts)
Round 5: *Sc in next 3 sts, 2 sc in next st* repeat around. (30 sts)
Round 6: *Sc in next 4 sts, 2 sc in next st* repeat around. (36 sts)
Round 7: *Sc in next 5 sts, 2 sc in next st* repeat around. (42 sts)
Round 8: *Sc in next 6 sts, 2 sc in next st* repeat around. (48 sts)
Round 9: *Sc in next 7 sts, 2 sc in next st* repeat around. (54 sts)
Round 10: *Sc in next 8 sts, 2 sc in next st* repeat around. (60 sts)
Round 11: *Sc in next 9 sts, 2 sc in next st* repeat around. (66 sts)
Round 12: *Sc in next 10 sts, 2 sc in next st* repeat around. (72 sts)
Your base should measure approximately 7 inches across. If yours is smaller, add another increase round following the pattern. If larger, you may need to go down a hook size.
Part 2: Solid Side Walls (Blush Pink)
Now we build up the sides without increases. This creates the bucket shape.
Rounds 13-14: Working in back loops only for Round 13 (this creates a defined edge at the base), sc in each st around. (72 sts each round)
Rounds 15-24: Sc in each st around. (72 sts) — 10 rounds total
You should have approximately 2.5 inches of solid pink walls. This sturdy section protects the bag bottom from wear.
Fasten off Color A with invisible join. Weave in ends.
Part 3: Transition Round
Join Color B in any stitch.
Round 25: Ch 3 (counts as first dc), dc in each st around, sl st to top of ch-3 to join. (72 dc)
Round 26: Ch 1, sc in same st, *ch 3, sk 2 sts, sc in next st* repeat around, ending with ch 3, sl st to first sc. (24 ch-3 spaces)
This round establishes the framework for our lace pattern.
Part 4: Romantic Lace Body (Cream)
Here comes the beautiful part. Take a breath. Work slowly through the first pattern round, then it becomes repetitive and meditative.
Round 27 (Shell Round): Sl st into first ch-3 space, ch 3 (counts as dc), (dc, ch 2, 2 dc) in same space (first shell made), *shell (2 dc, ch 2, 2 dc) in next ch-3 space* repeat around, sl st to top of ch-3. (24 shells)
Round 28: Sl st to first ch-2 space, ch 3, (dc, ch 2, 2 dc) in same space, ch 1, *shell in next ch-2 space, ch 1* repeat around, sl st to top of ch-3. (24 shells with ch-1 spaces between)
Round 29: Sl st to ch-2 space, ch 3, (dc, ch 2, 2 dc) in same space, ch 2, *shell in next ch-2 space, ch 2* repeat around, sl st to top of ch-3. (24 shells)
Round 30 (Fan Round): Sl st to ch-2 space, ch 3, 4 dc in same space (5-dc fan), ch 1, sc in ch-2 space between shells, ch 1, *5 dc in next shell ch-2 space, ch 1, sc in space between shells, ch 1* repeat around, sl st to top of ch-3. (24 fans)
Round 31: Ch 4 (counts as dc plus ch 1), dc in next dc, *ch 1, dc in next dc* across fan (5 dc with ch-1 between each), ch 2, sk sc, *dc in next dc, [ch 1, dc in next dc] 4 times, ch 2, sk sc* repeat around, sl st to 3rd ch of ch-4. (120 dc)
Round 32: Sl st to first ch-1 space, ch 1, sc in same space, *ch 3, sc in next ch-1 space* repeat across each fan section, ch 3, sc in ch-2 space, ch 3, repeat around, sl st to first sc.
Rounds 33-36: Repeat Rounds 27-30 for second lace tier.
Rounds 37-40: Repeat Rounds 27-30 for third lace tier.
Your lace section should now measure approximately 6 inches tall. The three tiers create beautiful cascading pineapple-style motifs.
Part 5: Drawstring Channel
Round 41: Join Color B if needed, ch 1, sc in each dc and 1 sc in each ch-1 space around, adjusting to reach 72 sts. (72 sts)
Round 42: Ch 3, dc in each st around, sl st to join. (72 dc)
Round 43 (Eyelet Round): Ch 3, dc in next st, *ch 1, sk 1 st, dc in next 2 sts* repeat around, sl st to join. (24 eyelet holes)
Round 44: Ch 3, dc in each dc and each ch-1 space around, sl st to join. (72 dc)
Round 45: Ch 1, sc in each st around, sl st to join. (72 sc)
Part 6: Scallop Edging
Round 46: Ch 1, sc in same st, sk 2 sts, *(sc, hdc, dc, hdc, sc) in next st, sk 2 sts* repeat around, sl st to first sc. (24 scallops)
Fasten off. Weave in all ends.
Part 7: Drawstring Cord (Make 2)
With Color B, ch 150 (or desired length plus 6 inches for tassels).
Row 1: Sl st in 2nd ch from hook and each ch across. (149 sl sts)
Fasten off, leaving 8-inch tails at each end for tassels.
*Alternative method:* Create a simple twisted cord or finger crochet chain if you prefer a different texture.
Part 8: Tassels (Make 4)
Cut 20 strands of Color B yarn, each 8 inches long. Fold in half. Insert folded end through drawstring end, pull cut ends through loop, tighten. Wrap separate strand around tassel head approximately 0.5 inch from top, secure and hide ends inside tassel. Trim tassel ends evenly.
Attach one tassel to each end of both drawstrings.
Part 9: Shoulder Strap
With Color B, ch 6.
Row 1: Sc in 2nd ch from hook and each ch across. (5 sc)
Rows 2-220: Ch 1, turn, sc in each st across. (5 sc)
*Or work until strap measures 44 inches or desired length.*
Fasten off leaving long tail. Sew strap ends securely to opposite sides of bag at Round 25 (where solid pink meets cream lace).
Assembly and Finishing
Thread first drawstring through eyelets starting at center front, going around entire bag, exiting at center front. Thread second drawstring starting at center back, going around, exiting at center back. When pulled, the two cords gather the bag closed from opposite directions.
Optional lining: Cut fabric circle 7.5 inches diameter for base, rectangle 23 x 8 inches for sides. Sew together with 0.5 inch seam allowance. Insert into bag wrong sides together. Hand stitch lining to inside of drawstring channel, folding raw edge under.
Block lace section gently by misting with water and shaping. Allow to dry flat before using.
Customization Ideas for Your Bucket Bag Crochet Pattern
- Go monochrome: Use a single color throughout for minimalist elegance
- Add beads: String beads onto yarn before starting lace section, slide into ch spaces
- Leather bottom: Replace crocheted base with a pre-made leather circle
- Different closure: Skip drawstring, add magnetic snap or button loop instead
- Mini version: Use fingering weight yarn and 2.5mm hook for a smaller crossbody
Troubleshooting Tips
Lace section looks sloppy: Check tension. Cotton yarn benefits from slightly tighter stitches than acrylic. Try going down half a hook size for lace portion only.
Bag is too floppy: Add fabric lining or use stiffer yarn. Some crocheters spray finished bags with fabric stiffener.
Base curls up: Block aggressively while wet. Pin flat and allow to dry completely.
Scallops uneven: Count stitches before starting. Each scallop needs exactly 3 stitches of foundation.
Wrapping Up Your Romantic Lace Bucket Bag
You did it. You created something genuinely beautiful and useful with your own two hands. This romantic lace bucket bag crochet pattern combines timeless techniques with modern styling, and now you have a handmade accessory worthy of compliments everywhere you carry it.
I absolutely love seeing your finished projects. Seriously, it makes my whole day. Tag me on Instagram or share in my Facebook group so I can celebrate your work with you.
Thank you for trusting me with your crafting time. Now go show off that gorgeous bag.
Happy hooking!
