This stunning two-tone bucket bag combines dense single crochet construction with delicate lace overlay details. I fell in love with the contrast between the sturdy charcoal base and that gorgeous silver grey lace medallion. If you can work basic stitches in the round and follow a lace pattern, you can absolutely make this bag.
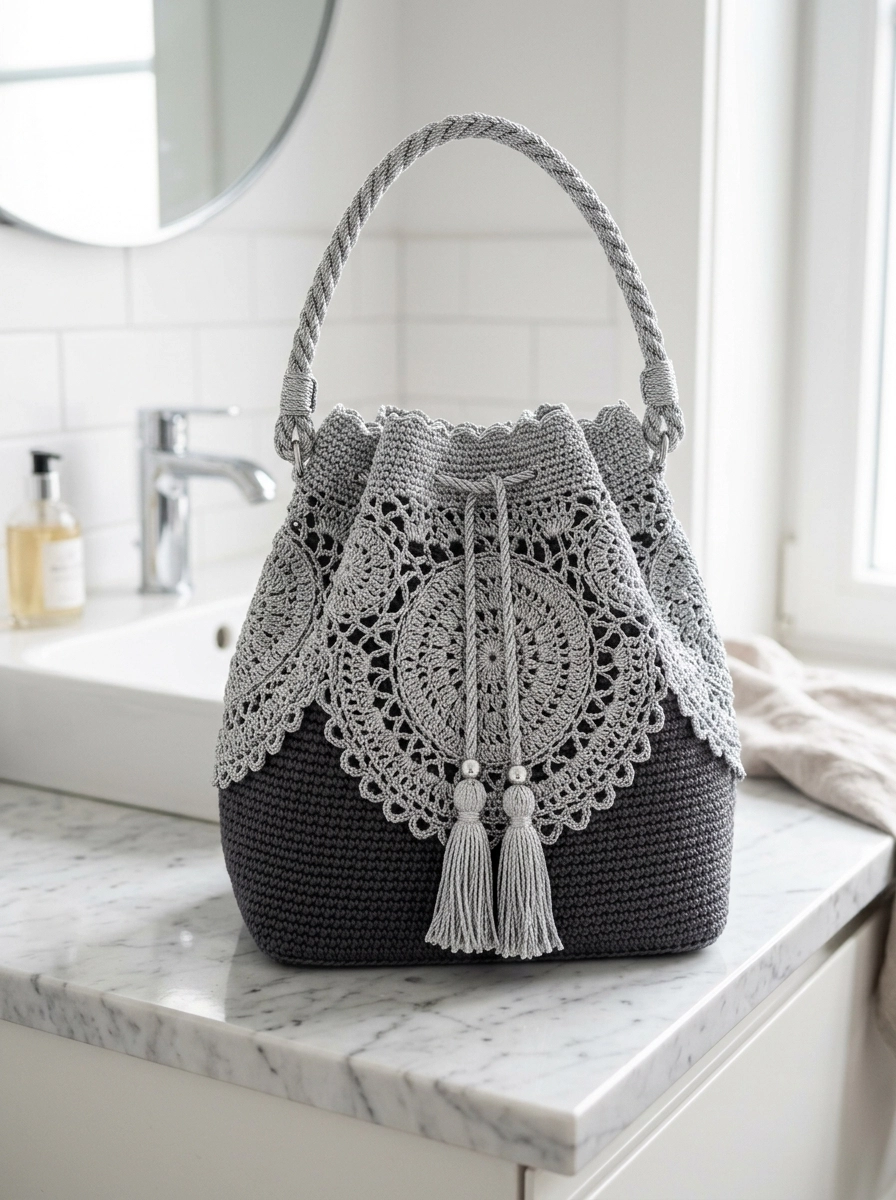
The construction is simpler than it looks. You will create a solid bucket bag first, then crochet the decorative lace overlay separately and attach it. The twisted rope handle and tassels add those finishing touches that make this bag look like something from a high-end boutique.
Why This Crochet Bucket Bag Pattern Works
This crochet pattern creates a bag that is both beautiful and functional. The dense single crochet base holds its shape and protects your belongings. The lace overlay adds visual interest without sacrificing structure. The drawstring closure keeps everything secure while the scalloped edges soften the overall look.
I designed this crochet tutorial with intermediate crocheters in mind. You should be comfortable working in continuous rounds and reading lace patterns. But do not worry if lace intimidates you. I will walk you through every step.
Materials Needed
Yarn:
- Color A (Charcoal): 200 grams of DK weight cotton or cotton blend yarn
- Color B (Silver Grey): 150 grams of DK weight cotton or cotton blend yarn
Hook:
- 3.5mm crochet hook for the bag body
- 3.0mm crochet hook for the lace overlay (optional, for tighter lacework)
Notions:
- Stitch marker
- Tapestry needle
- Two silver beads with holes large enough for yarn (approximately 10mm)
- Cardboard rectangle for tassel making (about 4 inches tall)
Gauge:
20 stitches and 22 rows = 4 inches in single crochet with 3.5mm hook
Always check your gauge. A bag that is too loose will stretch and sag under weight.
Abbreviations and Stitch Definitions
Let me define every stitch before we begin. Refer back to this section whenever you need a refresher.
ch = chain: Yarn over, pull through loop on hook. This creates the foundation for most crochet work.
sl st = slip stitch: Insert hook, yarn over, pull through both the stitch and the loop on your hook in one motion. Used for joining and invisible movement.
sc = single crochet: Insert hook into stitch, yarn over and pull up a loop (2 loops on hook), yarn over and pull through both loops. Creates a short, dense stitch.
hdc = half double crochet: Yarn over, insert hook, yarn over and pull up a loop (3 loops on hook), yarn over and pull through all 3 loops. Slightly taller than single crochet.
dc = double crochet: Yarn over, insert hook, yarn over and pull up a loop (3 loops on hook), yarn over and pull through 2 loops, yarn over and pull through remaining 2 loops. Creates a taller stitch with more drape.
tr = treble crochet: Yarn over twice, insert hook, yarn over and pull up a loop (4 loops on hook), yarn over and pull through 2 loops three times. The tallest basic stitch we use here.
ch-sp = chain space: The gap created by chains in a previous row. You work into this space, not into individual chains.
sk = skip: Pass over the indicated number of stitches without working into them.
inc = increase: Work 2 stitches into the same stitch to add one stitch to your count.
Finished Dimensions
- Height: Approximately 10 inches (not including handle)
- Width at base: 6 inches diameter
- Width at opening: 8 inches diameter
- Handle drop: 6 inches
How to Crochet the Bucket Bag Base
We start from the bottom and work up in continuous rounds. Place a stitch marker at the beginning of each round and move it up as you go. This helps you track where rounds begin since we do not join.
Base Circle
Work with Color A (Charcoal) and 3.5mm hook.
Round 1: Make a magic ring. Work 6 sc into the ring. Pull tight to close. (6 sts)
Round 2: Work 2 sc in each st around. (12 sts)
Round 3: *Sc in next st, 2 sc in next st* repeat around. (18 sts)
Round 4: *Sc in next 2 sts, 2 sc in next st* repeat around. (24 sts)
Round 5: *Sc in next 3 sts, 2 sc in next st* repeat around. (30 sts)
Round 6: *Sc in next 4 sts, 2 sc in next st* repeat around. (36 sts)
Round 7: *Sc in next 5 sts, 2 sc in next st* repeat around. (42 sts)
Round 8: *Sc in next 6 sts, 2 sc in next st* repeat around. (48 sts)
Round 9: *Sc in next 7 sts, 2 sc in next st* repeat around. (54 sts)
Round 10: *Sc in next 8 sts, 2 sc in next st* repeat around. (60 sts)
Round 11: *Sc in next 9 sts, 2 sc in next st* repeat around. (66 sts)
Round 12: *Sc in next 10 sts, 2 sc in next st* repeat around. (72 sts)
Your base should measure approximately 6 inches across. If it curls up at the edges, your tension might be too tight. If it ruffles, your tension is too loose.
Bag Sides
Now we stop increasing and work straight up to form the bucket walls.
Rounds 13 to 45: Sc in each st around. (72 sts per round)
That is 33 rounds of straight single crochet. It sounds like a lot, but it works up quickly once you find your rhythm. Put on a podcast and enjoy the meditative nature of this section.
At Round 45, your bag should stand approximately 6 inches tall from the base.
Shaping the Upper Section
We need to gradually widen the opening for that classic bucket bag silhouette.
Round 46: *Sc in next 11 sts, 2 sc in next st* repeat around. (78 sts)
Rounds 47 to 49: Sc in each st around. (78 sts)
Round 50: *Sc in next 12 sts, 2 sc in next st* repeat around. (84 sts)
Rounds 51 to 53: Sc in each st around. (84 sts)
Round 54: *Sc in next 13 sts, 2 sc in next st* repeat around. (90 sts)
Rounds 55 to 57: Sc in each st around. (90 sts)
Fasten off Color A. Your charcoal base section is complete.
Crochet Pattern for the Upper Lace Band
Join Color B (Silver Grey) to any stitch with a sl st.
Round 58: Ch 3 (counts as first dc), dc in each st around, sl st to top of ch-3 to join. (90 sts)
Round 59: Ch 1, sc in same st, *ch 3, sk 2 sts, sc in next st* repeat around, ending with ch 3, sl st to first sc. (30 ch-3 spaces)
Round 60: Sl st into first ch-3 space, ch 3, 2 dc in same space, *3 dc in next ch-3 space* repeat around, sl st to top of ch-3. (90 dc in 30 shell groups)
Round 61: Ch 4 (counts as dc plus ch 1), sk 1 st, *dc in next st, ch 1, sk 1 st* repeat around, sl st to 3rd ch of beginning ch-4. (45 dc, 45 ch-1 spaces)
Round 62: Ch 1, sc in same st, sc in ch-1 space, *sc in next dc, sc in ch-1 space* repeat around, sl st to first sc. (90 sts)
Drawstring Eyelet Round
Round 63: Ch 3, dc in next st, *ch 2, sk 2 sts, dc in next 2 sts* repeat around, ending with ch 2, sl st to top of ch-3. (This creates the holes for your drawstring)
Round 64: Ch 1, sc in each dc and 2 sc in each ch-2 space around, sl st to first sc. (90 sts)
Scalloped Edge
Round 65: *Sk 2 sts, 5 dc in next st (shell made), sk 2 sts, sl st in next st* repeat around. Fasten off.
You should have 15 scallop shells around the top edge.
Step by Step Lace Medallion Overlay
This decorative circle attaches to the front of your bag. Make two if you want matching front and back panels.
Work with Color B and 3.0mm hook for crisper lace definition.
Round 1: Magic ring, ch 3 (counts as dc), 11 dc into ring, sl st to top of ch-3. Pull ring closed. (12 dc)
Round 2: Ch 3, dc in same st, 2 dc in each st around, sl st to top of ch-3. (24 dc)
Round 3: Ch 4 (counts as dc plus ch 1), *dc in next st, ch 1* repeat around, sl st to 3rd ch of beginning ch-4. (24 dc, 24 ch-1 spaces)
Round 4: Sl st into ch-1 space, ch 3, 2 dc in same space, ch 1, *3 dc in next ch-1 space, ch 1* repeat around, sl st to top of ch-3. (24 shells)
Round 5: Ch 5 (counts as dc plus ch 2), *dc in center dc of next shell, ch 2* repeat around, sl st to 3rd ch of beginning ch-5. (24 dc)
Round 6: Sl st into ch-2 space, ch 3, 4 dc in same space, *5 dc in next ch-2 space* repeat around, sl st to top of ch-3. (120 dc in 24 fan groups)
Round 7: Ch 1, sc in same st, sc in next 2 sts, ch 5, *sc in next 5 sts, ch 5* repeat around, ending with sc in last 2 sts, sl st to first sc.
Round 8: Sl st to center sc of 5-sc group, ch 1, sc in same st, ch 3, 7 dc in ch-5 space, ch 3, *sc in center sc of next 5-sc group, ch 3, 7 dc in ch-5 space, ch 3* repeat around, sl st to first sc.
Scalloped Border for Medallion
Round 9: Ch 1, sc in same st, *ch 2, sk ch-3, sc in first dc, hdc in next dc, dc in next 3 dc, hdc in next dc, sc in last dc, ch 2, sc in next sc* repeat around, sl st to first sc. Fasten off.
The medallion should measure approximately 5 to 5.5 inches in diameter.
Creating the Drawstring Cord
Cut 6 strands of Color B yarn, each 60 inches long. Divide into two groups of 3 strands each. Knot the groups together at one end.
Twist each group tightly in the same direction (clockwise works well). When both groups are twisted, hold them together and let them twist around each other naturally. They will form a neat rope. Knot the other end to secure.
Thread the completed cord through the eyelet round, starting and ending at center front.
Making the Tassels
Wrap Color B yarn around your 4-inch cardboard about 30 times. Slide a short piece of yarn under the wraps at the top and tie tightly. Cut the loops at the bottom.
About half an inch from the top, wrap another piece of yarn tightly around the tassel several times and tie off. This creates the tassel head.
Trim the ends evenly. Thread the silver bead onto the top tie before attaching to the drawstring ends.
Attaching the Handle
For the twisted rope handle shown in the photo, you can purchase a premade macrame cord handle or create one using the same technique as the drawstring but with many more strands and longer length.
Attach the handle ends to the top lace band using small metal rings or by sewing securely with matching yarn.
Attaching the Lace Medallion
Pin the medallion to the front of the bag, centering it over the color change between charcoal and silver. The bottom of the medallion should overlap slightly onto the charcoal section.
Using Color B and a tapestry needle, whip stitch around the outer edge of the medallion. Work through just the back loops of the medallion edge so your stitches stay invisible from the front.
Finishing Your Crochet Bucket Bag
Weave in all ends securely. For a bag that will carry weight, I recommend weaving each end through at least 2 inches of stitches and doubling back.
Consider adding a fabric lining to prevent items from poking through the lace sections. A simple drawstring pouch in coordinating fabric works perfectly.
Block the lace medallion before attaching if you want extra crisp definition in the lacework. Wet blocking works best for cotton yarn.
Care Instructions
Hand wash in cool water with mild detergent. Reshape while damp and lay flat to dry. The dense single crochet base holds up well to regular use, but avoid overloading to maintain the bag shape.
Thank you so much for choosing this pattern for your next project. I genuinely hope you enjoy making this elegant bucket bag as much as I enjoyed designing it. The combination of textures and techniques makes this one of those projects you will be proud to carry everywhere.
I would absolutely love to see your finished bags. Tag me on Instagram or share your photos in my Facebook group. Seeing your color combinations and personal touches is honestly the best part of sharing patterns. Happy crocheting, friend.
