Well, this might just be the most adorable bathroom accessory you will ever crochet. This mini sofa toilet paper cozy turns an ordinary toilet paper roll into the cutest little guest, lounging on its very own armchair. Complete with tufted bobble details on the backrest, rolled armrests, and playful dangling legs with pompom feet, this project is equal parts functional and hilarious.
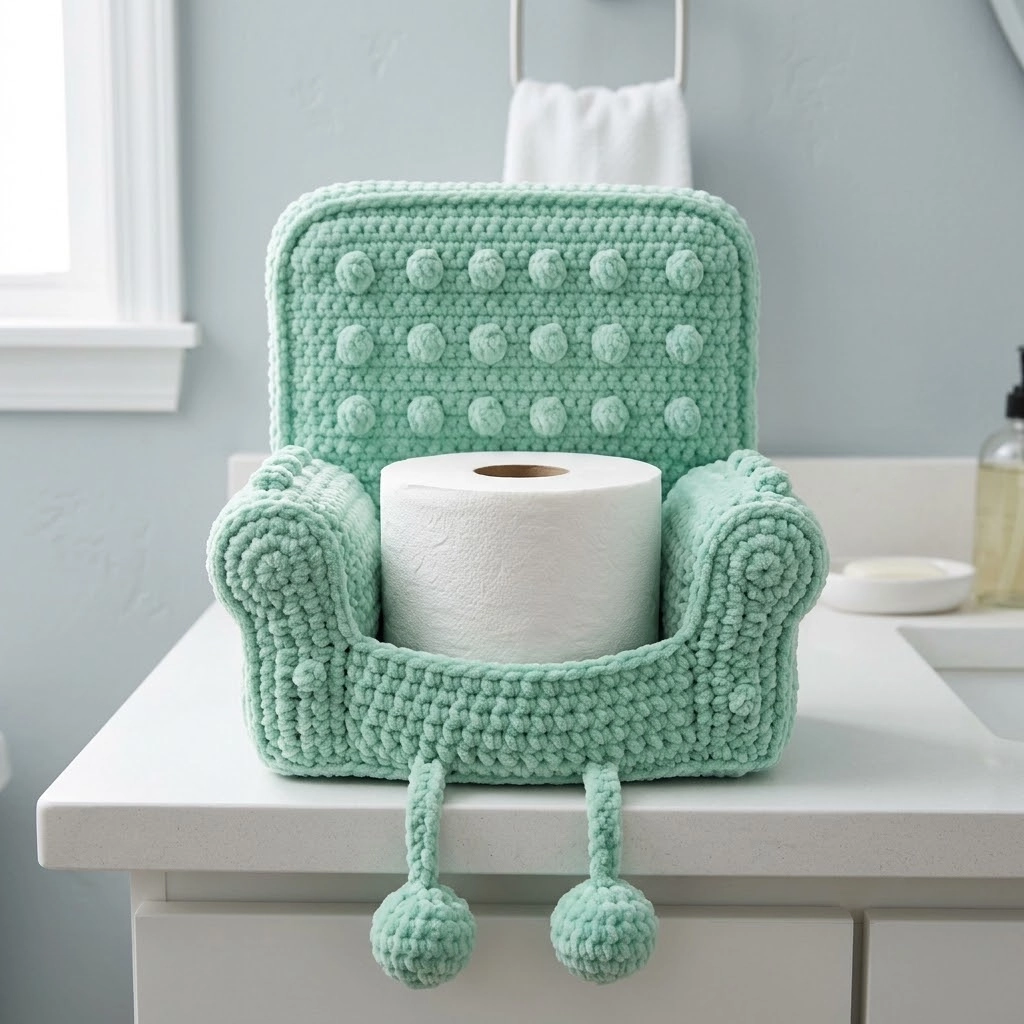
I designed this crochet pattern to fit a standard toilet paper roll perfectly. The construction is simpler than it looks. If you can crochet a rectangle and work basic shaping, you can absolutely make this. The bobble stitches create that tufted upholstery look, and the rolled armrests are just spirals sewn into place. Trust me, this is an intermediate project that any confident beginner can tackle.
Let me walk you through everything you need to recreate this mint green mini sofa crochet pattern from start to finish.
Why This Toilet Paper Cozy Pattern Works So Well
Bathroom decor can feel boring. This little sofa changes that instantly. Guests will laugh. You will smile every time you see it. And honestly, crocheting something this whimsical is just plain fun.
The chunky chenille yarn makes this project work up fast. We are talking a weekend project, maybe less. The soft velvety texture gives the sofa that plush furniture look without any complicated techniques.
This step by step crochet tutorial includes every piece you need: the seat base, backrest with bobbles, two armrests, two dangling legs, and two pompom feet. Each section is worked separately and then assembled. No confusing construction here.
Materials You Will Need
Gather these supplies before you start:
Yarn:
- Bernat Blanket yarn or similar super bulky chenille yarn (weight 6)
- Color: Mint or light seafoam green
- Approximately 200 yards total
Hook:
- 8mm (US L/11) crochet hook
Notions:
- Yarn needle for seaming
- Scissors
- Polyester fiberfill stuffing
- Stitch markers (optional but helpful)
Gauge:
- 9 stitches and 10 rows = 4 inches in single crochet
- Gauge is not critical for this project, but staying close ensures proper fit
Abbreviations and Stitch Definitions
Let me define every stitch before we begin. I want you to feel confident with each term.
ch = chain. Wrap yarn over hook, pull through loop. This creates your foundation.
sl st = slip stitch. Insert hook, yarn over, pull through both loops at once. Used for joining and invisible movement.
sc = single crochet. Insert hook, yarn over, pull up a loop (2 loops on hook), yarn over, pull through both loops. Your basic building block stitch.
hdc = half double crochet. Yarn over, insert hook, pull up a loop (3 loops on hook), yarn over, pull through all 3 loops. Slightly taller than sc.
dc = double crochet. Yarn over, insert hook, pull up a loop, yarn over, pull through 2 loops, yarn over, pull through remaining 2 loops. Creates height quickly.
bob = bobble stitch. Work 5 dc into the same stitch but do not complete the final yarn over on each dc. You will have 6 loops on your hook. Yarn over and pull through all 6 loops at once. This creates a puffy dimensional ball that pops to the front.
inc = increase. Work 2 stitches into one stitch.
dec = decrease. Work 2 stitches together as one. For sc, insert hook in first stitch, pull up loop, insert hook in second stitch, pull up loop, yarn over, pull through all 3 loops.
Finished Dimensions
The completed mini sofa measures approximately:
- Width: 7 inches across the armrests
- Depth: 5 inches from front to back
- Height: 7 inches from seat to top of backrest
- Leg length: 4 inches including pompom
This fits a standard US toilet paper roll perfectly.
The Pattern: How to Crochet the Mini Sofa Toilet Paper Cozy
Seat Base
The seat is a simple rectangular basket that holds the toilet paper roll. We work this in continuous rounds.
Round 1: Ch 12. Sc in 2nd ch from hook and in next 9 ch. Work 3 sc in last ch (this is the turn). Continue along opposite side of foundation chain, sc in next 9 sts. Work 2 sc in last st. Do not join. Place marker. (24 sts)
Round 2: Sc in each st around, working 2 sc in corner stitches (the center stitch of each 3-sc group from previous round). (28 sts)
Round 3: Sc in each st around. (28 sts)
Rounds 4 through 8: Repeat Round 3. Work even in sc for 5 more rounds. (28 sts)
Round 9: Sc in back loops only around entire round. This creates a defined edge where the sides meet the base. (28 sts)
Rounds 10 through 14: Sc in both loops around for 5 rounds. (28 sts)
Fasten off and weave in ends. Set aside.
Backrest Panel with Bobble Tufting
This is where the magic happens. The bobble stitches create that tufted upholstery look. Work this piece flat in rows.
Row 1: Ch 16. Sc in 2nd ch from hook and in each ch across. Ch 1, turn. (15 sts)
Row 2: Sc in each st across. Ch 1, turn. (15 sts)
Row 3: Sc in first 2 sts, *bob in next st, sc in next 2 sts* repeat across. Ch 1, turn. (15 sts, 4 bobbles)
Row 4: Sc in each st across, working into the top of each bobble. Ch 1, turn. (15 sts)
Row 5: Sc in each st across. Ch 1, turn. (15 sts)
Row 6: Sc in first st, *bob in next st, sc in next 2 sts* repeat to last 2 sts, bob in next st, sc in last st. Ch 1, turn. (15 sts, 5 bobbles)
Note how the bobbles in Row 6 are offset from Row 3. This creates a staggered tufted pattern.
Row 7: Sc in each st across. Ch 1, turn. (15 sts)
Row 8: Sc in each st across. Ch 1, turn. (15 sts)
Row 9: Repeat Row 3. (15 sts, 4 bobbles)
Rows 10 through 12: Sc in each st across for 3 rows. (15 sts)
Border: Do not fasten off. Sc evenly around entire backrest panel, working 3 sc in each corner. Sl st to first sc to join.
Fasten off and leave a long tail for sewing.
Armrests (Make 2)
Each armrest is a simple rectangle that you roll into a spiral. So satisfying.
Row 1: Ch 18. Sc in 2nd ch from hook and in each ch across. Ch 1, turn. (17 sts)
Rows 2 through 6: Sc in each st across. Ch 1, turn. (17 sts)
Fasten off and leave a long tail.
To shape the armrest, roll the rectangle tightly from one short end to the other, creating a spiral roll. Use your yarn tail to whip stitch the roll closed so it holds its shape. The spiral end should face outward when attached to the sofa.
Legs (Make 2)
These dangling legs add so much personality. Work in continuous rounds.
Round 1: Magic ring. Work 6 sc into ring. Pull tight. Do not join. (6 sts)
Round 2: Inc in each st around. (12 sts)
Rounds 3 through 12: Sc in each st around for 10 rounds. (12 sts)
Stuff lightly with fiberfill as you go. The legs should be floppy, not rigid.
Fasten off and leave a long tail for attaching.
Pompom Feet (Make 2)
These little balls finish the legs perfectly.
Round 1: Magic ring. Work 6 sc into ring. (6 sts)
Round 2: Inc in each st around. (12 sts)
Rounds 3 and 4: Sc in each st around. (12 sts)
Round 5: Dec around entire round. (6 sts)
Stuff firmly with fiberfill before closing.
Round 6: Dec around. Pull tight and fasten off.
Leave a tail to sew onto leg bottoms.
Assembly Instructions
Now we put this adorable sofa together. Take your time here.
Step 1: Position the backrest panel against the back inside edge of the seat base. The bobbles should face forward. Whip stitch securely along the bottom and sides of the backrest to attach.
Step 2: Attach one armrest to each side of the seat. Position the spiral end facing outward. Sew along the inner edge where the armrest meets the seat and backrest.
Step 3: Sew one pompom foot to the bottom of each leg.
Step 4: Attach both legs to the front bottom edge of the seat base. Space them evenly. The legs should dangle freely over the edge of your countertop or shelf.
Step 5: Weave in all remaining ends. Place a toilet paper roll in the seat. Admire your work.
Tips for Success with This Crochet Pattern
Yarn choice matters. Chenille yarn gives that plush furniture look. Acrylic worsted would work but look different. Stick with super bulky chenille for best results.
Bobble tips: Push each bobble to the front (right side) of your work as you complete it. They naturally want to pop forward, but give them a little nudge.
Armrest rolling: Roll tightly for a neat spiral. Loose rolling makes floppy armrests.
Leg stuffing: Less is more. You want these floppy and dangly, not stiff.
Make It Your Own
Try different colors for different bathroom themes. A blush pink sofa would be gorgeous. Navy blue feels sophisticated. You could even stripe the backrest or add a contrasting border.
For extra detail, embroider tiny buttons onto the bobbles using a scrap of contrasting yarn.
Final Thoughts on This Toilet Paper Cozy Crochet Pattern
This mini sofa toilet paper cozy crochet pattern is one of those projects that brings pure joy. Every single person who sees it will smile. It is functional, funny, and a great conversation starter.
I hope this crochet tutorial gave you everything you need to create your own little lounging toilet paper roll. The step by step instructions should make the construction clear, even if you have never worked bobble stitches before.
Thank you so much for choosing this pattern. I genuinely appreciate you being here. If you make this sofa, I would absolutely love to see it. Tag me on Instagram or share a photo in my Facebook group. Nothing makes my day like seeing your finished projects.
Happy crocheting, friend. Now go give that toilet paper roll the throne it deserves.
