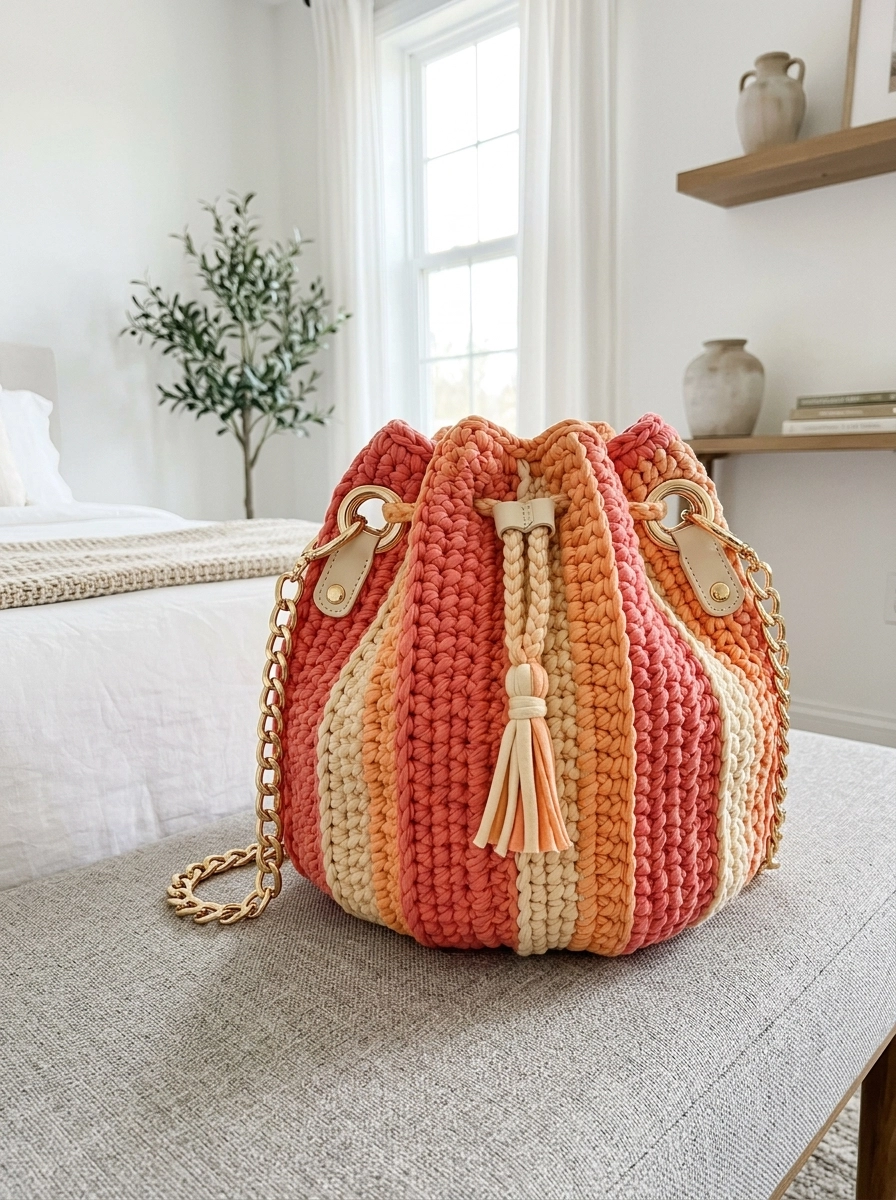
This stunning drawstring bucket bag is about to become your new favorite accessory. With its warm coral, peach, orange, and cream vertical stripes, chunky gold chain hardware, and elegant tassel closure, this bag looks like something straight from a boutique window. But here is the best part. You made it yourself.
I designed this crochet pattern to work up quickly using thick t-shirt yarn and simple stitches. If you can single crochet and work basic increases, you have everything you need. The vertical colorwork looks intricate, but I will walk you through every step. By the end of this tutorial, you will have a professional-looking bucket bag perfect for summer outings, farmers markets, or everyday errands.
Let me show you exactly how to crochet this gorgeous bag from start to finish.
Why You Will Love This Crochet Bucket Bag Pattern
This crochet bucket bag hits all the right notes. The construction is surprisingly straightforward. You start with a flat circular base, work up the sides in the round, and finish with a simple drawstring channel. The vertical stripes create that eye-catching pumpkin-like silhouette without any complicated colorwork techniques.
The t-shirt yarn makes this project work up fast. Most crocheters finish the entire bag in a weekend. And because the yarn is thick and squishy, the fabric has beautiful structure without needing a lining.
I especially love how the hardware elevates this piece. The gold chain strap, metal grommets, and leather tabs transform a handmade crochet project into something that looks designer. Trust me, people will ask where you bought it.
Materials and Tools Needed
Gather everything before you start. Nothing slows down a project like stopping mid-row to hunt for supplies.
Yarn
T-shirt yarn (also called trapillo or ribbon yarn) in four colors:
- Coral pink: approximately 150 grams
- Peach/salmon: approximately 100 grams
- Light orange: approximately 100 grams
- Cream/off-white: approximately 100 grams
T-shirt yarn typically comes in 100-gram skeins with roughly 100 yards each. This yarn weight is sometimes labeled as super bulky or jumbo. Look for yarn with consistent width throughout the skein for the neatest results.
Substitution tip: You can use any super bulky cotton yarn or even hold two strands of worsted weight cotton together. Just make sure to swatch first.
Hook
10mm crochet hook (US size N/15)
If your stitches feel tight or the fabric seems stiff, size up to a 12mm hook. T-shirt yarn works best with a relaxed gauge.
Hardware and Notions
- 2 large gold metal grommets (approximately 25mm inner diameter)
- 2 leather or faux leather connector tabs with rivets
- 1 gold chunky chain strap (approximately 45 inches long)
- 2 lobster claw clasps or jump rings for chain attachment
- Stitch marker
- Yarn needle with large eye
- Scissors
Optional
- Fabric lining and sewing supplies
- Magnetic snap closure
Finished Dimensions
Height: approximately 10 inches (not including strap)
Width at widest point: approximately 11 inches
Base diameter: approximately 7 inches
Skill Level
Confident Beginner to Intermediate
You should be comfortable with:
- Working in continuous rounds
- Basic increases
- Changing colors
- Counting stitches
If any of those make you nervous, take a breath. I explain everything as we go.
Abbreviations and Stitch Definitions
Let me define every stitch before we begin. Reference this section anytime you need a refresher.
Ch = Chain. Wrap yarn over hook, pull through loop on hook. This creates the foundation for most crochet projects.
Sl st = Slip stitch. Insert hook into stitch, yarn over, pull through both the stitch and the loop on your hook in one motion. Used for joining and invisible movement across stitches.
Sc = Single crochet. Insert hook into stitch, yarn over and pull up a loop (two loops on hook), yarn over and pull through both loops. This creates a short, dense stitch.
Inc = Increase. Work two single crochet stitches into the same stitch. This adds one stitch to your total count.
BLO = Back loop only. Instead of inserting your hook under both loops at the top of a stitch, insert it under only the back loop (the one farthest from you). This creates a ribbed texture.
St(s) = Stitch(es)
Gauge
8 sc x 8 rows = 4 inches in single crochet with t-shirt yarn and 10mm hook
Gauge matters for this project because you want the bag to hold its shape and match the finished dimensions. If your swatch is too small, try a larger hook. Too big? Go down a hook size.
Pattern Notes Before You Begin
Read this section completely. It will save you confusion later.
This bag is worked in continuous rounds. You do not join at the end of each round. Instead, you spiral upward. Use a stitch marker to track the beginning of each round. Move it up as you go.
Color changes happen vertically. Each color section is worked separately within the same round. I will explain exactly how to carry and twist your yarns as you work.
The body uses the waistcoat stitch technique. This is simply single crochet worked into the center V of each stitch rather than under the top loops. It creates the beautiful knit-like appearance you see in the photos.
Do not fasten off colors between rounds until instructed. You will carry unused colors up the inside of the bag.
Step-by-Step Crochet Pattern
Part 1: The Circular Base
You will work the base in one color (I used coral) using the magic ring method.
Round 1: Using coral yarn, create a magic ring. Ch 1 (does not count as a stitch), work 6 sc into the ring. Pull ring closed. Place marker. (6 sts)
Round 2: Inc in each st around. (12 sts)
Round 3: *Sc 1, inc* repeat around. (18 sts)
Round 4: *Sc 2, inc* repeat around. (24 sts)
Round 5: *Sc 3, inc* repeat around. (30 sts)
Round 6: *Sc 4, inc* repeat around. (36 sts)
Round 7: *Sc 5, inc* repeat around. (42 sts)
Round 8: *Sc 6, inc* repeat around. (48 sts)
Round 9: *Sc 7, inc* repeat around. (54 sts)
Round 10: *Sc 8, inc* repeat around. (60 sts)
Round 11: *Sc 9, inc* repeat around. (66 sts)
Round 12: *Sc 10, inc* repeat around. (72 sts)
Your base should measure approximately 7 inches across. If it is curling or cupping, your tension might be too tight. Try relaxing your grip.
Do not fasten off.
Part 2: Building the Sides with Vertical Stripes
Now comes the fun part. You will create 8 vertical stripe sections using all four colors. Each section spans 9 stitches.
Setting up the color sections:
Looking at your base, you will divide the 72 stitches into 8 sections of 9 stitches each. The color sequence repeats around: coral, cream, orange, peach, coral, cream, orange, peach.
Here is how to manage multiple colors:
When you reach a color change point, drop the current yarn to the inside of the bag. Pick up the next color and continue. At the end of each round, twist the first and last color together to prevent holes.
Transition Round (Round 13): Working in BLO only, sc around with color pattern established. This back loop round creates a defined edge between base and sides. (72 sts)
Rounds 14 through 35: Continue in sc through the center V of each stitch (waistcoat stitch), maintaining your established color sections. Each round should have 72 sts total, with 9 sts per color section.
Shaping tip: Around rounds 20 to 25, the bag naturally curves inward slightly due to the nature of t-shirt yarn. If you want more dramatic shaping, skip one increase in each color section on round 22.
After round 35, your bag body should measure approximately 8 to 9 inches tall from the base edge.
Part 3: Drawstring Channel
Round 36: *Ch 2, skip 2 sts, sc in next 7 sts* repeat around, maintaining colors. The ch-2 spaces create holes for the drawstring. (72 sts total including chains)
Rounds 37 and 38: Sc in each st and ch around in established color pattern. (72 sts)
Round 39: Sl st in each st around in coordinating colors. Fasten off all colors. Weave in ends securely.
Part 4: Creating the Drawstring Cord
Using cream yarn, create a simple twisted cord or crochet chain.
Chain method: Ch 120, or until cord measures approximately 36 inches. Fasten off.
For a thicker cord: Hold two strands together and ch 120.
Thread the cord through the ch-2 spaces created in round 36, weaving in and out alternately around the entire top of the bag.
Part 5: Tassel
Step 1: Cut approximately 20 strands of yarn, each 10 inches long. Mix coral, peach, orange, and cream for a coordinating look.
Step 2: Fold strands in half. Tie a separate strand around the folded top, about 1 inch down from the fold, wrapping several times to create the tassel head.
Step 3: Trim ends evenly.
Step 4: Attach tassel to the center of your drawstring cord using the folded top loop.
Part 6: Adding Hardware
Grommets: Position metal grommets on opposite sides of the bag, approximately 1 inch below the drawstring channel. Follow manufacturer instructions for installation. Most require a setting tool and hammer.
Leather tabs: Attach tabs over grommets using rivets for a polished look.
Chain strap: Connect chain to grommets using jump rings or lobster clasps. Adjust length as desired. Most crossbody lengths range from 42 to 50 inches.
Finishing Touches
Weave in all remaining ends using your yarn needle. For t-shirt yarn, weave through at least 3 to 4 inches of fabric to prevent ends from working loose.
If you want extra structure, add a circular cardboard or plastic canvas insert to the base.
Optional lining provides a smooth interior and hides all your color carries. Simply sew a fabric pouch slightly smaller than your bag dimensions and hand-stitch to the inside edge.
Styling Your Sunset Coral Bucket Bag
This crochet bucket bag looks incredible with summer dresses, linen pants, or casual jeans. The warm coral tones complement neutrals beautifully, but feel bold pairing it with other bright colors too.
Wear it crossbody for hands-free convenience or shorten the chain for a shoulder bag look. The structured shape keeps essentials organized while the soft fabric stays comfortable against your body.
Troubleshooting Common Issues
Bag looks floppy: Your gauge may be too loose. Try blocking the finished bag or adding a fabric lining for structure.
Color changes look messy: Make sure you are twisting yarns at each color junction to close gaps. Practice on a swatch first.
Base is cupping: Your tension is too tight. Relax your grip or size up your hook.
Uneven stripes: Count every round. Using a row counter helps enormously with this pattern.
Final Thoughts on This Crochet Pattern
I hope this Sunset Coral Drawstring Bucket Bag crochet pattern brings you as much joy to make as it brought me to design. There is something so satisfying about creating a truly wearable, functional accessory with your own hands.
The techniques you learned here work for all kinds of projects. Try different color combinations for a completely different vibe. Navy and white stripes for a nautical look. Earth tones for fall. Pastels for spring. The possibilities are endless.
Thank you for trusting me with your crafting time. It genuinely means so much.
I would absolutely love to see your finished bucket bag. Tag me on Instagram or share your photos in our Facebook group. Seeing your creations is the highlight of my week.
Now go grab that gorgeous yarn and get hooking. You have a stunning new bag waiting to happen.
Happy crocheting, friend.
*Pin this crochet bucket bag pattern for later and share with your crafty friends who need a new summer project.*
