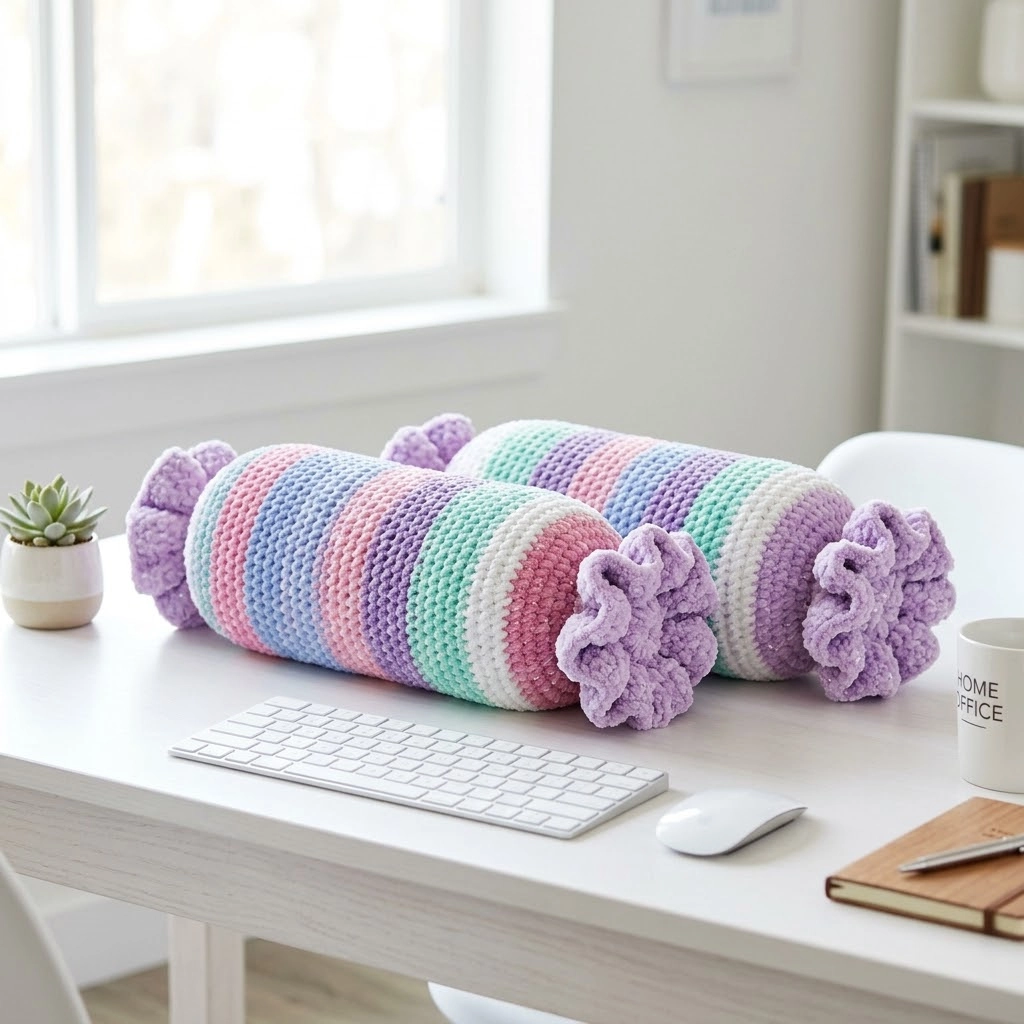
These adorable striped bolster pillows look like something straight out of a candy shop. I absolutely love how the pastel rainbow stripes give them that whimsical unicorn vibe, and those fluffy ruffled ends? Pure magic. If you have been looking for a crochet pattern that creates something both decorative and functional, this is your project.
The good news is this crochet tutorial uses only basic stitches worked in the round. If you can single crochet and change colors, you can make these pillows. The construction is straightforward. You are essentially crocheting a tube, stuffing it, and adding those gorgeous ruffled flower-like ends. I will walk you through every step.
Why You Will Love This Crochet Pattern
This bolster pillow pattern hits that sweet spot between simple and impressive. The finished pillows look complicated with their candy-stripe bodies and dimensional ruffled ends. But the actual stitching? Repetitive rounds of single crochet that you can do while watching your favorite show.
The striped body uses a basic color change technique. Nothing tricky. The ruffled ends are worked separately and sewn on. They look like fluffy flowers or decorative rosettes. The texture comes from working increases into a chenille or velvet yarn, which naturally creates that gathered, plush effect.
You can make these in different sizes too. The image shows what appears to be two sizes. A larger bolster and a smaller one. Same technique, just different dimensions. Perfect for mixing and matching on a bed, couch, or even your home office desk.
Materials Needed
Yarn
For the striped body:
- Worsted weight yarn (weight 4) in 5 to 6 pastel colors
- Suggested colors: soft pink, lavender, mint green, light blue, cream or white, coral pink
- Approximately 200 to 300 yards total for the larger pillow
- Approximately 100 to 150 yards total for the smaller pillow
For the ruffled ends:
- Chenille or velvet yarn (weight 5 bulky) in purple or lavender
- Approximately 75 to 100 yards per pillow
I recommend using a soft acrylic like Red Heart Super Saver, Caron Simply Soft, or similar for the body. For the ruffled ends, something like Bernat Velvet or Baby Blanket Sparkle creates that plush, gathered texture you see in the image.
Hook
- 5.0mm (H/8) crochet hook for the worsted weight body
- 6.0mm (J/10) crochet hook for the chenille ruffled ends
Notions
- Polyester fiberfill stuffing
- Yarn needle for weaving ends and seaming
- Stitch marker
- Scissors
- Optional: bolster pillow form insert if you prefer not to hand stuff
Finished Dimensions
Large bolster: Approximately 16 inches long by 5 inches diameter
Small bolster: Approximately 10 inches long by 3.5 inches diameter
These measurements are approximate based on what I observe in the image. Your gauge and stuffing firmness will affect final size.
Gauge
14 single crochet stitches and 16 rows = 4 inches in single crochet worked in continuous rounds
Gauge is not critical for this project since it is a pillow, but matching approximately will help your yarn quantities work out.
Skill Level
Beginner to Easy Intermediate
You need to know how to:
- Chain
- Single crochet
- Work in continuous rounds
- Change colors
- Increase stitches
- Sew pieces together
If you are new to working in the round, do not worry. I will explain the technique clearly below.
Abbreviations and Stitch Definitions
Let me define every stitch term before we begin so there is no confusion.
ch = chain: Yarn over, pull through the loop on your hook. This creates a foundation chain.
sc = single crochet: Insert hook into stitch, yarn over and pull up a loop (2 loops on hook), yarn over and pull through both loops.
inc = increase: Work 2 single crochet stitches into the same stitch. This adds one stitch to your count.
sl st = slip stitch: Insert hook into stitch, yarn over and pull through both the stitch and the loop on your hook in one motion.
st(s) = stitch(es)
rnd = round
How to Crochet the Unicorn Dream Candy Bolster Pillow
This step by step crochet pattern is broken into three parts: the striped body tube, the ruffled ends, and assembly.
Part One: Striped Body Tube
The body is worked in continuous rounds of single crochet. This means you do not join at the end of each round. You just keep spiraling. Use a stitch marker to track your first stitch of each round.
Starting Circle (worked in your first stripe color)
Rnd 1: Using a magic ring (or ch 2 and work into second chain from hook), work 6 sc into the ring. Pull tight. Place stitch marker in first sc. (6 sts)
Rnd 2: Inc in each st around. (12 sts)
Rnd 3: *Sc in next st, inc in next st* repeat around. (18 sts)
Rnd 4: *Sc in next 2 sts, inc in next st* repeat around. (24 sts)
Rnd 5: *Sc in next 3 sts, inc in next st* repeat around. (30 sts)
Rnd 6: *Sc in next 4 sts, inc in next st* repeat around. (36 sts)
Rnd 7: *Sc in next 5 sts, inc in next st* repeat around. (42 sts)
Rnd 8: *Sc in next 6 sts, inc in next st* repeat around. (48 sts)
For the smaller pillow, stop increasing at Round 6 with 36 stitches. For the larger pillow, continue to Round 8 with 48 stitches.
Your starting circle should lay flat like a coaster. If it is cupping or ruffling, adjust your tension.
Tube Section (continuous rounds, no increases)
Now you will work straight rounds without any increases. This creates the cylindrical tube shape.
For larger pillow: Sc in each st around for approximately 80 to 90 rounds total, changing colors every 8 to 10 rounds to create the stripe pattern. (48 sts per round)
For smaller pillow: Sc in each st around for approximately 50 to 60 rounds total, changing colors every 6 to 8 rounds. (36 sts per round)
Color Change Technique
When you are ready to switch colors, work your last single crochet stitch until you have 2 loops on your hook. Drop the old color. Yarn over with your new color and pull through both loops. Continue crocheting with the new color.
Do not cut your yarn after each stripe if you plan to use that color again. Instead, carry it loosely up the inside of the tube. This saves time and creates fewer ends to weave in.
Suggested Stripe Sequence
Based on the image, here is an approximate stripe order that creates that candy-like effect:
1. Pink
2. Lavender
3. Mint green
4. Cream
5. Light blue
6. Coral pink
7. Repeat from pink
Feel free to customize your colors. The magic is in choosing soft pastels that blend harmoniously.
Closing the Tube
When your tube reaches your desired length, you will close the second end using decreases. But first, stuff your pillow.
Stuffing tip: Add fiberfill gradually, pushing it toward the closed starting end. Pack it firmly but not so tight that stitches gap open.
Rnd 1 of closing: *Sc in next 5 sts, sc2tog (insert hook in next st, pull up loop, insert hook in following st, pull up loop, yarn over and pull through all 3 loops)* repeat around. (For 48 sts, you will have 42 sts remaining)
Rnd 2: *Sc in next 4 sts, sc2tog* repeat around. (36 sts)
Rnd 3: *Sc in next 3 sts, sc2tog* repeat around. (30 sts)
Continue adding stuffing as you decrease.
Rnd 4: *Sc in next 2 sts, sc2tog* repeat around. (24 sts)
Rnd 5: *Sc in next st, sc2tog* repeat around. (18 sts)
Rnd 6: Sc2tog around. (9 sts)
Rnd 7: Sc2tog around until hole closes, or thread yarn through remaining stitches and pull tight.
Fasten off and weave in ends.
Part Two: Ruffled Ends (Make 4 total, 2 per pillow)
These fluffy purple rosettes are what make this bolster pillow look like a wrapped candy. The chenille yarn creates natural dimension as you work increases rapidly.
Switch to your 6.0mm hook and chenille yarn.
Rnd 1: Magic ring, 6 sc into ring. (6 sts)
Rnd 2: Inc in each st around. (12 sts)
Rnd 3: *Sc, inc* repeat around. (18 sts)
Rnd 4: *Sc in next st, inc in next 2 sts* repeat around. (30 sts)
Rnd 5: Inc in every st around. (60 sts)
Rnd 6: *Sc in next st, inc in next st* repeat around. (90 sts)
The rapid increases cause the fabric to ruffle and gather. This is intentional. The chenille yarn adds weight and plushness, creating those dimensional petal-like folds.
Fasten off, leaving a long tail for sewing.
Part Three: Assembly
1. Position a ruffled end over one end of your stuffed bolster tube. The center of the ruffle should sit directly over the closed end.
2. Pin or hold in place. Using your yarn needle and the long tail, whip stitch the inner edge of the ruffle to the pillow body. Work all the way around.
3. Repeat for the second end of the pillow.
4. Weave in all remaining ends securely.
Your bolster pillow is complete.
Tips for Success
Working in continuous rounds can be tricky at first. Your stitch marker is your best friend. Move it up every round to always know where you started.
Chenille yarn can be slippery. Work slowly and deliberately on the ruffled ends. The texture hides minor imperfections beautifully.
Stuffing matters. A firmly stuffed bolster holds its shape better. If you prefer a softer pillow, stuff more loosely.
Color planning: Lay out your yarn before starting. Seeing the colors together helps you plan a pleasing sequence.
Customization Ideas
This crochet pattern is wonderfully versatile. Here are some variations to try:
- Solid body with contrasting ruffles for a more minimalist look
- Variegated yarn for automatic color changes without cutting yarn
- Larger diameter by continuing increases in the starting circle
- Neck roll size by making a very thin, long tube
- Different ruffle colors for each end
Caring for Your Finished Pillow
Spot clean with mild detergent and cool water. If you used machine washable yarn, you can wash on a gentle cycle inside a pillowcase. Reshape while damp and air dry flat.
Final Thoughts on This Bolster Pillow Crochet Pattern
I hope this step by step tutorial gives you everything you need to create your own Unicorn Dream Candy Bolster Pillow. These pillows are such a satisfying make. The stripes grow quickly, the color changes keep things interesting, and those ruffled ends provide the perfect finishing touch.
They make wonderful gifts for kids and adults alike. Use them as decorative accents on a bed, toss them on a reading chair, or display them on your desk like the image shows. They bring instant cheer to any space.
Thank you so much for choosing this pattern for your next crochet project. I truly appreciate you being here.
If you make this pillow, I would absolutely love to see it. Tag me on Instagram or share a photo in our Facebook group. Seeing your finished projects is honestly my favorite part of creating these patterns.
Happy crocheting, and enjoy your beautiful new bolster pillows.
