I have been obsessed with making crochet houseplants lately. This sage green monstera plant might be my favorite project yet. It looks stunning on a nightstand, never needs watering, and stays beautiful forever.
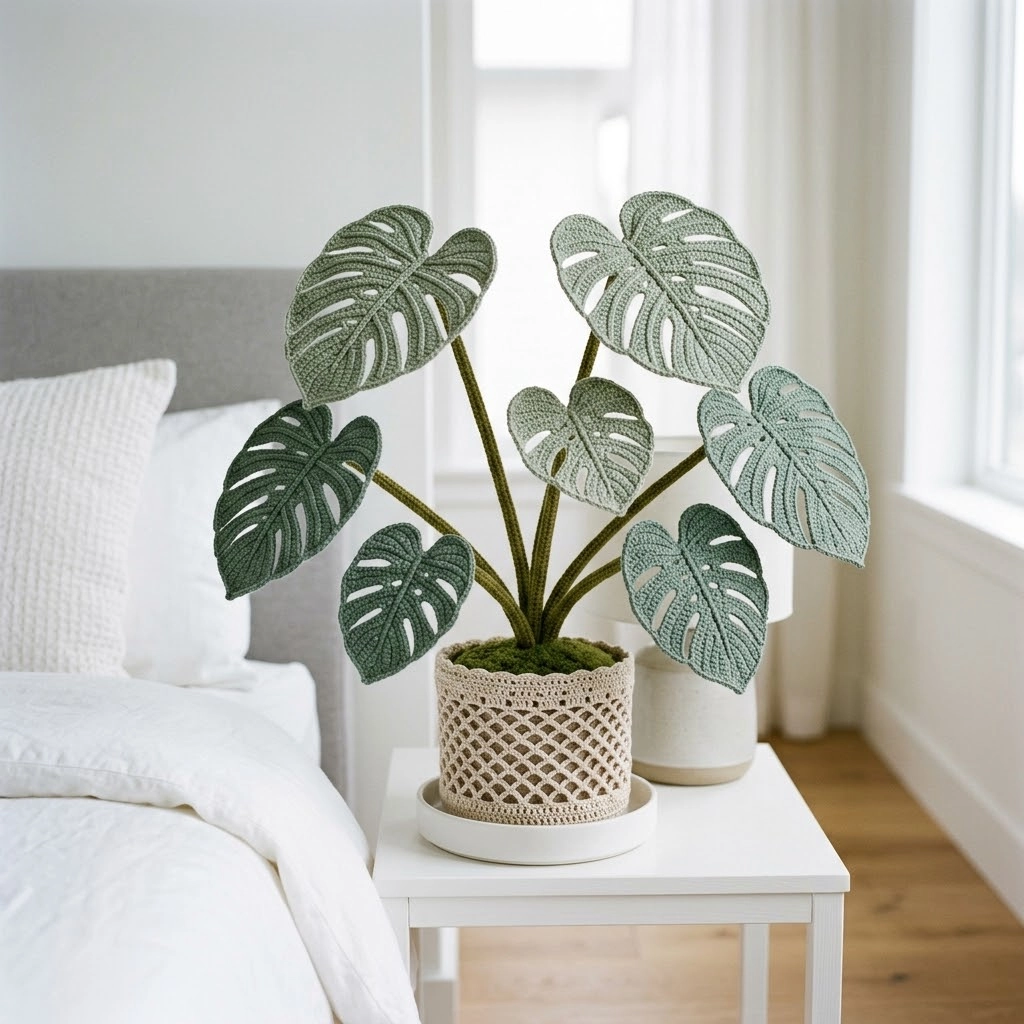
This crochet pattern creates a realistic monstera deliciosa with those iconic split leaves everyone loves. The finished plant stands about 14 inches tall and includes seven leaves in varying sizes and shades of green. You will also make the stems and a decorative pot cover with an openwork lattice design.
Do not let the detailed appearance intimidate you. If you can single crochet and work in rows, you can absolutely make this. I will walk you through every step.
Why You Will Love This Crochet Monstera Pattern
Real monstera plants are gorgeous but demanding. They need specific light, consistent watering, and the right humidity. This crocheted version gives you all the beauty with zero maintenance.
The sage green color palette feels modern and calming. I used three shades of green for the leaves. This creates depth and visual interest, just like a real plant with leaves at different stages of growth.
This crochet tutorial works perfectly for:
- Plant lovers who struggle to keep things alive
- Anyone wanting handmade home decor
- Crafters looking for a satisfying long term project
- Gift makers wanting something truly unique
The lattice pot cover adds an extra special touch. It has a boho macrame vibe that elevates the whole piece.
Materials Needed for Your Crochet Monstera
Gather these supplies before you start. Having everything ready makes the process so much smoother.
Yarn:
- Worsted weight cotton yarn in dark forest green, 150 yards
- Worsted weight cotton yarn in medium sage green, 150 yards
- Worsted weight cotton yarn in light sage green, 100 yards
- Worsted weight cotton yarn in olive green for stems, 80 yards
- Worsted weight cotton yarn in cream or natural for pot cover, 120 yards
- Small amount of dark olive or moss green for pot soil topper
I recommend cotton yarn for this project. It holds the leaf shapes better than acrylic and gives a more natural matte finish. Lion Brand 24/7 Cotton or Paintbox Cotton DK work beautifully.
Tools:
- 4.0mm crochet hook (G/6) for leaves and stems
- 3.5mm crochet hook (E/4) for pot cover
- Tapestry needle
- Scissors
- Floral wire, 18 gauge, for leaf and stem structure
- Wire cutters
- Green floral tape
- Small plastic pot or container, approximately 4 inches diameter
- Polyester fiberfill stuffing
- Stitch markers
Optional but helpful:
- Fabric stiffener spray for extra leaf structure
- Hot glue gun for assembly
Stitch Abbreviations and Definitions
Let me explain every stitch you will use. Even if you know these, a quick refresher never hurts.
Ch = Chain. Wrap yarn over hook, pull through loop on hook. This creates the foundation for most crochet work.
Sl st = Slip stitch. Insert hook, yarn over, pull through stitch and loop on hook in one motion. Used for joining and moving across stitches without adding height.
Sc = Single crochet. Insert hook into stitch, yarn over, pull up a loop (two loops on hook), yarn over, pull through both loops. The shortest and most basic stitch.
Hdc = Half double crochet. Yarn over, insert hook, yarn over, pull up loop (three loops on hook), yarn over, pull through all three loops. Slightly taller than single crochet.
Dc = Double crochet. Yarn over, insert hook, yarn over, pull up loop, yarn over, pull through two loops, yarn over, pull through remaining two loops. Creates a taller stitch with nice drape.
Inc = Increase. Work two stitches into the same stitch. This makes your piece wider.
Dec = Decrease. Work two stitches together as one. For sc dec: insert hook in first stitch, pull up loop, insert hook in next stitch, pull up loop (three loops on hook), yarn over, pull through all three.
Ch sp = Chain space. The gap created by a chain in a previous row. You work into this space, not into individual chain stitches.
How to Crochet the Monstera Leaves
Each leaf is worked flat in rows, creating the distinctive heart shape with split sections. The fenestrations (those cool holes and splits) are created by skipping stitches and working separate sections.
I recommend making two leaves in each green shade. This gives you six leaves total, plus one extra small leaf if desired.
Large Monstera Leaf Pattern
Foundation: Ch 25.
Row 1: Sc in 2nd ch from hook and in each ch across. (24 sts)
Row 2: Ch 1, turn. 2 sc in first st, sc in next 10 sts, ch 5, skip 2 sts (this creates first fenestration), sc in next 10 sts, 2 sc in last st. (26 sts, 1 ch sp)
Row 3: Ch 1, turn. 2 sc in first st, sc in next 11 sts, 5 sc in ch sp, sc in next 11 sts, 2 sc in last st. (33 sts)
Row 4: Ch 1, turn. Sc in each st across. (33 sts)
Row 5: Ch 1, turn. 2 sc in first st, sc in next 7 sts, ch 4, skip 2 sts, sc in next 5 sts, ch 4, skip 2 sts, sc in next 5 sts, ch 4, skip 2 sts, sc in next 7 sts, 2 sc in last st. (29 sts, 3 ch sps)
Row 6: Ch 1, turn. 2 sc in first st, sc in next 8 sts, 4 sc in ch sp, sc in next 5 sts, 4 sc in ch sp, sc in next 5 sts, 4 sc in ch sp, sc in next 8 sts, 2 sc in last st. (43 sts)
Rows 7 through 10: Ch 1, turn. Sc in each st across, working 2 sc in first and last sts of each row. You should have approximately 51 sts after Row 10.
Creating the split sections:
Row 11 (Right lobe): Ch 1, turn. Sc in first 15 sts only. Leave remaining sts unworked.
Rows 12 through 14: Ch 1, turn. Sc dec over first 2 sts, sc across to last 2 sts, sc dec. Continue decreasing until you have 7 sts.
Row 15: Ch 1, turn. Sc dec, sc in next 3 sts, sc dec. (5 sts)
Row 16: Ch 1, turn. Sc dec, sc 1, sc dec. (3 sts)
Fasten off.
Row 11 (Left lobe): Skip center 21 sts. Join yarn in next st with sl st. Ch 1, sc in same st and in remaining 15 sts. (15 sts)
Repeat Rows 12 through 16 to mirror the right lobe.
Edging: Join yarn at base of leaf. Sc evenly around entire leaf edge, working 3 sc in each point and sc dec at inner corners to keep edges smooth. Sl st to first sc. Fasten off.
Medium Monstera Leaf Pattern
Work the same as the large leaf but start with Ch 20 and reduce all stitch counts proportionally. Work only two fenestration holes instead of three.
Small Monstera Leaf Pattern
Foundation: Ch 15.
Row 1: Sc in 2nd ch from hook and each ch across. (14 sts)
Rows 2 through 6: Ch 1, turn. 2 sc in first st, sc across to last st, 2 sc in last st. (24 sts after Row 6)
Rows 7 through 8: Ch 1, turn. Sc in each st across.
Row 9: Begin shaping the split by working only the first 8 sts, then fasten off. Rejoin for remaining 8 sts on opposite side.
Rows 10 through 12: Decrease on both edges until you have a rounded tip.
Work edging as described above.
How to Crochet the Stems
The stems give your monstera structure and height. Each stem attaches to the base of a leaf.
For each stem:
Using olive green yarn and 4.0mm hook:
Round 1: Make a magic ring. 6 sc in ring. Pull tight. Do not join. Work in continuous spiral.
Rounds 2 through 30: Sc in each st around. (6 sts per round)
The length depends on where you want the leaf positioned. Make stems between 25 and 40 rounds for variety. Longer stems go in the center, shorter ones around the edges.
Important: Before closing, insert floral wire cut to stem length plus 3 inches. The extra wire tucks into the pot base later.
Sl st in next st. Fasten off, leaving a long tail for attaching to leaf.
How to Crochet the Pot Cover
This lattice pot cover fits a 4 inch diameter pot. The openwork design has a macrame inspired look.
Using cream yarn and 3.5mm hook:
Base:
Round 1: Make a magic ring. 6 sc in ring. Sl st to first sc to join. (6 sts)
Round 2: Ch 1. 2 sc in each st around. Sl st to join. (12 sts)
Round 3: Ch 1. *Sc in next st, 2 sc in next st.* Repeat around. Sl st to join. (18 sts)
Round 4: Ch 1. *Sc in next 2 sts, 2 sc in next st.* Repeat around. Sl st to join. (24 sts)
Round 5: Ch 1. *Sc in next 3 sts, 2 sc in next st.* Repeat around. Sl st to join. (30 sts)
Round 6: Ch 1. *Sc in next 4 sts, 2 sc in next st.* Repeat around. Sl st to join. (36 sts)
Continue increasing until base fits your pot bottom. My pot needed 48 sts total.
Sides with lattice pattern:
Round 1: Ch 1. Sc in back loop only of each st around. Sl st to join. (48 sts) This creates a defined edge where sides begin.
Rounds 2 through 4: Ch 1. Sc in each st around. Sl st to join.
Round 5 (Begin lattice): Ch 5. Skip 2 sts. *Dc in next st, ch 2, skip 2 sts.* Repeat around. Sl st to 3rd ch of beginning ch 5.
Round 6: Sl st into ch sp. Ch 5. *Dc in next ch sp, ch 2.* Repeat around. Sl st to 3rd ch of beginning ch 5.
Rounds 7 through 10: Repeat Round 6.
Round 11: Ch 1. *Sc in dc, 2 sc in ch sp.* Repeat around. Sl st to join.
Round 12: Ch 1. Sc in each st around. Sl st to join. Fasten off.
Soil Topper
This hides where the stems come together and adds realism.
Using moss or dark olive yarn:
Ch 4. Sl st to form ring.
Round 1: 8 sc in ring. Do not join.
Rounds 2 through 8: Work in spiral, increasing 6 sts evenly each round until piece covers your pot opening.
Work a few extra rounds without increasing if needed for a slightly domed shape. Fasten off.
Assembly Instructions
Now comes the satisfying part. Putting everything together.
Step 1: Wrap each wire inside the stems with green floral tape if any wire shows through stitches.
Step 2: Using your tapestry needle and the long tail, whip stitch each stem securely to the center back of its leaf. The wire should extend from the leaf base.
Step 3: Arrange your wired leaf stems in a bundle. Wrap them together with floral tape about 2 inches from the bottom.
Step 4: Place your plastic pot inside the crocheted pot cover. Add stuffing or a weighted object to the bottom for stability.
Step 5: Insert the bundled stem wires into the pot. Bend and arrange wires to spread leaves naturally. Some leaves should arch outward, others reach upward.
Step 6: Place the soil topper over the pot opening, tucking edges inside if needed. You can tack it down with a few stitches or leave it loose.
Step 7: Bend and shape each leaf gently. Real monstera leaves curve and twist slightly. Imperfection looks more natural.
Tips for Success
Wire gauge matters. Too thin and leaves flop. Too thick and they will not bend smoothly. 18 gauge is the sweet spot for this project.
Block your leaves before assembly. Wet them lightly, pin them flat on a blocking board, let them dry completely. This evens out your stitches beautifully.
Vary your greens intentionally. Put the darkest leaves toward the bottom and lighter ones up top. This mimics how real plants grow toward light.
Take breaks. This is not a one sitting project. I made it over about two weeks, a leaf here and there. Enjoy the process.
Final Thoughts on This Crochet Monstera Pattern
Making this monstera plant felt so rewarding. Every time I walk past it on my nightstand, I smile. The sage green tones work perfectly in my bedroom, and guests always do a double take before realizing it is handmade.
This step by step crochet pattern gives you everything needed to create your own everlasting houseplant. Whether you are a beginner ready for a challenge or an experienced crafter wanting a satisfying project, this monstera delivers.
I would absolutely love to see your finished plants. Tag me on Instagram or share in our Facebook group when you complete yours. Seeing your creations honestly makes my whole day.
Thank you so much for choosing this pattern. Happy crocheting, and may your hooks always find the right stitch.
