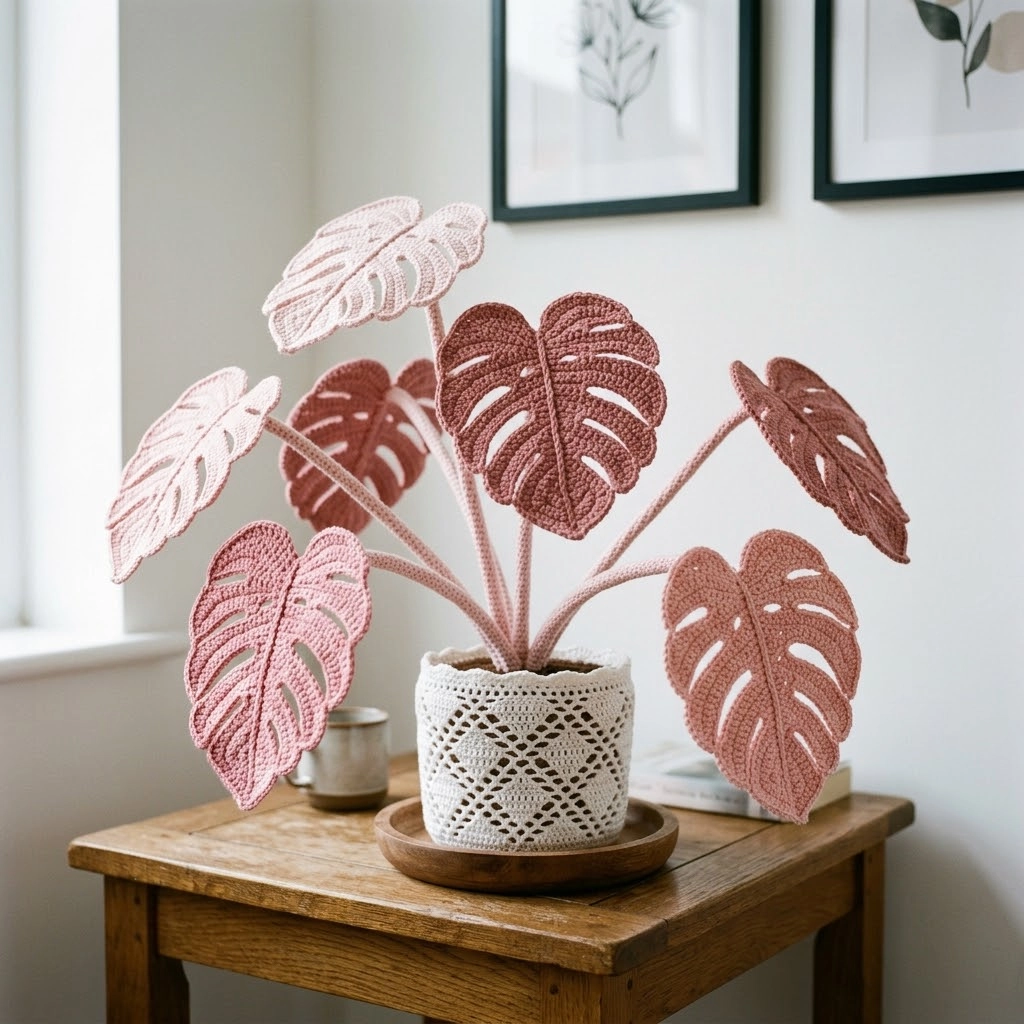
I absolutely love this project, and I think you will too. This crocheted monstera plant brings all the trendy tropical vibes without any of the watering, wilting, or worrying about sunlight. The blush pink color palette takes it from botanical to bohemian, and the lacy pot cover ties everything together beautifully.
This crochet pattern looks impressive, but I promise it is more approachable than it appears. If you can work basic stitches and follow simple shaping, you can make this. The leaves use familiar techniques repeated in a logical way. The stems are just tubes. The pot cover is a straightforward lace pattern. You have got this.
Let me walk you through everything you need to recreate this stunning crochet monstera plant from scratch.
Why You Will Love This Crochet Monstera Pattern
Real monstera plants are gorgeous but demanding. They need specific light, consistent watering, and they attract every pest imaginable. This crocheted version? She just sits there looking beautiful forever.
The blush pink and dusty rose color scheme makes this piece feel modern and intentional. It works in nurseries, bedrooms, offices, or anywhere you want a soft pop of botanical charm without committing to actual plant parenthood.
This project includes:
- Seven crocheted monstera leaves in three sizes
- Matching stems with wire support
- A decorative lacy pot cover
- Assembly instructions for a realistic arrangement
The finished plant stands approximately 14 to 16 inches tall, making it a perfect accent piece for side tables, shelves, or desks.
Materials You Will Need
Gather everything before you start. Nothing derails crochet momentum like hunting for supplies mid-project.
Yarn:
- Worsted weight cotton yarn in blush pink (approximately 150 yards)
- Worsted weight cotton yarn in dusty rose (approximately 200 yards)
- Worsted weight cotton yarn in cream or natural white (approximately 100 yards)
Cotton yarn works best here because it holds structure, shows stitch definition clearly, and does not stretch over time. I recommend something like Lily Sugar’n Cream or similar mercerized cotton for that slight sheen you see in the photos.
Hook:
- 4.0mm (US G/6) crochet hook for leaves and stems
- 3.5mm (US E/4) crochet hook for the lacy pot cover
Notions:
- Floral wire, 18 gauge (for stem support)
- Wire cutters
- Tapestry needle
- Stitch markers
- Small pot or container (approximately 4 inches diameter)
- Floral foam or styrofoam to fit inside pot
- Scissors
Skill Level
Confident beginner to intermediate. You should be comfortable with basic stitches and increasing/decreasing. The leaf shaping involves some turning and working into specific stitches, but I will guide you through every step.
Stitches and Abbreviations
Let me define every stitch before we begin. I will use these abbreviations throughout the pattern, but you will always know exactly what to do.
ch — Chain: Yarn over, pull through the loop on your hook. This creates the foundation for most crochet work.
sl st — Slip stitch: Insert hook, yarn over, pull through both the stitch and the loop on your hook in one motion. Used for joining and moving across stitches invisibly.
sc — Single crochet: Insert hook into stitch, yarn over, pull up a loop (two loops on hook), yarn over, pull through both loops. Your shortest, tightest basic stitch.
hdc — Half double crochet: Yarn over, insert hook into stitch, yarn over, pull up a loop (three loops on hook), yarn over, pull through all three loops. Slightly taller than single crochet.
dc — Double crochet: Yarn over, insert hook into stitch, yarn over, pull up a loop (three loops on hook), yarn over, pull through two loops, yarn over, pull through remaining two loops. A taller stitch that works up faster.
tr — Treble crochet: Yarn over twice, insert hook into stitch, yarn over, pull up a loop (four loops on hook), then yarn over and pull through two loops three times. Your tallest basic stitch.
inc — Increase: Work two stitches into the same stitch. This adds one stitch to your count.
dec — Decrease: Work two stitches together as one. For single crochet decrease, insert hook into first stitch, pull up loop, insert hook into next stitch, pull up loop (three loops on hook), yarn over, pull through all three.
sk — Skip: Pass over the indicated stitch without working into it.
sp — Space: The gap created by chains, typically worked into rather than around.
Gauge
With 4.0mm hook and worsted cotton: 16 sc and 18 rows = 4 inches square.
Gauge matters here because it affects the final leaf size. If your gauge is very different, adjust your hook size. Larger hook equals larger, looser leaves. Smaller hook equals smaller, denser leaves.
The Pattern
Large Monstera Leaf (Make 3)
These are your statement pieces. Make two in dusty rose and one in blush pink for the color variation shown.
Foundation:
Ch 26.
Row 1: Sc in 2nd ch from hook and in each ch across. Turn. (25 sc)
Row 2: Ch 1, sc in each st across. Turn. (25 sc)
Row 3: Ch 1, 2 sc in first st (increase made), sc in next 23 sts, 2 sc in last st. Turn. (27 sc)
Rows 4-5: Ch 1, sc in each st across. Turn. (27 sc)
Row 6: Ch 1, 2 sc in first st, sc in next 25 sts, 2 sc in last st. Turn. (29 sc)
Rows 7-8: Ch 1, sc in each st across. Turn. (29 sc)
Now we create the characteristic monstera holes and splits. This is where the magic happens.
Row 9 (First split row): Ch 1, sc in first 6 sts, ch 5, sk 5 sts (this creates a hole), sc in next 7 sts, ch 5, sk 5 sts, sc in last 6 sts. Turn.
Row 10: Ch 1, sc in first 6 sts, 5 sc in ch-5 sp, sc in next 7 sts, 5 sc in ch-5 sp, sc in last 6 sts. Turn. (29 sc)
Row 11: Ch 1, sc in each st across. Turn. (29 sc)
Row 12: Ch 1, sc dec over first 2 sts, sc in next 25 sts, sc dec over last 2 sts. Turn. (27 sc)
Row 13 (Side split row): Ch 1, sc in first 5 sts, ch 3, turn, sl st in first ch (this creates a small side lobe), turn back to main work, sk 2 sts, sc in next 13 sts, ch 3, turn, sl st in first ch, turn back, sk 2 sts, sc in last 5 sts. Turn.
Row 14: Ch 1, sc in first 5 sts, sk the side lobe, sc in next 13 sts, sk the side lobe, sc in last 5 sts. Turn. (23 sc)
Row 15: Ch 1, sc dec, sc in next 19 sts, sc dec. Turn. (21 sc)
Row 16: Ch 1, sc dec, sc in next 17 sts, sc dec. Turn. (19 sc)
Row 17: Ch 1, sc dec, sc in next 15 sts, sc dec. Turn. (17 sc)
Continue decreasing one stitch at each end every row until you have 7 sts remaining.
Final Row: Ch 1, sc dec, sc in next 3 sts, sc dec. (5 sc)
Fasten off, leaving a long tail for attaching to stem.
Adding the center vein:
With the same color, surface slip stitch a line down the center of the leaf from tip to base. This adds dimension and that realistic botanical look.
Medium Monstera Leaf (Make 2)
Make one in each shade for variety.
Foundation:
Ch 20.
Row 1: Sc in 2nd ch from hook and in each ch across. Turn. (19 sc)
Rows 2-4: Ch 1, sc in each st across. Turn. (19 sc)
Row 5: Ch 1, 2 sc in first st, sc in next 17 sts, 2 sc in last st. Turn. (21 sc)
Row 6: Ch 1, sc in each st across. Turn. (21 sc)
Row 7 (Hole row): Ch 1, sc in first 5 sts, ch 4, sk 4 sts, sc in next 3 sts, ch 4, sk 4 sts, sc in last 5 sts. Turn.
Row 8: Ch 1, sc in first 5 sts, 4 sc in ch-4 sp, sc in next 3 sts, 4 sc in ch-4 sp, sc in last 5 sts. Turn. (21 sc)
Rows 9-10: Ch 1, sc in each st across. Turn. (21 sc)
Row 11: Ch 1, sc dec, sc across to last 2 sts, sc dec. Turn. (19 sc)
Continue decreasing at each end every row until 5 sts remain.
Fasten off. Add center vein with surface slip stitch.
Small Monstera Leaf (Make 2)
These smaller leaves add youth and realism to your arrangement. Real monstera plants have a mix of mature and young leaves.
Foundation:
Ch 14.
Row 1: Sc in 2nd ch from hook and in each ch across. Turn. (13 sc)
Rows 2-3: Ch 1, sc in each st across. Turn. (13 sc)
Row 4: Ch 1, 2 sc in first st, sc in next 11 sts, 2 sc in last st. Turn. (15 sc)
Rows 5-6: Ch 1, sc in each st across. Turn. (15 sc)
Row 7 (Simple split): Ch 1, sc in first 4 sts, ch 3, sk 3 sts, sc in next st, ch 3, sk 3 sts, sc in last 4 sts. Turn.
Row 8: Ch 1, sc in first 4 sts, 3 sc in ch-sp, sc in next st, 3 sc in ch-sp, sc in last 4 sts. Turn. (15 sc)
Row 9: Ch 1, sc dec, sc across to last 2 sts, sc dec. Turn. (13 sc)
Continue decreasing until 5 sts remain.
Fasten off. Add center vein.
Stems (Make 7)
The stems give your monstera that realistic upright posture. Wire inside keeps them poseable.
Foundation:
Ch 4, sl st to first ch to form ring.
Round 1: Ch 1, 6 sc in ring, sl st to first sc to join. (6 sc)
Rounds 2-40 (or desired length): Ch 1, sc in each st around, sl st to join. (6 sc)
For large leaves, work 35-40 rounds. For medium, work 25-30 rounds. For small, work 15-20 rounds.
Fasten off, leaving a long tail.
Insert wire: Cut floral wire about 2 inches longer than your stem. Insert through the tube. Fold the top end over and press flat so it does not poke through.
Lacy Pot Cover
This is worked in cream yarn with the smaller 3.5mm hook.
Foundation:
Ch 4, sl st to first ch to form ring.
Round 1: Ch 3 (counts as dc), 11 dc in ring, sl st to top of ch-3 to join. (12 dc)
Round 2: Ch 3, dc in same st, 2 dc in each st around, sl st to join. (24 dc)
Round 3: Ch 3, dc in next st, 2 dc in next st, *dc in next 2 sts, 2 dc in next st* around, sl st to join. (32 dc)
Round 4: Ch 5 (counts as dc plus ch-2), sk 1 st, *dc in next st, ch 2, sk 1 st* around, sl st to 3rd ch of ch-5. (16 dc, 16 ch-2 sps)
Rounds 5-8: Sl st into ch-sp, ch 5, *dc in next ch-sp, ch 2* around, sl st to join.
Round 9: Ch 1, sc in each dc and 2 sc in each ch-sp around, sl st to join.
Rounds 10-14: Ch 1, sc in each st around, sl st to join.
Fasten off. Weave in ends.
Assembly
Now for the fun part. Bringing it all together.
1. Attach leaves to stems: Use your tapestry needle and long tails to whip stitch each leaf base securely to the top of its stem. The wire should extend slightly into the leaf for support.
2. Prepare your pot: Place floral foam or styrofoam inside your container, trimming to fit snugly.
3. Insert stems: Push the wire ends of each stem into the foam. Arrange with taller stems in the back, shorter in front. Angle some outward for natural movement.
4. Add the pot cover: Slip the crocheted cover over your container. The lacy section should sit at the top, the solid rounds at the bottom.
5. Adjust and fluff: Bend stems gently to create organic curves. Rotate leaves to show their best angles.
Tips for Success
Blocking helps. Wet block your leaves before assembly for crisp, flat shapes. Pin them to a blocking board and let dry completely.
Vary your stem heights. Real plants have leaves at different levels. This creates visual depth.
Wire gauge matters. 18 gauge is sturdy enough to hold the leaves upright but flexible enough to bend into natural poses.
Color placement is intentional. Notice how the original has lighter shades higher and darker lower. This mimics how light affects real plants.
Customization Ideas
This crochet tutorial is just the beginning. Make it yours.
Try deep emerald green for a classic look. Use variegated yarn for a more organic feel. Scale up with bulky yarn and a larger hook for a floor plant. Add more leaves for a fuller arrangement. Mix in other crocheted plants like philodendrons or pothos.
Final Thoughts
Thank you so much for choosing this blush pink monstera plant crochet pattern for your next project. I hope these step by step instructions make the process enjoyable and the results stunning. There is something deeply satisfying about creating permanent botanical beauty with your own hands.
I would absolutely love to see your finished monstera plants. Tag me on Instagram or share in my Facebook group. Seeing your makes genuinely brightens my day, and it helps other crocheters see what is possible.
Happy hooking, friend. You are going to do beautifully.
