This striped bolster pillow is exactly the kind of project that makes you look like a crochet expert while being surprisingly straightforward to make. The Forest Meadow Candy Bolster Pillow combines chunky yarn stripes in gorgeous earthy greens with ruffled ends that give it that candy wrapper shape we all love. If you can crochet in rows and know how to change colors, you can absolutely make this.
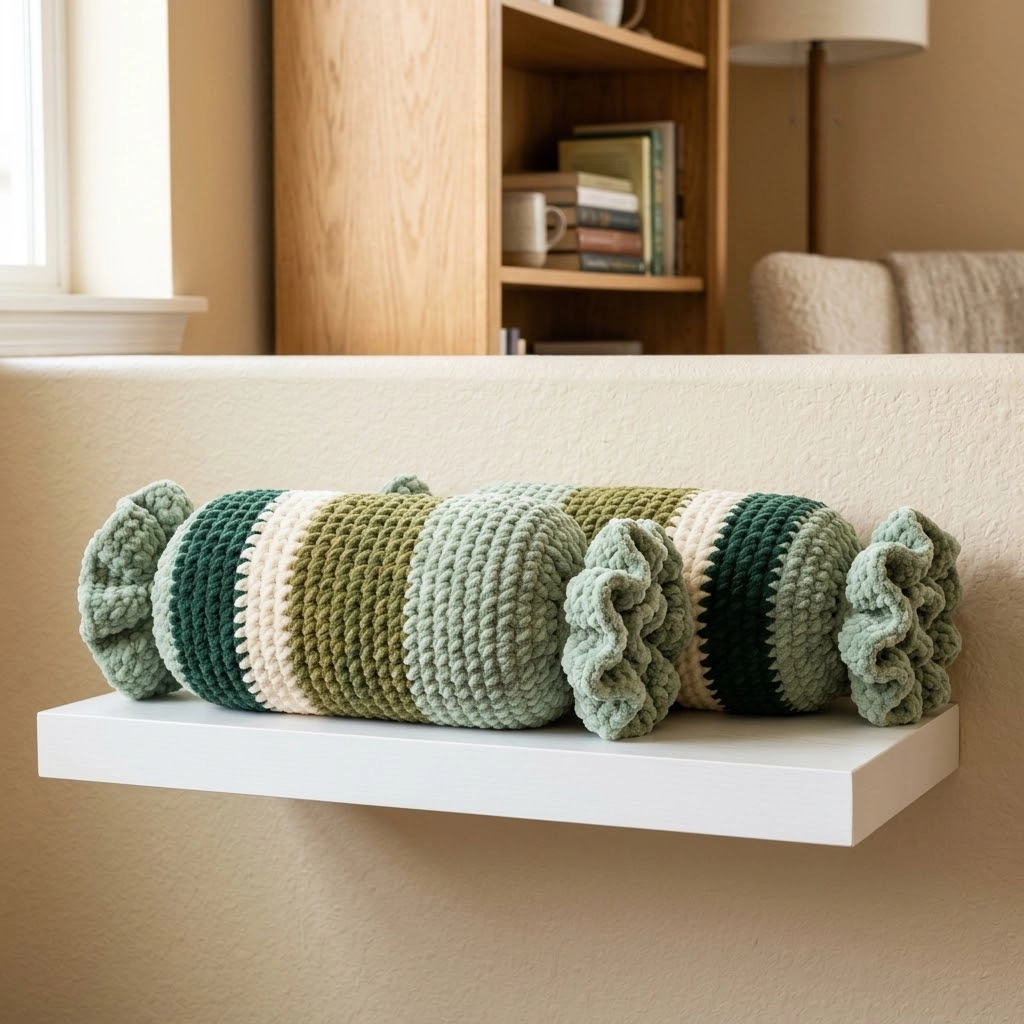
I designed this crochet pattern to work up quickly using super bulky yarn. The thick stitches create a plush, squishy texture that feels amazing as a neck roll or decorative accent. The color blocking in sage, forest green, olive, and cream creates a nature-inspired palette that works beautifully in modern or boho spaces.
Let me walk you through everything you need to recreate this bolster pillow from scratch.
Why You Will Love This Crochet Tutorial
This bolster pillow pattern hits that sweet spot between impressive results and manageable effort. The construction is simpler than it looks. You are essentially crocheting a striped rectangle, seaming it into a tube, and adding gathered ruffles at each end.
The candy wrapper effect comes from those playful ruffled ends. They are created by working extra stitches into a simple band, which naturally causes the fabric to ruffle and gather. No complicated shaping required.
The chunky yarn means this project works up in a weekend. You will see progress quickly, which keeps motivation high.
Skill Level
Confident Beginner to Intermediate
You should be comfortable with:
- Chaining and working into chains
- Single crochet stitches
- Changing yarn colors
- Basic seaming
- Working in the round
If you have made a simple blanket or scarf with color changes, you have the skills for this project.
Finished Dimensions
Approximately 16 inches long by 6 inches diameter (not including ruffles)
With ruffles extended: approximately 20 inches total length
*Note: Exact size will depend on your tension and pillow form size. This pattern is easily adjustable.*
Materials Needed
Yarn
Super Bulky Weight Yarn (Category 6) in four colors:
- Color A (Sage Green): approximately 80 yards — used for ruffles and accent stripes
- Color B (Forest/Teal Green): approximately 60 yards — main stripe color
- Color C (Olive Green): approximately 50 yards — center stripe
- Color D (Cream/Off-White): approximately 40 yards — contrast stripe
Total yarn needed: approximately 230 yards
I recommend a chenille-style super bulky yarn like Bernat Blanket or similar. The plush texture you see in the photos comes from this yarn type. It creates that soft, velvety look and feel.
Yarn Substitution Note: You can use any super bulky yarn, but chenille or velvet yarns give the most accurate result. Standard acrylic super bulky will work but will have a different texture.
Hook
Size N/P (10mm) crochet hook
Or size needed to achieve gauge. With chunky yarn, going up or down a hook size makes a big difference.
Additional Supplies
- Bolster pillow insert: 16 inches by 6 inches (or adjust pattern to fit your insert)
- Yarn needle for weaving ends and seaming
- Stitch markers (optional but helpful)
- Scissors
Gauge
8 single crochet stitches and 9 rows = 4 inches in single crochet with super bulky yarn
Gauge is not critical for this project since you are making a cover for an insert. However, checking gauge helps ensure your cover fits your specific pillow form.
Abbreviations and Stitch Definitions
Let me define every stitch and term before we begin. I will use these abbreviations throughout the pattern.
ch — Chain: Yarn over, pull through loop on hook. This creates your foundation.
sc — Single Crochet: Insert hook into stitch, yarn over and pull up a loop (2 loops on hook), yarn over and pull through both loops. This is the main stitch for this entire project.
sl st — Slip Stitch: Insert hook into stitch, yarn over and pull through both the stitch and the loop on hook in one motion. Used for joining and finishing.
inc — Increase: Work 2 single crochet stitches into the same stitch. This adds stitches and creates width or ruffling.
st(s) — Stitch(es)
RS — Right Side: The front of your work, the side that will show.
WS — Wrong Side: The back of your work.
Pattern Notes Before You Begin
Read this section first. It will save you confusion later.
1. The main body is worked flat in rows, then seamed into a tube. You are not working in the round for the body.
2. Color changes happen at the end of rows. When changing colors, complete the last stitch of the old color by pulling the new color through for the final yarn over. This creates cleaner color transitions.
3. Do not cut yarn after every stripe if you will use that color again soon. You can carry yarn loosely up the side. For colors used only once, cut and weave in ends.
4. The ruffles are worked separately and attached to each end of the tube.
5. Turning chain does not count as a stitch in this pattern.
6. Stitch counts are given at the end of each row in parentheses for easy checking.
The Pattern: Step by Step Instructions
Part 1: Main Body Panel
The body is a striped rectangle that wraps around your pillow insert.
With Color B (Forest Green) and 10mm hook:
Foundation Row: Ch 33.
Row 1: Sc in 2nd ch from hook and in each ch across, turn. (32 sts)
Rows 2–4: Ch 1, sc in each st across, turn. (32 sts)
*You now have 4 rows of Forest Green.*
Change to Color D (Cream):
Rows 5–8: Ch 1, sc in each st across, turn. (32 sts)
*4 rows of Cream completed.*
Change to Color C (Olive Green):
Rows 9–16: Ch 1, sc in each st across, turn. (32 sts)
*8 rows of Olive Green completed. This is your center stripe.*
Change to Color B (Forest Green):
Rows 17–20: Ch 1, sc in each st across, turn. (32 sts)
Change to Color D (Cream):
Rows 21–24: Ch 1, sc in each st across, turn. (32 sts)
Change to Color B (Forest Green):
Rows 25–28: Ch 1, sc in each st across, turn. (32 sts)
Fasten off. Weave in ends.
Your stripe sequence is: Forest (4 rows) — Cream (4 rows) — Olive (8 rows) — Forest (4 rows) — Cream (4 rows) — Forest (4 rows)
Total: 28 rows
*This creates a panel approximately 16 inches long and 19 inches wide when laid flat.*
Part 2: Seaming the Body into a Tube
Now we turn your flat panel into a cylinder.
1. Lay your panel flat with the right side facing up.
2. Fold the panel so the two short edges (your foundation chain edge and your final row) meet.
3. Using a yarn needle and matching yarn, whip stitch or mattress stitch the two short edges together. Work through the back loops only for a neater seam.
4. Turn the tube right side out. The seam should be on the inside.
Pro tip: Before seaming, wrap your panel around your pillow insert to make sure it fits. The fabric should wrap around with just a little stretch. Adjust your seam allowance if needed.
Part 3: Ruffle Ends (Make 2)
These ruffles give the bolster that signature candy wrapper look. They are worked in rounds.
With Color A (Sage Green) and 10mm hook:
Foundation: Ch 40, sl st to first ch to form a ring. Be careful not to twist your chain.
Round 1: Ch 1, sc in each ch around, sl st to first sc to join. (40 sts)
Round 2: Ch 1, sc in each st around, sl st to join. (40 sts)
Round 3 (Increase Round): Ch 1, *sc in next st, inc in next st*, repeat from * around, sl st to join. (60 sts)
Round 4: Ch 1, sc in each st around, sl st to join. (60 sts)
Round 5 (Increase Round): Ch 1, *sc in next st, inc in next st*, repeat from * around, sl st to join. (90 sts)
Round 6: Ch 1, sc in each st around, sl st to join. (90 sts)
Round 7 (Increase Round): Ch 1, *sc in next 2 sts, inc in next st*, repeat from * around, sl st to join. (120 sts)
Round 8: Ch 1, sc in each st around, sl st to join. (120 sts)
Fasten off, leaving a long tail for attaching.
The rapid increases cause the fabric to ruffle naturally. This is exactly what we want.
Repeat to make a second ruffle.
Part 4: Assembly
This is where your pillow comes together.
Step 1: Insert the pillow form
Slide your bolster pillow insert into the crocheted tube. Center it so equal amounts of fabric extend past each end.
Step 2: Attach the first ruffle
Take one ruffle and position it at one end of the tube. The foundation chain edge of the ruffle should align with the edge of the tube opening.
Using your yarn needle and the long tail, whip stitch the ruffle to the tube edge. Work all the way around, easing the ruffle evenly.
Step 3: Gather the ruffle
Thread a separate piece of yarn through the foundation chain edge of the ruffle (the inner edge closest to the pillow). Pull gently to gather the ruffle closed around the pillow end. Tie securely.
Step 4: Repeat for the second end
Attach the second ruffle to the other end of the tube using the same method.
Step 5: Weave in all remaining ends
Take your time here. Hide ends inside the pillow tube where possible.
Part 5: Optional Accent Ruffles
Looking at the finished pillow, you may notice smaller accent ruffles at the transition points. These are optional but add extra charm.
Small Accent Ruffle (Make 2–4 as desired):
With Color A or B:
Ch 30, sl st to join.
Round 1: Ch 1, sc in each ch around, sl st to join. (30 sts)
Round 2: Ch 1, inc in each st around, sl st to join. (60 sts)
Fasten off with long tail. Slip over the tube at stripe transition points and tack in place with a few stitches.
Customization Ideas
Make it longer: Add more rows to the main body. Each 4 rows adds approximately 1.75 inches.
Change the stripe pattern: Try ombre effects with 5–6 shades of one color family.
Skip the ruffles: For a simpler look, gather the ends with drawstrings instead.
Add tassels: Replace ruffles with chunky tassels for a different aesthetic.
Troubleshooting Common Issues
My tube is too tight around the pillow: Your tension may be tighter than the pattern assumes. Try going up one hook size or adding 4–8 more foundation chains.
The ruffles are not ruffling enough: Make sure you are completing all the increase rounds. The ruffling happens because of the extra stitches.
My stripes are not lining up: This is purely decorative, so slight variations are fine. The pillow will still look beautiful.
The seam shows: Try using mattress stitch instead of whip stitch for an invisible seam. Or position the seam on the bottom of the pillow.
Care Instructions
For chenille/velvet yarn: Machine wash cold on gentle cycle. Tumble dry low. The yarn may shed slightly at first but will soften with washing.
For standard acrylic: Machine wash warm, tumble dry low.
Remove pillow insert before washing if possible.
Wrapping Up Your Forest Meadow Candy Bolster Pillow
You did it. This Forest Meadow Candy Bolster Pillow pattern combines simple techniques with stunning results. The striped body works up quickly in single crochet, and those ruffled ends add personality without complicated construction.
This bolster makes a gorgeous addition to a bed, sofa, or reading nook. The earthy green palette brings calm, natural vibes to any space. It also makes a thoughtful handmade gift for housewarmings, birthdays, or holidays.
I hope this crochet tutorial gave you everything you need to create your own version. The step by step instructions should guide you from foundation chain to finished pillow with confidence.
Share Your Finished Pillow
I would absolutely love to see your finished Forest Meadow Candy Bolster Pillow. Tag me on Instagram or share in our Facebook group so I can celebrate your work. Seeing your creations genuinely makes my day.
Thank you for choosing this pattern and trusting me to guide you through it. Happy crocheting, friend. You have got this.
