This gorgeous wrap style crop top might look like something from a high end boutique, but I promise you can absolutely make it yourself. The Coral and Sage Granny Square Crop Top combines classic granny square construction with a modern silhouette that flatters beautifully. If you can crochet a basic granny square, you already have the main skill you need for this crochet pattern.
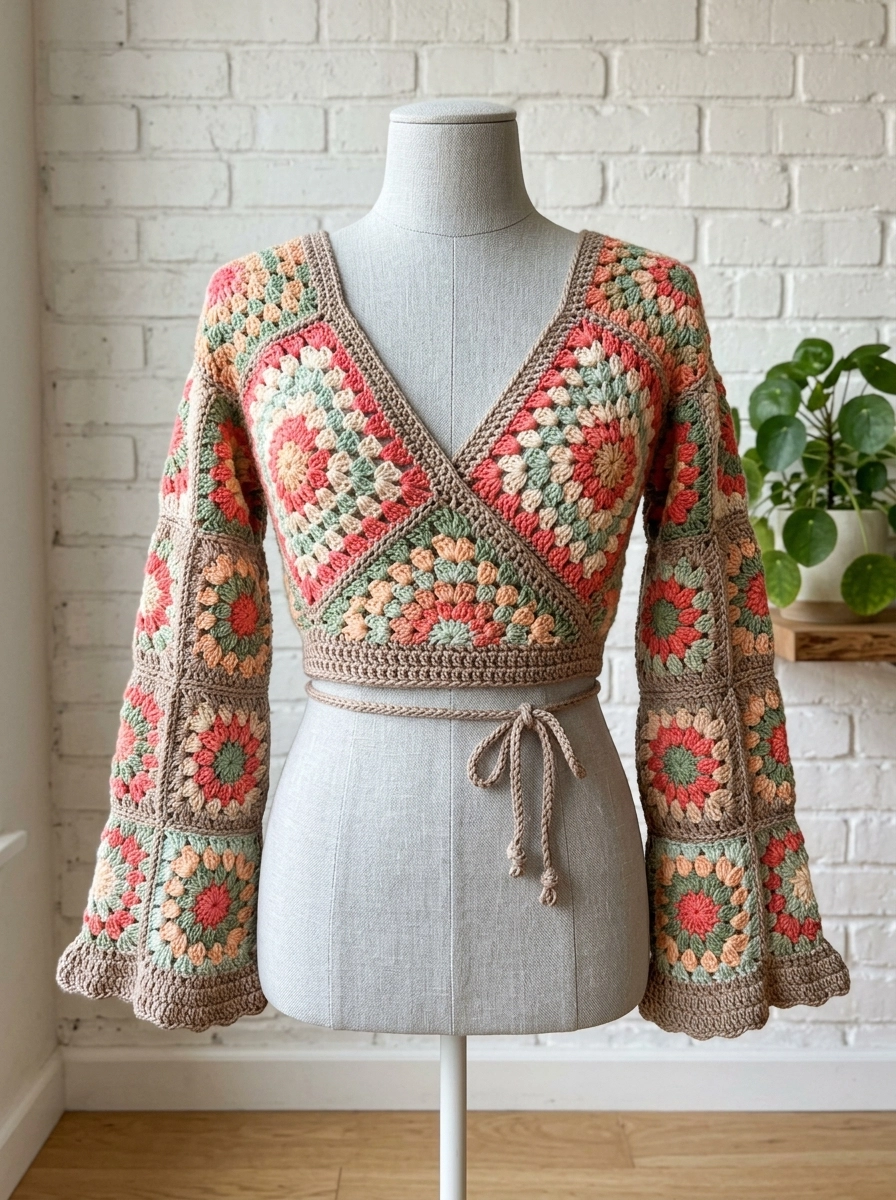
I designed this piece with that perfect boho vibe in mind. The wrap front creates a lovely V neckline, while those flared bell sleeves add drama without overwhelming the cropped length. The warm coral, soft sage green, creamy peach, and taupe color palette feels fresh yet earthy. This crochet tutorial walks you through every single step from your first chain to weaving in that final end.
Skill level: Intermediate. You should feel comfortable with granny squares and basic garment assembly.
Why This Granny Square Crop Top Works So Well
The magic of this design is in the construction. Rather than piecing together dozens of tiny squares, you are working with larger statement squares that show off the beautiful color progression. Each square builds outward from the center, letting you watch those colors bloom round by round.
The wrap closure means you can adjust the fit to your body. Tie it snug for a cropped look or leave it slightly looser for a relaxed feel. Those bell sleeves add movement and visual interest without requiring any complicated shaping. They are simply tubes of granny squares that flare naturally at the wrist.
Materials You Will Need
Yarn:
- Color A (Sage Green): 150g of DK weight cotton or cotton blend yarn
- Color B (Coral Pink): 150g of DK weight cotton or cotton blend yarn
- Color C (Peach/Cream): 100g of DK weight cotton or cotton blend yarn
- Color D (Taupe/Brown): 200g of DK weight cotton or cotton blend yarn
The taupe serves as your joining color and edging, so you will need the most of this shade. I recommend a DK weight yarn (also called light worsted or size 3) with good stitch definition. Cotton works beautifully for this garment because it drapes nicely and shows off the stitch texture. A cotton acrylic blend would also work well and be easier on the budget.
Hook:
- 4.0mm (US G/6) crochet hook
- 3.5mm (US E/4) crochet hook for edging (optional but recommended)
Notions:
- Tapestry needle for weaving ends
- Stitch markers
- Measuring tape
- Scissors
Gauge (Please Do Not Skip This)
One completed granny square should measure approximately 6 inches (15cm) across.
I know gauge swatches feel tedious. But for a garment, especially one with a fitted silhouette like this crop top, gauge determines whether your finished piece actually fits. If your squares are too big, size down your hook. Too small, go up a hook size.
Abbreviations and Stitch Definitions
Let me walk you through every stitch abbreviation you will encounter in this step by step crochet pattern.
Ch = Chain. Wrap yarn over hook, pull through loop on hook. This creates the foundation and spaces between stitches.
Sl st = Slip stitch. Insert hook, yarn over, pull through both the stitch and the loop on your hook in one motion. Used for joining rounds.
Sc = Single crochet. Insert hook, yarn over and pull up a loop (2 loops on hook), yarn over and pull through both loops.
Dc = Double crochet. Yarn over, insert hook, yarn over and pull up a loop (3 loops on hook), yarn over and pull through 2 loops, yarn over and pull through remaining 2 loops.
3dc cluster = Three double crochet stitches worked into the same stitch or space. This creates the characteristic granny square grouping.
Ch-sp = Chain space. The gap created by chain stitches where you will work into on following rounds.
How to Crochet the Basic Granny Square
This is the foundation of your entire crop top. You will make multiple squares of varying sizes, but they all follow this same progression.
Starting Ring
With Color A (Sage Green) and your 4.0mm hook:
Magic ring method: Create an adjustable loop, ch 3 (counts as first dc throughout), work 2 dc into ring, ch 2, *3 dc into ring, ch 2* repeat 3 more times. Sl st to top of beginning ch-3 to join. Pull tail to close ring. (4 corner groups, 4 ch-2 spaces)
If magic rings intimidate you, that is completely fine. You can ch 4 and sl st to first ch to form a ring instead. Works exactly the same.
Round 2
Change to Color C (Peach/Cream).
Ch 3, 2 dc in same corner ch-2 sp, ch 2, 3 dc in same corner sp (first corner made). *Ch 1, in next corner ch-2 sp work (3 dc, ch 2, 3 dc)* repeat around. Ch 1, sl st to top of beginning ch-3 to join. (8 groups of 3dc, 4 corner ch-2 spaces, 4 side ch-1 spaces)
Round 3
Change to Color B (Coral Pink).
Ch 3, 2 dc in same corner sp, ch 2, 3 dc in same corner sp. *Ch 1, 3 dc in next ch-1 sp, ch 1, in corner ch-2 sp work (3 dc, ch 2, 3 dc)* repeat around, ending with ch 1, 3 dc in last ch-1 sp, ch 1. Sl st to join. (12 groups of 3dc total)
Round 4
Change to Color A (Sage Green).
Work corner as established. Continue working 3 dc in each ch-1 sp along sides with ch 1 between each group. Work corner cluster in each corner ch-2 sp. Sl st to join. (16 groups of 3dc total)
Round 5
Change to Color D (Taupe).
Continue pattern as established. Each side now has 3 groups of 3dc between corners. Work corner clusters in corner spaces. Sl st to join. (20 groups of 3dc total)
Your completed square should measure 6 inches across.
Granny Square Layout and Quantities
Here is exactly how many squares you need for a size Small/Medium crop top:
Large Squares (5 rounds each, 6 inches):
- Front body: 4 squares
- Back body: 4 squares
- Sleeves: 8 squares (4 per sleeve)
Total: 16 large squares
For size Large/XL, add one additional round to each square (making them 6 rounds) and adjust quantities as follows:
- Front body: 4 squares
- Back body: 4 squares
- Sleeves: 12 squares (6 per sleeve)
Assembling the Front Panels
The front of this crochet crop top uses a diagonal wrap construction. This is simpler than it looks, I promise.
Left Front Panel
Take 2 large squares. Using Color D and a whip stitch or slip stitch join, connect them along one edge to create a vertical rectangle.
Right Front Panel
Repeat with 2 more large squares.
Creating the Wrap Effect
Position your left panel so the squares sit diagonally (rotated 45 degrees so corners point up and down). Repeat with right panel. The panels will overlap at center front, with the right panel crossing over the left.
Assembling the Back
Join 4 large squares in a 2×2 grid formation using Color D and your preferred joining method. I recommend the slip stitch join for a flat seam or whip stitch for flexibility.
Row 1: Join 2 squares side by side.
Row 2: Join remaining 2 squares side by side.
Final join: Connect Row 1 to Row 2.
Attaching Front to Back
With right sides facing, use Color D to join:
- Left front panel to left side of back at shoulder and side seam
- Right front panel to right side of back at shoulder and side seam
Leave the center front open for the wrap closure.
Creating the Bell Sleeves
Each sleeve requires 4 squares arranged in a tube formation.
Sleeve Assembly
Step 1: Join 2 squares horizontally to create the upper sleeve.
Step 2: Join 2 more squares horizontally to create the lower sleeve (the bell portion).
Step 3: Connect upper and lower sections. The seam where they meet creates that beautiful horizontal band you see in the design.
Step 4: Fold the rectangle in half and join the long edges to form a tube.
Step 5: Attach the narrower end of the sleeve tube to the armhole opening on the body.
Repeat for second sleeve.
Edging and Trim
This is where the garment really comes together. That beautiful taupe trim unifies everything.
Body Edging
Using Color D and your smaller 3.5mm hook:
Round 1: Starting at center back bottom edge, sc evenly around entire body opening. Work 3 sc in each corner for smooth turning. Sl st to join.
Round 2: Ch 1, sc in each sc around, working 3 sc in corner stitches. Sl st to join.
Rounds 3 through 5: Repeat Round 2.
This creates that substantial ribbed band you see at the bottom hem and along the wrap edges.
Neckline Edging
Starting at one front edge:
Work 3 rounds of sc along the V neckline, following the diagonal edges of the wrap panels. Keep your tension even to prevent puckering.
Sleeve Edging
For each sleeve, work 2 rounds of sc around the wrist opening. The slight ruffle effect comes naturally from the granny square edges. Add one final round of reverse single crochet (also called crab stitch) for a decorative finish if desired.
Making the Tie Closure
The wrap ties are simply long crochet chains with a bit of substance.
Option 1: Chain Tie
Ch 150 (or desired length), turn and sl st in each ch back to beginning. Fasten off.
Option 2: I-Cord Tie (pictured)
Using 2 double pointed knitting needles or a small crochet hook, create a 3 stitch i-cord approximately 40 inches long.
Attach one tie to each side of the wrap front at waist level. These wrap around and tie at the front or back depending on your preference.
Finishing Your Crop Top
Weave in all ends. With this many color changes, you will have quite a few tails. Take your time and weave each one through at least 2 inches of stitches on the wrong side.
Block your finished garment. Wet blocking works beautifully for cotton yarn. Soak the piece in lukewarm water for 15 minutes, gently squeeze out excess water (do not wring), and lay flat to dry on blocking mats. Pin the squares into perfect alignment as they dry.
Steam blocking is another option if you prefer. Hold your steamer several inches from the fabric and let the moisture relax the fibers.
Customization Ideas
This beginner friendly crochet pattern adapts beautifully to your personal style:
- Change the color palette: Try all neutrals for a minimalist look, or go bold with jewel tones
- Add length: Include additional rows of granny squares at the bottom for a full length wrap top
- Modify the sleeves: Make them shorter for a three quarter length, or skip them entirely for a sleeveless vest version
- Adjust the crop: Add rounds to each square for a longer bodice
Troubleshooting Common Issues
Squares are different sizes: Check your tension. Some crocheters work tighter when tired. Block aggressively to even things out.
Wrap does not lay flat: Your seaming may be too tight. Try joining with a slightly larger hook.
Sleeves feel too snug: Add a fifth square to each sleeve for more width at the upper arm.
Final Thoughts
Thank you so much for choosing this Coral and Sage Granny Square Crop Top crochet pattern for your next project. I truly hope you enjoy making it as much as I enjoyed designing it. There is something so satisfying about watching those colorful squares transform into a wearable piece of art.
When you finish yours, I would absolutely love to see it. Tag me on Instagram or share your photo in our Facebook group. Seeing your versions of my patterns genuinely makes my day.
Happy crocheting, friend. You have got this.
