I still remember the first time I saw a crocheted houseplant. My jaw literally dropped. You mean I can have gorgeous greenery that never needs watering, never dies, and I get to *make* it myself? Sign me up.
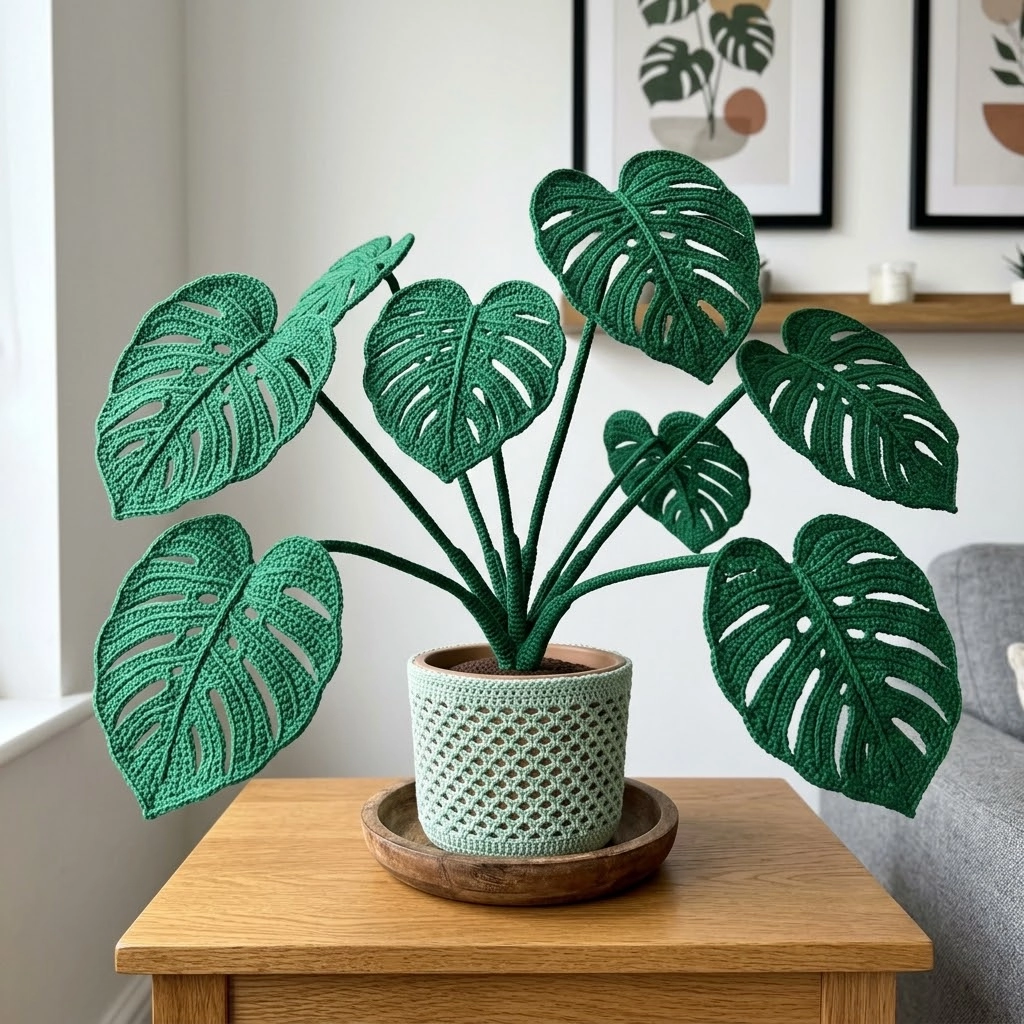
This crochet Monstera plant pattern is one of my absolute favorite projects to date. Those iconic split leaves, the realistic stems, even the sweet little pot cover. It looks like something straight out of a plant shop, but it is 100% yarn and creativity.
Here is the thing. This project looks incredibly advanced. People will ask if you bought it. But I promise you can absolutely make this. If you can single crochet and follow a pattern, you have got what it takes. I will walk you through every single step.
Let me show you how to crochet your very own forever plant.
Why You Will Love This Crochet Monstera Pattern
The Monstera deliciosa, also called the Swiss cheese plant, has become an interior design icon. Those dramatic heart-shaped leaves with their signature holes and splits? Pure botanical perfection.
But real Monsteras can be fussy. They need the right light. The right humidity. The right amount of neglect that somehow is not too much neglect. Mine have definitely given me grief.
This crochet version though? Zero maintenance. Eternally lush. And it makes the most thoughtful handmade gift for plant lovers, new homeowners, or anyone who loves that boho botanical vibe.
What makes this pattern special:
- Realistic leaf construction with actual fenestrations (those are the holes and splits)
- Sturdy wire-supported stems so leaves hold their shape and position
- Multiple leaf sizes for natural variety
- Decorative crocheted pot cover to complete the look
- Intermediate skill level but totally achievable for ambitious beginners
Trust me. When you finish this project, you will not stop showing it off.
Materials You Will Need
Before we dive into the step by step crochet tutorial, let me walk you through your supplies. Having everything ready makes the process so much smoother.
Yarn
- Worsted weight cotton yarn in deep forest green (approximately 200 yards for a full plant)
- Worsted weight cotton yarn in sage or mint green (approximately 75 yards for the pot cover)
- Cotton works best here because it holds structure beautifully and gives crisp stitch definition
Recommended brands: Lily Sugar’n Cream, Paintbox Cotton Aran, or similar mercerized cotton
Hook
- 4.0mm (G/6) crochet hook for the leaves and stems
- 5.0mm (H/8) crochet hook for the pot cover (to create that lovely open mesh texture)
Notions
- Floral wire, 18 gauge (for main stems) and 22 gauge (for leaf support)
- Wire cutters
- Tapestry needle for weaving ends
- Stitch markers (at least 4)
- Scissors
- Small terracotta pot (approximately 4 to 5 inches diameter)
- Floral foam or similar to anchor stems in pot
- Optional: Green floral tape to wrap wire stems
Stitch Abbreviations and Definitions
Let me break down every stitch you will use in this pattern. Even if you know these already, a quick refresher never hurts.
Ch = Chain: Wrap yarn over hook, pull through loop. This creates your foundation and adds height.
Sl st = Slip stitch: Insert hook, yarn over, pull through stitch AND loop on hook in one motion. Used for joining and moving across stitches invisibly.
Sc = Single crochet: Insert hook, yarn over, pull up a loop (2 loops on hook), yarn over, pull through both loops. Your basic building block stitch.
Hdc = Half double crochet: Yarn over, insert hook, pull up loop (3 loops), yarn over, pull through all 3 loops. Slightly taller than sc.
Dc = Double crochet: Yarn over, insert hook, pull up loop (3 loops), yarn over, pull through 2 loops, yarn over, pull through remaining 2 loops. Creates taller fabric.
Inc = Increase: Work 2 stitches into the same stitch. This makes your piece grow wider.
Dec = Decrease: Work 2 stitches together as one. This narrows your piece.
Sc2tog = Single crochet 2 together: Insert hook in first stitch, pull up loop, insert hook in next stitch, pull up loop (3 loops on hook), yarn over, pull through all 3. A decrease method.
Ch-sp = Chain space: The gap created by chain stitches in previous row. You work into this space, not into individual chains.
Sk = Skip: Pass over the indicated stitch without working into it. Creates openings.
Understanding the Monstera Leaf Construction
Before we start, I want to explain how these leaves come together. Understanding the structure makes everything easier.
Each Monstera leaf is worked in two main phases:
1. The center spine and basic leaf shape worked flat from bottom to top
2. The fenestrations (holes and splits) created by strategic chain spaces and skipped stitches
The leaves get their realistic curve from wire inserted along the center spine. The natural tendency of the stitches plus the wire creates that gorgeous organic drape.
You will make three leaf sizes: small (baby leaves without splits), medium (with 2 to 3 splits), and large (with full fenestrations and multiple splits). This variety is what makes your finished plant look authentic.
Ready? Let us create some botanical magic.
Crochet Monstera Leaf Pattern: Large Leaf
This is your showstopper leaf. Make 3 to 4 of these for a full plant.
Finished size: Approximately 7 inches tall by 6 inches wide
Center Spine
Row 1: Ch 25, sc in 2nd ch from hook and in each ch across. (24 sts)
Row 2: Ch 1, turn, sc in each st across. (24 sts)
This creates your sturdy center vein. Set aside but do not fasten off.
Right Leaf Section
Now we build out from the spine. This is where the magic happens.
Row 1: Working along the long edge of your spine, sc 12 evenly spaced along one side. (12 sts)
Row 2: Ch 1, turn, 2 sc in first st, sc in next 10 sts, 2 sc in last st. (14 sts)
Row 3: Ch 1, turn, 2 sc in first st, sc in next 5 sts, ch 3, sk 2, sc in next 5 sts, 2 sc in last st. (14 sc + ch-3 sp)
*This chain space creates your first fenestration. Exciting, right?*
Row 4: Ch 1, turn, sc in first 6 sts, 3 sc in ch-3 sp, sc in remaining 6 sts, 2 sc in last st. (17 sts)
Row 5: Ch 1, turn, sc in first 4 sts, ch 4, sk 3, sc in next 3 sts, ch 4, sk 3, sc in remaining sts. (11 sc + two ch-4 sps)
Row 6: Ch 1, turn, sc in each st and 4 sc in each ch-sp across. (19 sts)
Row 7: Ch 1, turn, sc2tog, sc to last 2 sts, sc2tog. (17 sts)
Row 8: Ch 1, turn, sc2tog, sc in next 3 sts, ch 5, sk 4, sc in next 3 sts, ch 5, sk 4, sc2tog. (10 sc + two ch-5 sps)
Row 9: Ch 1, turn, sc in each st and 5 sc in each ch-sp across. (20 sts)
Rows 10 to 12: Ch 1, turn, sc2tog at beginning and end of each row, sc across middle. You should decrease to approximately 14 sts.
Row 13: Ch 1, turn, sc2tog across entire row until 3 to 4 sts remain. Fasten off.
Left Leaf Section
Join yarn to opposite long edge of center spine. Repeat Rows 1 through 13, mirroring the pattern. Your increases and decreases should create a symmetrical heart shape.
Creating the Splits
Those dramatic edge splits are what make Monstera leaves so recognizable.
After completing both sides, identify 2 to 3 spots along each outer edge. Using scissors, carefully cut 1 to 1.5 inch slits into the edge. Then single crochet around each cut edge to seal and neaten:
Join yarn at base of slit. Sc evenly around the cut (approximately 6 to 8 sc per side of slit). Sl st to join. Fasten off.
*Do not panic about cutting your work. I know it feels scary. But this is how we get that authentic Monstera silhouette.*
Crochet Monstera Leaf Pattern: Medium Leaf
Make 2 to 3 of these.
Finished size: Approximately 5 inches tall by 4 inches wide
Follow the large leaf pattern with these modifications:
- Center spine: Ch 18 instead of 25. (17 sts)
- Side sections: Work only 8 to 9 rows each
- Fenestrations: Include only one ch-sp hole per side
- Edge splits: Make 1 to 2 smaller splits per side
The construction is identical. You are simply scaling down.
Crochet Monstera Leaf Pattern: Small Leaf (Baby Leaf)
Make 2 to 3 of these adorable baby leaves.
Finished size: Approximately 3 inches tall by 2.5 inches wide
Real baby Monstera leaves do not have splits or holes yet. How cute is that?
Row 1: Ch 4, 2 sc in 2nd ch from hook, sc in next ch, 3 sc in last ch. Working back along opposite side of foundation ch, sc in next ch, 2 sc in last ch. (9 sts)
Round 2: Working in continuous rounds (place marker), 2 sc in first st, sc in next 3 sts, 3 sc in center st, sc in next 3 sts, 2 sc in last st. (14 sts)
Round 3: Sc in first 2 sts, 2 sc in next st, sc in next 4 sts, 3 sc in center st, sc in next 4 sts, 2 sc in next st, sc in last 2 sts. (19 sts)
Round 4: Sc in each st around, placing 3 sc in the center top stitch. (21 sts)
Rounds 5 to 6: Continue increasing at center top (3 sc in center st) while maintaining sides. (Approximately 25 to 27 sts)
Final round: Sl st in each st around for a neat edge. Fasten off.
Crochet Monstera Stem Pattern
Each leaf needs a stem. The stems are simply tubes worked around wire.
Round 1: Using 4.0mm hook, ch 4, sl st to first ch to form ring.
Round 2: Ch 1, 6 sc in ring. Do not join. Work in continuous spiral. (6 sts)
Rounds 3 onward: Sc in each st around.
Continue until stem reaches desired length:
- Large leaves: 8 to 10 inches
- Medium leaves: 6 to 7 inches
- Small leaves: 4 to 5 inches
Before closing, insert 18-gauge floral wire cut 2 inches longer than your tube. The extra length anchors into your pot base.
Final round: Sc2tog around until opening closes. Fasten off. Weave in ends.
Attaching Leaves to Stems
Cut a piece of 22-gauge wire slightly longer than your leaf spine. Weave it through the back of the center spine using your tapestry needle as a guide.
Place the top of your stem tube against the base of the leaf spine. Whip stitch securely using matching yarn. Make at least 10 to 12 passes for stability.
Bend the leaf wire gently to create natural curves. Real Monstera leaves arch and twist. Play with positioning until it looks organic.
Crochet Pot Cover Pattern
This finishing touch elevates everything. The open mesh texture looks so elegant.
Finished size: Fits 4 to 5 inch diameter pot
Using sage or mint green yarn and 5.0mm hook:
Round 1: Ch 4, sl st to form ring. Ch 3 (counts as dc), 11 dc in ring. Sl st to top of ch-3 to join. (12 dc)
Round 2: Ch 3, dc in same st, 2 dc in each st around. Sl st to join. (24 dc)
Round 3: Ch 3, dc in same st, dc in next st, *2 dc in next st, dc in next st* around. Sl st to join. (36 dc)
Round 4: Ch 5 (counts as dc + ch 2), sk 1 st, *dc in next st, ch 2, sk 1 st* around. Sl st to 3rd ch of beginning ch-5. (18 dc + 18 ch-sps)
Rounds 5 to 8: Ch 5, *dc in next dc, ch 2* around. Sl st to join.
This creates your lovely lattice mesh.
Rounds 9 to 12: Ch 3, dc in each dc and 2 dc in each ch-2 sp around. Sl st to join. (54 dc after Round 9)
Continue even (no increases) for remaining rounds to create the straight sides.
Fasten off. Weave in ends. Slip over your terracotta pot.
Assembly and Finishing
Almost there. This is the fun part.
1. Prepare your pot. Place floral foam snugly inside the terracotta pot.
2. Arrange your stems. Insert the wire ends of each stem into the foam. Largest leaves toward the back and sides. Smaller leaves toward the front and center.
3. Adjust angles. Bend stems and leaf wires until the arrangement looks natural. Step back and view from different angles.
4. Add your pot cover. Slide the crocheted cover over the pot. The weight of the foam and stems keeps everything stable.
5. Optional finishing. Add decorative moss, pebbles, or faux soil on top of the foam for extra realism.
Tips for Success
Blocking helps. Lightly steam or wet block your finished leaves before adding wire. This evens out stitches and improves drape.
Wire gauge matters. Too thin and stems flop. Too thick and you cannot bend them. The 18 and 22 gauge combination gives perfect support with flexibility.
Leaf variety is key. Make leaves in slightly different sizes even within the same category. Nature is not perfectly uniform.
Tension consistency. Keep your tension even throughout each leaf so the fabric lies flat without curling.
You Did It!
Look at you with your gorgeous, everlasting crochet Monstera plant. No watering schedule. No grow lights. No guilt when you go on vacation.
This crochet plant pattern makes such a meaningful handmade gift. It also looks absolutely stunning in your own space. Every time someone compliments it and you say *”I made that,”* you will feel that crafter pride.
Thank you so much for choosing this pattern and trusting me to guide you through. I genuinely hope you enjoyed the process as much as the finished piece.
I would absolutely love to see your finished Monstera. Tag me on Instagram or share in my Facebook group. Seeing your creations honestly makes my entire week.
Happy hooking, plant parent. You have got this. 🌿
