This gorgeous wrap top might just become your new favorite handmade wardrobe piece. I fell in love with how the warm terracotta, mustard, olive, and cream tones come together in those classic granny squares and sunburst motifs. The cropped wrap silhouette with dramatic bell sleeves feels so boho and flattering on every body type.
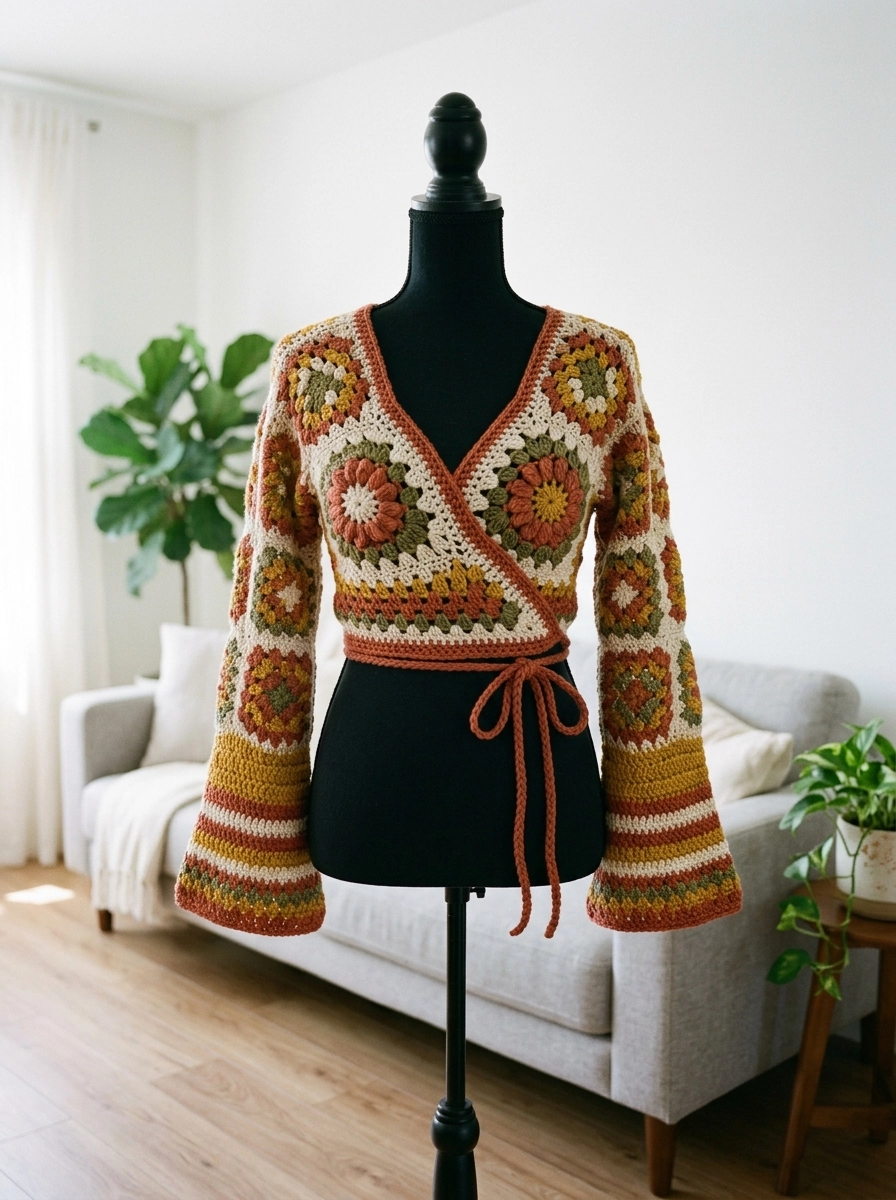
If you can make a granny square and know basic joining techniques, you can absolutely make this top. I promise. The construction looks complex, but it breaks down into simple motifs and straightforward assembly. Let me walk you through every step of this crochet pattern so you can recreate this beauty for yourself.
Why This Granny Square Wrap Top Works So Well
The magic of this crochet tutorial lies in its modular construction. You are not crocheting one giant intimidating piece. Instead, you make individual squares and motifs, then join them strategically to create the wrap shape. This means you can work on it anywhere, anytime. Waiting rooms, lunch breaks, couch time. Each motif is a mini project.
The wrap front creates that stunning crossover neckline without any complicated shaping. The tie closure at the waist means one size fits many. You simply adjust how tightly you wrap and tie.
Those bell sleeves add serious drama. They start with joined granny squares at the upper arm, then transition into striped rows that flare out beautifully at the wrist.
Materials You Will Need
Yarn:
- Worsted weight yarn (medium weight, category 4) in five colors
- Color A: Terracotta/rust (approximately 250 yards)
- Color B: Mustard/gold (approximately 200 yards)
- Color C: Olive green (approximately 150 yards)
- Color D: Cream/off-white (approximately 300 yards)
- Color E: Deep burgundy or dark rust (approximately 100 yards)
I recommend a cotton blend or acrylic yarn with good stitch definition. Something like Lion Brand 24/7 Cotton, Paintbox Yarns Cotton DK, or Red Heart Soft works beautifully. You want your stitches crisp and visible, not fuzzy.
Hook:
- 5.0 mm (US H/8) crochet hook, or size needed to achieve gauge
Notions:
- Tapestry needle for weaving ends
- Scissors
- Stitch markers (at least 4)
- Measuring tape
Gauge (Please Check This)
Gauge matters for garments. I know checking gauge feels tedious, but trust me here.
Large Sunburst Motif: 5.5 inches across when blocked
Traditional Granny Square: 3.5 inches across when blocked
Striped Section: 16 stitches and 10 rows = 4 inches in double crochet
If your motifs are too big, go down a hook size. Too small, go up a hook size. This ensures your top fits properly.
Skill Level
Intermediate. You should be comfortable with:
- Granny squares
- Color changes
- Basic joining methods
- Working in the round
- Double crochet rows
If you have made a few granny square blankets or bags, you are ready for this step by step crochet pattern.
Abbreviations and Stitch Definitions
Let me explain every stitch before we begin. No surprises later.
Ch = Chain. Wrap yarn over hook, pull through loop on hook. This creates the foundation or spaces between stitches.
Sl st = Slip stitch. Insert hook, yarn over, pull through both the stitch and loop on hook in one motion. Used for joining and moving across stitches invisibly.
Sc = Single crochet. Insert hook, yarn over, pull up a loop (2 loops on hook), yarn over, pull through both loops. A short, tight stitch.
Dc = Double crochet. Yarn over, insert hook, yarn over, pull up a loop (3 loops on hook), yarn over, pull through 2 loops, yarn over, pull through remaining 2 loops. A taller stitch that creates the classic granny square look.
3-dc cluster = Three double crochet stitches worked into the same stitch or space. This is the building block of granny squares.
Puff stitch = Yarn over, insert hook, pull up a loop, (yarn over, insert hook in same space, pull up a loop) 2 more times (7 loops on hook), yarn over, pull through all 7 loops, ch 1 to secure. Creates a raised, textured bump. Used in the sunburst center.
Ch-sp = Chain space. The gap created by chains in previous rows. You work into this space, not into individual chains.
Pattern Notes Before You Begin
- All rounds are worked from the right side unless noted
- Join rounds with a slip stitch to the top of the beginning chain-3 (which counts as your first dc)
- The ch-3 at the start of rounds counts as 1 dc throughout
- Weave in ends as you go. Seriously. Your future self will thank you.
- Block all motifs before joining for best results
Large Sunburst Motif (Make 6)
These larger motifs feature that beautiful flower center. You need 4 for the front bodice panels and 2 for the back.
Round 1 (Color E): Create a magic ring. Ch 3 (counts as dc), 11 dc into ring, sl st to top of ch-3 to join. Pull ring closed. (12 dc)
Round 2 (Color A): Join with sl st in any st. Ch 1, sc in same st. *In next st, work puff stitch. Sc in next st.* Repeat from * to * around. Sl st to first sc to join. (6 puff stitches, 6 sc)
Round 3 (Color D): Join with sl st in any puff stitch. Ch 3, 2 dc in same puff, ch 2. *3 dc in next puff, ch 2.* Repeat from * to * around. Sl st to top of ch-3. (6 clusters of 3-dc, 6 ch-2 spaces)
Round 4 (Color C): Sl st to ch-2 space. Ch 3, 2 dc, ch 2, 3 dc in same space (corner made). Ch 1. *Skip next cluster. In next ch-2 space: 3 dc, ch 2, 3 dc (corner). Ch 1.* Repeat from * to * around. Sl st to join. (6 corners)
Round 5 (Color B): Sl st to corner ch-2 space. Ch 3, 2 dc, ch 2, 3 dc in corner space. Ch 1, 3 dc in ch-1 space, ch 1. *Corner in next corner space. Ch 1, 3 dc in ch-1 space, ch 1.* Continue around. Sl st to join. Fasten off.
Round 6 (Color D): Join in any corner. Ch 3, 2 dc, ch 2, 3 dc in corner. *Ch 1, 3 dc in next ch-1 space.* Repeat to next corner. Work corner. Continue around entire motif. Sl st to join. (4 sides with 3 clusters each plus corners)
Fasten off. Weave in ends.
Traditional Granny Square (Make 16)
These smaller squares fill in the bodice areas and form the upper sleeve sections.
Round 1 (Color A): Magic ring. Ch 3, 2 dc, ch 2. *3 dc, ch 2.* Repeat 2 more times (4 clusters total). Sl st to join. (4 clusters, 4 ch-2 corners)
Round 2 (Color B): Sl st to corner. Ch 3, 2 dc, ch 2, 3 dc in same corner (corner made). *3 dc, ch 2, 3 dc in next corner.* Repeat around. Sl st to join. (8 clusters)
Round 3 (Color C): Sl st to corner. Work corner. Ch 1, 3 dc in space between clusters along side. Ch 1, corner in corner. Continue around. Sl st to join. (12 clusters)
Round 4 (Color D): Repeat round 3 pattern, adding one more 3-dc cluster per side. Sl st to join. Fasten off. (16 clusters)
Assembling the Bodice
Take a breath. This is where it comes together.
Back Panel:
Join 2 large sunburst motifs side by side using the flat slip stitch join method. Place motifs with wrong sides together, working through both loops of each edge stitch. Use Color D.
Add 4 traditional granny squares: 2 above and 2 below the sunburst row. Join using same method.
Left Front Panel:
Arrange 2 large sunburst motifs diagonally. The wrap angle means these sit at roughly 45 degrees from vertical. Join 2 traditional granny squares to fill the upper shoulder area.
Right Front Panel:
Mirror the left front panel.
Joining Front to Back:
Connect left front to back at the side seam and shoulder. Connect right front to back on opposite side. Leave the front panels unjoined where they overlap for the wrap effect.
Bell Sleeves (Make 2)
Upper Sleeve (Granny Square Section):
Join 4 traditional granny squares in a tube. You are essentially creating a ring of squares that wraps around your upper arm.
Lower Sleeve (Striped Section):
This is worked in joined rows, picking up stitches along the bottom edge of the granny square tube.
Row 1 (Color B): With RS facing, join yarn at underarm. Ch 3, dc evenly around bottom edge of square tube. Aim for approximately 48 dc. Join to work in the round. (48 dc)
Rows 2 to 4 (Color B): Ch 3, dc in each st around. Sl st to join. (48 dc)
Row 5: Change to Color A. Ch 3, dc in each st around, increasing 4 stitches evenly spaced. To increase: work 2 dc in one stitch. (52 dc)
Rows 6 to 8 (Color A): Ch 3, dc around. (52 dc)
Row 9: Change to Color D. Repeat row with 4 increases. (56 dc)
Rows 10 to 12 (Color D): Ch 3, dc around. (56 dc)
Row 13: Change to Color C. Repeat with 4 increases. (60 dc)
Rows 14 to 15 (Color C): Ch 3, dc around. (60 dc)
Fasten off. The gradual increases create that gorgeous bell flare at the wrist.
Attach sleeves to bodice at shoulder and underarm openings using slip stitch join.
V-Neck Edging and Tie
Neckline Edging:
Using Color A, join yarn at bottom of left front wrap edge (at waist level).
Sc evenly up the left front edge, around the back neck, and down the right front edge. Work 3 sc in each corner to keep edges flat. Sl st to join. Do not turn.
Work 1 more round of sc in Color A for a clean, defined edge.
Waist Tie:
Ch 200 (or desired length for wrapping and tying). Turn, sl st in each chain back to beginning. Fasten off.
Alternatively, create a simple I-cord or twisted cord for the tie.
Attach tie to the side seam at waist level on the right front panel. When wearing, wrap around body and tie at left side or back.
Finishing Your Wrap Top
Blocking: Wet block or steam block your finished top. Lay flat, pin to measurements, let dry completely. This evens out stitches and helps motifs lay flat.
Weave in all remaining ends. I like to weave through the back of stitches for at least 2 inches, then reverse direction for security.
Try it on! Wrap the front panels, adjust the tie, and admire your work.
Sizing Adjustments
This wrap top fits approximately sizes Small to Large thanks to the adjustable wrap closure.
For XS: Make slightly smaller sunburst motifs by stopping after Round 5. Use fewer granny squares.
For XL and up: Add extra granny squares to the side panels. Extend the tie length. Add one more stripe repeat to the sleeves for width.
Tips for Success
Color placement matters. Lay out all your motifs before joining to ensure balanced color distribution.
Join as you go if you prefer. Some crocheters like joining motifs on the final round rather than seaming after. Both methods work beautifully.
Pressing after blocking with a steam iron (hover, do not touch) helps granny squares lay perfectly flat.
Do not stress about perfection. Handmade means character. Slight variations add to the boho charm.
Wear It Your Way
This crochet wrap top layers beautifully over a simple tank or bralette. Pair with high-waisted jeans for that seventies vibe. Wear it to a festival, brunch, or just around the house feeling like the creative goddess you are.
The terracotta earth tones transition seamlessly from summer to fall. Add a camisole underneath and you have got a top that works three seasons.
Thank you so much for choosing this pattern for your next project. I genuinely hope you love making this wrap top as much as I loved designing it. There is something so satisfying about watching those motifs become a wearable piece of art.
I would absolutely love to see your finished top. Tag me on Instagram or share in my Facebook group. Your color choices, your styling, your beautiful work. It all inspires me and this whole community.
Happy hooking, friend. You have got this.
